How to Structure a PowerPoint Presentation


Think of a movie that has breathtaking special effects but no storyline. Does it have any chance of becoming a blockbuster? Of course not. The same is true with PowerPoint presentations. No matter how beautiful the visuals of your slide deck are, it will never succeed with your audience if it doesn’t follow a logically sound structure.
In this post, we’ll talk about the typical structure of a PowerPoint presentation, share ideas about what sections to include, and give practical guidelines on arranging slides for better information retention and engagement.
But first, let’s see why your PPT (PowerPoint) deck needs to be guided by a structure.
Why Is Structuring a PowerPoint Presentation Important?
A clear structure of a PPT presentation is crucial to help your audience understand your message. When the information is presented logically, it’s much easier for a viewer to get the ideas you want to transmit. Research supports this idea – it shows that people are 40% more likely to retain structured information than unstructured information.
If your slide presentation will include narration, a good structure of the PowerPoint presentation is also important for you as a presenter. It will help you feel confident, stay on topic, and avoid any awkward silences, so you’re more likely to win your audience over.
What Is the Typical PowerPoint Presentation Structure?
A good PowerPoint presentation always has a story to tell. Like any narration, it consists of three basic parts: introduction, body, and conclusion. Let’s examine the parts of the presentation in greater detail with some examples.
Introduction
The introduction sets the tone for the entire presentation and explains what the audience will come away with after viewing it. A strong presentation overview slide may include these key elements:
- The title. Introduce the topic of your presentation and provide a brief description.


- A table of contents / main menu. You can make it interactive by using hyperlinks. People can choose a chapter to navigate there.
- Objectives. State your presentation’s objectives to let your audience know what new knowledge they will acquire.
- Definitions (optional). You will need this slide if you want to introduce some new terms and concepts and provide their definitions. All the slide examples above are taken from the iSpring Suite Content Library. To go into greater detail, continue reading.


The body
This is the main part of your presentation, where you talk about your topic and present all your information to your audience. It should fulfill the expectations you set in the introduction.
Depending on the nature of your presentation, divide it into segments or points. Arrange your points logically and then provide information to support each of them. Here are some examples of presentation logic you can follow:
- Number your points according to their priority (1, 2, 3, …).
- Place the points in a time frame (past, present, future).
- Use narration (tell a story from beginning to end).
- Present the points with a problem-solution dynamic (state a problem, describe its impact, and offer ways to solve the issue).
Too much to read? Get a summary from AI
Conclusion
A good conclusion summarizes the key points you made or highlights what the audience should have learned. It clarifies the general purpose of your presentation and reinforces the reason for viewing it. List what results your audience has achieved, what knowledge they got, and how this information can help them in the future.
Prepare Your Content for the PowerPoint Presentation
Based on this survey conducted by Decktopus, 40% of creators prioritize the content of their PowerPoint slides over any other aspects. Moreover, about 25% said they focused on images, 15% on quotes, and 10% on video.
Let’s say you have a course, a set of articles, and reports or case studies. Now you need to prepare content for the PPT presentation that will resonate with your audience. This involves organizing the text, images, and videos for each slide. Focus on these key elements to ensure your presentation achieves its goals: engage your audience and help them remember the core ideas you want to convey.
- Stories. According to the Decktopus survey, people consider “the story” the most important and memorable part of a presentation. So, include stories, examples, or scenarios that help your audience connect with the content emotionally and understand complex concepts better.
- Core message. Your PowerPoint presentation content should revolve around a single central idea. Each slide should support this key message, making it clearer for your audience.
- Simplify your content. Break complex presentation content down into key points and remove unnecessary details. To identify which details are not necessary in a presentation, keep only the information that directly supports your core message and is immediately relevant to your audience’s needs and decision-making. But don’t make your PPT content too long: based on these research results from VENNGAGE, 41.2% of respondents said that they only included between 21 and 40 PowerPoint slides in their presentations.
- Insert engagement elements such as an opening hook, a memorable ending note (video, story, etc.), questions for the audience, group discussions, mini games, quick exercises, quizzes, or training activities.
- Add visuals. Substitute text with schemes, tables, quotes, screenshots, screencasts, charts, icons, or diagrams wherever appropriate.
Best Practices to Structure PPT Slide Content
Now that we’ve covered the structure and content preparation for your PowerPoint presentation, let’s focus on how to organize each slide effectively.
Text guidelines
- Message focus: Remove any competing concepts and have only one clear idea or message per slide.
- Data presentation: Limit data to one statistic per slide for maximum impact and memorability.
- Text hierarchy: Use consistent heading and body text sizes throughout the presentation.
- Font choice: Stick to 2 complementary fonts – one for headers, and one for body text.
- Visibility: Ensure the content of the PPT presentation is large enough for the audience members in the very last row to see clearly.
- Font size: Use a 30-point minimum to ensure readability from any distance.
- Line length: Keep lines to a maximum of five words for clarity and impact.
- Text limit: Maintain a maximum of five lines of text per slide to avoid overwhelming viewers.
- Sequential density: Avoid more than five text-heavy slides in a row to maintain engagement.
- Space usage: Text should occupy no more than 25% of the slide’s space.
Visual elements
- Master the content-visual balance. Maintain a 40% text to 60% visuals ratio.
- Use one powerful, full-screen image rather than multiple smaller ones.
- Ensure all images are high-resolution (minimum 300 DPI).
Choose the right visuals for your PPT presentation content:
- Charts: Best for visualizing data and highlighting trends.
- Infographics: Ideal for explaining processes and simplifying complex concepts.
- Images: Use to create an emotional connection and illustrate concepts.
- Icons: Serve to provide quick visual cues and aid navigation.
- Diagrams: Useful for showing relationships and illustrating flow.
Use animations purposefully:
- Include animations strategically for more engagement (79% effectiveness rate).
- Limit transitions between slides to two or three different types.
- Use simple animations like “Wipe Left-to-Right” for bullet points. Avoid complex animations like “Move” or “Fly” that can slow the pace.
Color
Core color principles:
- Limit to 3 or 4 color combinations per slide for clarity.
- Maintain a 4.5:1 minimum contrast ratio between text and background.
- Test color visibility to ensure your audience can view content across different displays and lighting conditions.
Strategic color application:
- Backgrounds: Use cool colors like blue and green, as they tend to visually recede.
- Text and foreground: Use warm colors such as orange and red, as they draw attention.
- Dark room presentations: Choose a dark background with light text for better visibility.
- Call-to-action elements: Highlight them with standout accent colors to catch the eye.
- Icons: Maintain a consistent color scheme.
Color for communication:
- Use color to guide the viewer’s attention for more impact, not to decorate.
- Create visual hierarchy through color intensity.
- Apply color psychology to evoke appropriate emotions.
Color accessibility and consistency:
- Design for color-blind people.
- Maintain the same color palette throughout the PowerPoint presentation.
- Apply colors systematically:
- Primary brand color for titles.
- Consistent colors for recurring elements.
- High-contrast colors for text.
- Subtle shades for backgrounds.
Tips for Structuring a Presentation in PowerPoint
Now that you know which parts a typical presentation should consist of, let’s see how to structure it in PPT.
1. Combine slides into sections
When working with a large PowerPoint presentation, you can create collapsible sections that can be expanded. Each section name should clearly indicate the topic of its slides.
This will help you keep presentation slides organized and facilitate navigation in editing mode. To do that, follow these steps:
- Right-click on the slide on the list where you want the new section to begin and select Add Section from the drop-down menu.

- Now, right-click where it says Untitled Section and select Rename Section. Then type the name in the Section name field. You can repeat the process to create and/or rename other sections.
- To shift the position of a section in the sequence, right-click on its name and use the Move Section Up and Move Section Down options.
- To collapse or expand a certain section, click on the collapse icon to the left of the section name. You can also minimize and maximize all sections at once by right-clicking on the section name and choosing Collapse All or Expand All.


These settings can also be accessed by choosing Slide Sorter under the View tab.

This kind of segmentation is a great way to view the logical flow of your slides all at once and see if any changes are needed. For example, you might decide to break one slide into two or three, or the other way around.
2. Use the outline View
Another way to structure a PowerPoint presentation in the editing mode is to use Outline View. You can choose it from the View tab.

In this view, the outline pane doesn’t display sections, but it shows all the slide titles and main text of each slide, which can give you a quick overview of the presentation’s contents.
Here you can go through the entire text and edit it instantly. You can also work with text (on the left) and slides (on the right) simultaneously.
Note that text needs to be typed in a text placeholder, not a text box, to be displayed in an outline. A text placeholder is a box with the words “Click to add text” or “Click to add title.” It appears when you choose a standard layout.
You can also use Outline View to promote bullet text to titles and the other way around. To do that, right-click on a relevant title or paragraph and select the Promote or Demote options.

- Promoting text means moving it up one level in the hierarchy. For example, if you promote a bullet point, it becomes a slide title. This effectively creates a new slide with that text as its title.
- Demoting text means moving it down one level in the hierarchy. For example, if you demote a slide title, it becomes bulleted text on the previous slide. This removes the original slide and moves its content to the previous slide as subordinate text.
Here’s a practical example:
You have:
Slide 1: “Main Topic” (title)
- Bullet point A
- Bullet point B
If you promote “Bullet point A,” you’ll end up with:
Slide 1: “Main Topic” (title)
- Bullet point B
Slide 2: “Bullet point A” (new title)
This feature is useful when you realize that some of your bullet points should actually be separate slides, or vice versa. However, use it carefully because promoting or demoting can significantly restructure your presentation.
Be cautious when demoting a title, as this will delete the original slide and move its title and text to the adjacent slide.
PPT only allows users to promote and demote text, not entire slides. Therefore, there’s no possibility of changing the hierarchical order of slides.
3. Create a table of contents
All the aforementioned tips help you organize a presentation when formatting it. However, it’s also crucial that your viewers are able to easily navigate through the entire presentation. One sure way to make this possible is to create an interactive and structured chapter list.
Although there is no native automatic table of contents in PPT, you can add it manually:
- Insert a table of contents into the title slide or a blank one. To add a slide, right-click on any slide and then click on New Slide on the ribbon. Then select all the objects on the slide and delete them.

- For the chapters, you will need to use the slide titles. This is where the outline pane in the now familiar Outline View comes in handy. You can access it from the VIEW tab. Right-click anywhere on the outline pane, choose Collapse, then Collapse All. That way, only the slide titles are displayed.
- Press Ctrl+A to select all the names, and Ctrl+C to copy them.
- Then press Ctrl+V to paste the copied titles on the desired slide. In case there are too many titles and they don’t fit onto a single page, you can divide the table of contents into two columns or spread it out over two slides.
- Now select and right-click on the title of the first slide and choose Link.

- In the open window, click on Place in This Document on the left-hand menu, then choose the corresponding slide and click on OK.


You’ll need to repeat this procedure to link all the chapters to their corresponding slides. For more information, read this step-by-step guide on how to add a hyperlink in PowerPoint.
Now you can access all the chapters from a single table of contents. You will also need to link chapters back to that unifying page. You can do this by inserting an Action Button on every slide of your presentation in the Slide Master mode:
- Go to the View tab and choose Slide Master.

- Choose the first slide on the left, then open the Insert tab on the ribbon, click on Shapes, and, under Action Buttons, select the Home button.
- Place the Home button anywhere on your slide – it will then appear on all slides. Once you’ve placed it, the Action Settings window will appear. Under Hyperlink to: choose Slide and then select the one with the table of contents.


Now, you can also go back to the table of contents at any time with the intuitive Home button.
The time it takes to create an interactive outline can vary according to the size of your presentation. You’ll need to add hyperlinks to each chapter manually.
Be aware that if you rename or delete a slide, these changes will not be registered in the table of contents automatically. For example, if you delete a slide, its title will still be displayed in the chapter list, but clicking on it will not lead the viewer to another point in the presentation.
This is what our sample presentation looks like:

An Automated Way to Structure a PowerPoint Presentation
Creating a table of contents manually might be fine for a small presentation, but if you have 20+ slides, it will require excessive time and energy to do so.
In this section, we explore ways to speed up PPT presentation structuring with iSpring Suite.
iSpring Suite
Fully-stocked eLearning authoring tool for PowerPoint. No training required to start!

Note: iSpring Suite converts slides to HTML5 format, so your audience can view them online, right in their browsers.

As you can see, the new presentation has a pop-up outline and a navigation panel. These features make it possible to move to any slide at any time without leaving the slideshow mode.
How to set up navigation
Follow these steps to create navigation in your presentation:
1. Get a free trial of iSpring Suite.
2. Open PPT and switch to the iSpring Suite tab. Then, click on Slide Properties on the toolbar.

3. Here you can see the slide titles. Unlike in PPT, you can give a slide any name regardless of the text in the placeholder. You can also organize slides into a hierarchy by changing their nesting levels. To do that, select any slide(s) and click on the Promote or Demote buttons on the toolbar.

To collapse or expand nested slides, use the “-” and “+” icons to the left of a top-level slide. The arranged slides can also be easily minimized and maximized during the presentation playback, since they appear as menus and sub-menus in the outline.
4. PowerPoint doesn’t have a specific panel where you can simply set up the navigation of all the slides. You need to configure it manually for each slide, which is awkward and time-consuming.
With iSpring Suite, you can easily turn a linear presentation into an engaging non-linear scenario. To do that, select a slide and click on the Branching button on the ribbon. Now choose the corresponding slides for users’ forward and backward actions, or None to lock navigation.

5. When you’ve configured the Slide Properties settings, click on Save & Close in the upper-left corner.
How to configure a table of contents
Whereas PPT requires the chapter list to be designed manually, iSpring Suite has already prepared this for you. As well, you do not have to stick with the standard outline template because you can easily customize the player’s final look and feel:
- Click on Publish on the iSpring Suite toolbar.


2. Find Player and click on Universal (Full).
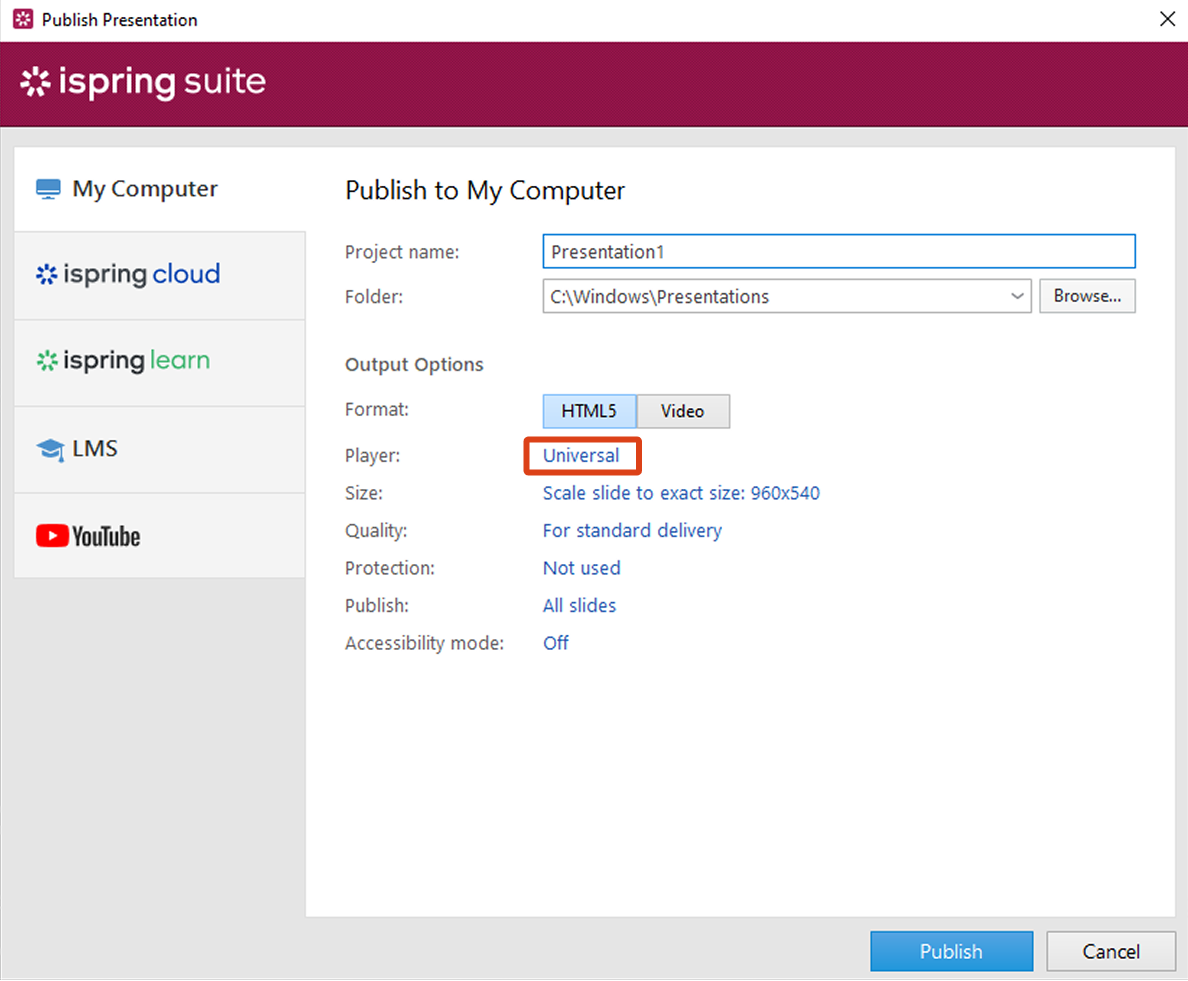
3. In the opened window, you can define which elements to display and where to display them.
To add the table of contents (the equivalent of Outline in iSpring Suite), choose a premade layout or click on “+” to create a custom layout where you can place the Outline button and adjust other options.

When customizing your Outline, you can adjust the position of the Outline button using one of several options in the Buttons Position drop-down menu. To reposition buttons, simply click on the six dots next to the button and drag it to your desired spot.
If you scroll down, you’ll find more Outline settings.
We recommend leaving the Enable search marked, as this will allow viewers to search for any content, including the texts on the slides. This is especially useful for large presentations with a lot of text.
If you have previously arranged slides into multiple levels in the Slide Properties, then leave the Multilevel outline selected. That way, the outline will display the nesting presentation in the PPT structure of the presentation, facilitating navigation.

4. Customize your layout’s color scheme and text font using the Color Scheme and Font options in the Design tab.

5. When you’ve finished configuring the player, click on Apply & Close in the upper-left corner.
6. Now you can publish your enhanced presentation either to HTML5, to make it easily accessible via browser on any device, or to MP4 video format. If you’re going to upload your presentation to an LMS, you can publish it to any eLearning format: SCORM, AICC, Tin Can, or cmi5.
iSpring Suite saves presentation creators from the need to do a lot of manual work and viewers from having to follow a strict slide order. An interactive and searchable outline allows non-linear navigation.
Also read: → How to Convert PowerPoint to MP4 Video
Also read: → How To Record Presentations With Audio
Bonus: choose a PPT presentation format
iSpring Suite comes with Content Library, which provides a vast collection of presentation templates and allows you to create professional-looking presentations in a matter of minutes. Each PowerPoint presentation format includes basic course elements: a title slide, a table of contents, chapters, a timeline, and info slides.
With Content Library, you can:
- Choose a format of PPT presentation out of 2,300+ templates.
- Fit your presentation format into any type of device screen.
- Enrich slide presentation format with customized characters.
- Insert icons from a collection of 3,600+ icons and UI controls to further refine your PowerPoint presentation format.
- Add ready-to-use photos of various devices, furniture, and office supplies to turn your PowerPoint presentation format into an engaging story.


FAQ on How to Structure a PowerPoint Presentation
Before we wrap up, let’s address some common questions about structuring PowerPoint presentations.
What is the second slide of a PowerPoint presentation called?
The second slide in a PPT presentation is typically called the agenda or table of contents slide. It outlines the main topics and structure of the presentation, giving viewers a clear overview of what will be covered.
What should you include in a PowerPoint presentation?
A well-structured PPT presentation should include:
1. A title slide with the presentation’s topic and presenter info
2. An agenda/chapter list
3. Clear learning objectives or results
4. Main content slides with:
- Key messages
- Supporting data/evidence
- Relevant visuals
5. A summary/conclusion slide
What file formats are supported in PowerPoint?
You can save PPT in one of the following file formats:
- PPT Presentation
- PPT Macro-Enabled Presentation
- PDF Document Format
- XPS Document Format
- PPT Design Templates
- PPT Macro-Enabled Design Template
- Office Theme
- PPT Show
- PPT Macro-Enabled Show
- PPT Add-In
- PPT XML Presentation
- MPEG-4 Video
- Windows Media Video
- MOV
- GIF (Graphics Interchange Format)
- JPEG (Joint Photographic Experts Group)
- PNG (Portable Network Graphics)
- TIFF (Tag Image File Format)
- Device Independent Bitmap
- Windows Metafile
- Enhanced Windows Metafile
- Outline/RTF
- PPT Picture Presentation
- Strict Open XML Presentation
- OpenDocument Presentation
- Single File Web Page
- Web Page
- PPT XML Presentation
To learn more, check this Microsoft article.
Conclusion
We hope this post will help you develop the ideal structure for your PPT presentation and do so quickly and easily. Captivate your audience with a powerful and persuasive presentation!
Do you have any other insights on how to simplify PPT presentation design? Please share them in the comment section. We’d love to hear from you.
Create online courses and assessments in record time.


How to Change PPT Slide Size: A Step-by-Step Guide
How to Create a Training Manual in PowerPoint (+Template)
How to Create a Storyboard in PowerPoint in Four Easy Steps