How To Record a PowerPoint Presentation With Audio


We’re all accustomed to the live presentation format with a lecturer and the projection of their presentation on the whiteboard. Nowadays, however, such live events have become quite rare. Fortunately, we can recreate this format by including recorded audio in PowerPoint presentations. There are multiple ways to record voice narration or to add precrafted audio recordings to your slides.
The first and most obvious solution is to use MS PowerPoint. This tool allows you to record a presentation with audio and export it as a video file.
Another way to record narration right in Microsoft PowerPoint is to use iSpring Suite. This authoring tool enables you to make interactive presentations, receive activity statistics, use advanced recording and editing options, convert text to speech, and create online quizzes, video lectures, and dialogue simulations.
In this article, we’ll show you how to record PPT presentations with audio narration in both MS PowerPoint and iSpring Suite, step by step. Let’s get started!
Key Takeaways
The article explains how to record a PowerPoint presentation with audio narration using both Microsoft PowerPoint and iSpring Suite. It details the steps in PowerPoint to open a presentation, use the Slide Show tab’s Record Slide Show feature, capture narration with or without video, and export the result as a video. It also covers inserting existing audio files. The guide then introduces iSpring Suite as a more advanced add-in that allows audio recording and editing, syncing with animations, noise removal, text-to-speech, and flexible publishing options, offering enhanced control and quality over PowerPoint’s built-in recording tools.
How to record a PowerPoint presentation with audio narration in PowerPoint
These are the steps to record presentations with audio in PowerPoint:
1. Open your PowerPoint presentation.
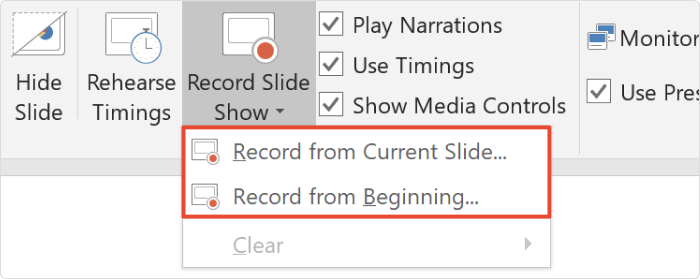
2. Go to the Slide Show tab and click the Record Slide Show box.
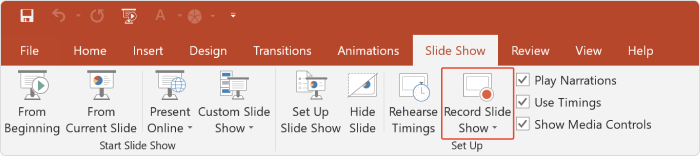
3. Select Record from Beginning if you want to start right from the beginning of a presentation. Select Record from Current Slide if you want to record from a specific slide or wish to re-record a particular slide.
4. By default, PowerPoint records both video and audio. If you don’t need a video in your presentation, turn it off by clicking on the camera button. That way, the tool will only record your microphone along with the presentation file.

5. Click on the Record button to begin recording. PowerPoint will count down 3 seconds in the recording window to allow you to get ready, then you can start speaking.

6. Record your narration for a particular slide or the entire presentation. Use the directional arrow buttons to switch slides. You might want to make a one-second break when you go to the next slide, so that nothing will get cut out. Click on Pause if you want to stop and then resume speaking. When you finish, click on Stop in the recording window.

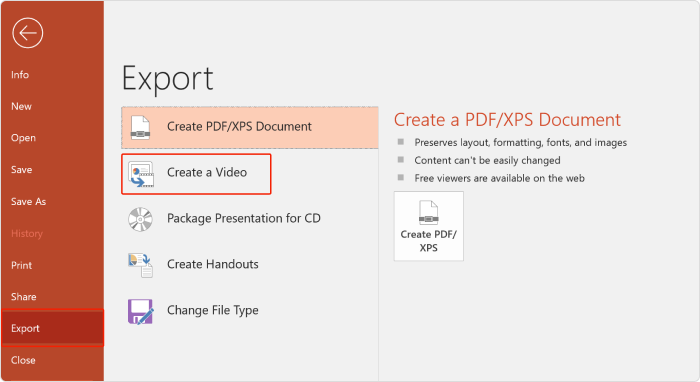
7. Save the file as a PowerPoint presentation. Then go to the File menu and click on Export. Select Create a Video.
For Mac users: You will be directed to the settings menu right after you click Export.
8. Set the desired video quality. Select Use Recorded Timings and Narrations to maintain slide timings for all of the slides. Then, click Create Video.
For Mac users: You can select the desired video format at this point. Once you’ve set the parameters, click Export.
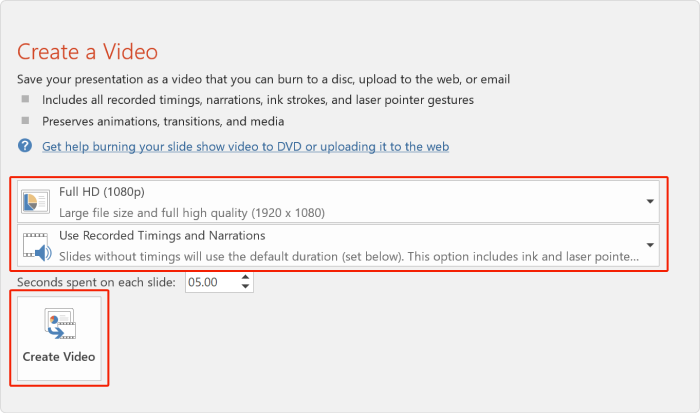
9. Select the video format and the PC location where you want to save your video presentation with narration. Then, click Save.
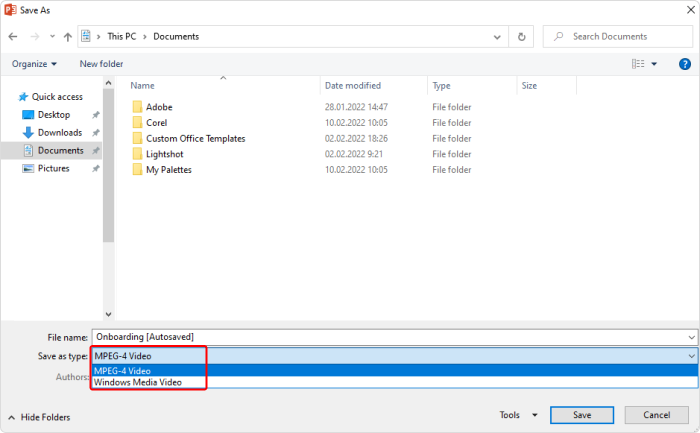
Congratulations! Once the export process is complete, your video with the complete presentation will be ready.
Too much to read? Get a summary from AI
How to add an existing audio to a PowerPoint presentation
Follow these steps if you have an existing audio file that you’d like to add to your presentation.
1. On the main menu, click on the Insert tab.
2. On the sub-menu, select Audio.

3. Choose Audio on My PC.
4. Then, browse your audio files, select the narration, and click Insert.
How to Record PPT Presentations
with Audio in iSpring Suite AI
MS PowerPoint allows you to export presentations with audio in a video format. However, PowerPoint does not offer any audio editing options, so it can be challenging to get good-quality sound and a clear recording without unnecessary breaks, volume differences, and other problems.
If you don’t have time to re-record your audio and want great quality with minimal efforts, you might need a more advanced tool like iSpring Suite AI. It works as a PowerPoint add-in and is extremely easy to use. iSpring Suite AI offers many audio recording and editing options for your slide show.
For example, you can synchronize audio with slide animations, remove background noise, and improve slide transitions in your PowerPoint file. You can even create voice-overs without ever recording your own voice by converting text to lifelike AI-generated speech.

Here’s a step-by-step guide on how to record presentations with audio in iSpring Suite AI:
Step 1. Install iSpring Suite AI
Download a free 14-day iSpring Suite AI trial and install it on your computer.
Step 2. Choose your presentation
Open your PowerPoint presentation and go to the iSpring Suite tab.

Step 3. Record slide show with audio
The next step will vary depending on your needs. iSpring Suite offers 3 recording options:
- Create a simple recording with preset parameters like noise removal and volume options
- Record audio that synchronizes with the PowerPoint slide and animation timings
- Convert text to speech
Let’s look at each of these options.
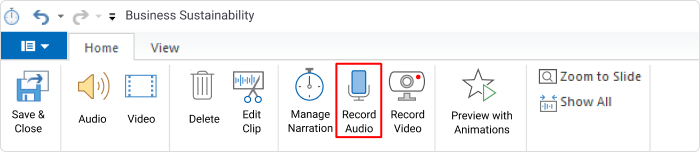
Record audio with preset parameters
Follow this approach if you don’t have any animations or effects in your presentation and just want to add high-quality audio to your presentation.
1. Click on Record Audio in the top left corner of the menu.

2. Use the intuitive menu and record your narration.
Please note that you can apply some settings before recording. For example, you can set noise removal and volume, which will make your audio more comprehensible and easier to edit. Click on Options to set the desired parameters.

3. Once your recording is ready, click OK to save it.
Synchronize audio with animations
Use this approach if you have animations in your presentations and want them to appear at specific points during your speech.
1. Click Manage Narration.

2. Click Record Audio.
3. Now, you can start recording, save, or cancel the changes you’ve made, and preview your presentation. When you click Start Record, that button will change to Next Slide or Next Animation, offering you an easy transition between slides – as though you were delivering the lecture live using a projector. Each of your live clicks will automatically preserve those specific timings for slides and animations.

4. Click Save & Close to save your recording.
Convert text to speech
Use this approach if you don’t want to record your own voice or that of a voice-over artist, but need to record and play narrations for your presentations.
1. Click Manage Narration on the iSpring Suite AI toolbar.
2. Click the Audio button and choose Text to Speech.
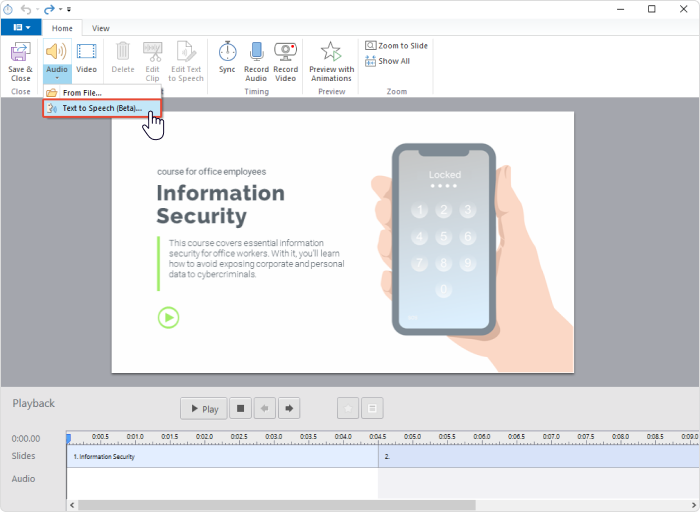
3. Select the language, speaker, and type of voice.
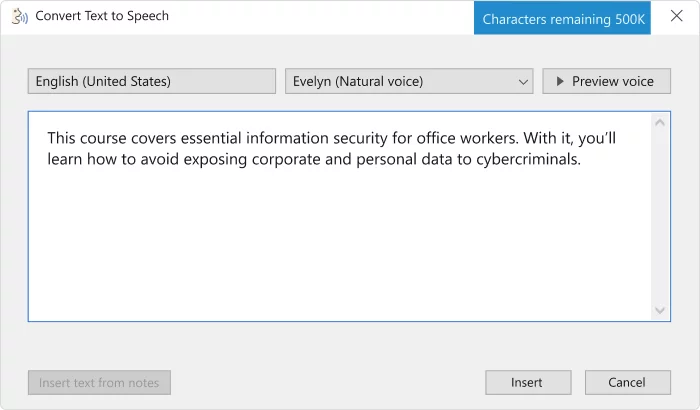
4. Add the text that you wish to convert, and click the Insert button. Then you’ll be able to choose when to start playing narration: right after you open the slide or later.
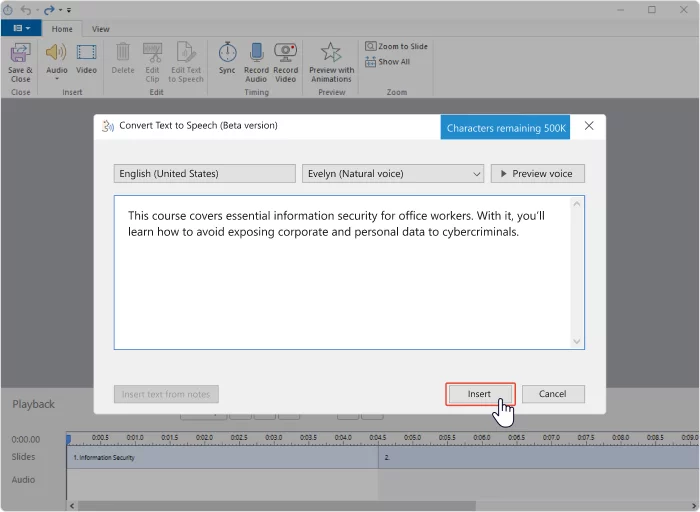
5. Click Save & Close to save your recording.
Step 4. Save and export your presentation with audio
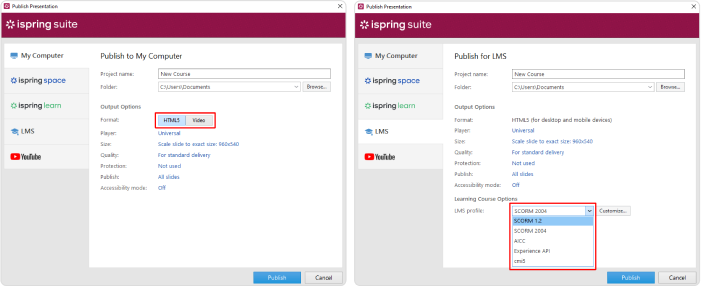
No matter which option you had selected earlier, you now have an audio file. Your next step is to export your presentation. Click Publish on the iSpring Suite toolbar.

Step 5. Publish your presentation
Select where you want to publish your presentation and in which format. You can either publish it as a video or in one of the different online formats. Select:
- Video – if you want to upload your presentation to YouTube.
- SCORM or xAPI – if you want to upload your presentation to an LMS and track learner progress as they study your presentation.
- HTML5 – if you want to upload your presentation to a website.
Then click Publish.
Congratulations! Your presentation with audio is ready.
Useful resources
We’ve selected some tutorials that can make you a more effective PowerPoint user.
- How to Record a Voice-Over for PowerPoint Presentations
- How to Create a Video Lecture
- How to Add Narration to a PowerPoint Presentation
- How to Create a Video Presentation
- How to Insert a YouTube Video into a PowerPoint Presentation
- How to Convert a PowerPoint Presentation to an MP4 Video on Windows and macOS
- The Ultimate Guide to Lecture Capture
Fast eLearning authoring toolkit
Have you ever searched for a way to create a course but found the tools and resources too complex to use? What if you could design and produce courses in a familiar environment like PowerPoint with full audio or video narration?
The eLearning authoring toolkit by iSpring allows you to create courses from within PowerPoint with just a few clicks. You can also convert your Word and PDF documents into interactive e-books.
Some of the other features include:
- Content Library
- Adaptive player
- Extensive LMS compatibility
- Video Editor
- Interactive assessments
- Screen recordings
- Conversion of PowerPoint slides into mobile-ready courses
- Combination of videos with slides
- Course localization in 42 languages with text-to-speech capabilities
There’s so much more you can do with the iSpring Suite 11 fast eLearning authoring toolkit.
Takeaways
Recording PowerPoint presentations with narration and audio is pretty easy if you follow our guide. And your recordings will sound great and synchronize with your animations perfectly when you use iSpring Suite AI.
The tool also allows you to:
- Create complex online courses
- Build engaging online quizzes
- Create interactive dialogue simulations
- Record video lectures
- Collaborate with your colleagues on simple courses and quizzes right in a browser
- Use over 81,000 ready-made eLearning assets (templates, backgrounds, characters, and icons)
Download a free 14-day iSpring Suite AI trial and start designing engaging learning content right away!
Good luck!
Create online courses and assessments in record time.


How to Create an Online Course: A Comprehensive Guide
How to Create an Interactive PowerPoint Presentation
How to Add a Hyperlink to a PowerPoint Presentation (PPT)
How to Convert Your PowerPoint Slides to an eLearning Module