How to Lock a PowerPoint from Editing


No matter what field you’re in — business, teaching, or design — your PowerPoint presentation might include something you’d rather keep private. But the moment you share it, you risk losing control. Someone could edit your slides, copy your work, or forward it without asking.
That’s the reason for this guide — to show you how to lock a PowerPoint to avoid it from being edited and keep your content safe. We’ll walk you through some smart ways to protect your presentation, from quick built-in tools to more advanced options. You’ll also see what mistakes to avoid and how to choose the method that works best for you.
What You’ll Need
| Tool | User Skill | Time Required |
| Microsoft PowerPoint | Basic | 3–5 minutes |
| iSpring Suite (free trial available) | Intermediate | 5–10 minutes |
| PDF Reader (optional) | Basic | 2–3 minutes |
8 Effective Ways to Protect a PowerPoint Presentation
PowerPoint gives you a few built-in ways to protect PowerPoint presentations, and there are also more advanced tools out there if you need extra control. The best method just depends on how tightly you want to restrict access and stop others from making changes.
#1. Use iSpring Suite for advanced protection
If you need more than just basic file restrictions — like deciding who can view, copy, or download your PowerPoint presentation — a digital rights management (DRM) tool is your best choice. One of the most user-friendly and cost-effective options is iSpring Suite.
It integrates right into PowerPoint, so there’s no need to learn a new interface. You get access to a number of security features. With just a few clicks, you can set up password protection, limit access duration (e.g., 7 days), disable copying or exporting, and insert a watermark with your logo. You don’t need to be an IT pro to figure it out because the feature is user friendly.
Follow these steps:
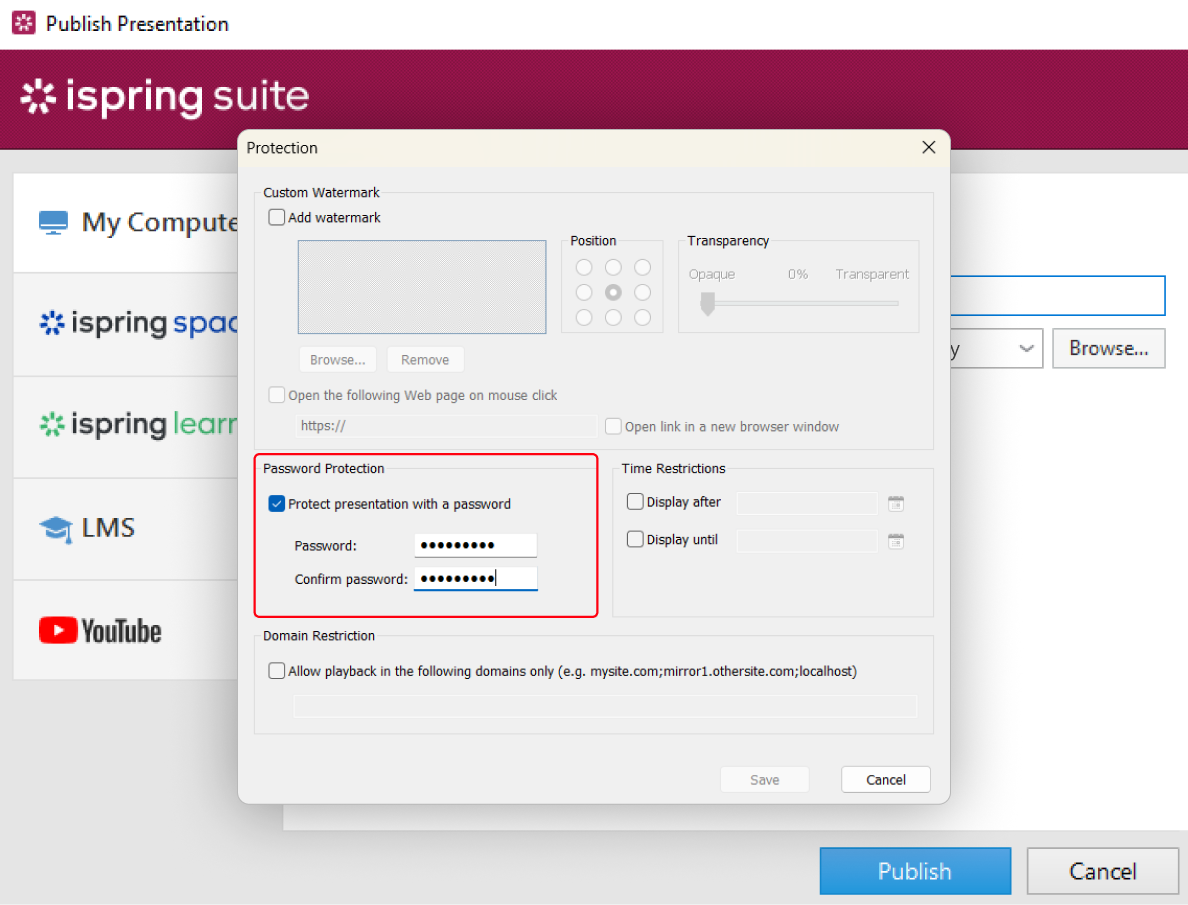
1. Get a free trial of iSpring Suite. Open your presentation, go to the iSpring Suite tab, and click on Publish.

2. Choose My Computer → Protection.

3. Set your desired parameters, e.g., password, access expiration, etc., then click on Publish again. The protected file will be saved to your device.
Too much to read? Get a summary from AI
#2. Set a password to open the file in PowerPoint
If you want to restrict access to unauthorized users, PowerPoint has a simple built-in option to set up password protection. That way, only people who have the correct password can open and view your PowerPoint presentation, and you’ll keep it safe from anyone who shouldn’t see it.
Follow these steps:
1. Open your presentation and go to File → Info → Protect Presentation → Encrypt with Password.

2. Just enter and confirm your password, and you’re all set. Once it’s locked, no one can open the PowerPoint presentation without it. This is a quick and easy way to restrict access to the entire presentation — especially if you’re sharing sensitive info and only want specific people to see it.

Note: Microsoft does not offer a way to recover a lost password, so make sure you store it somewhere safe.
#3. Change the presentation settings to read-only
You can discourage editing further by using the Mark as Final feature. It lets others open the PowerPoint presentation, allowing users to view the slides in read-only mode but not edit them.
Follow these steps:
Go to File → Info → Protect Presentation → Mark as Final. PowerPoint will add a message bar at the top that lets users know the content has been finalized.

Just keep in mind that this is more of a suggestion than a lock. Users can manually turn off this setting via the change permission dialog box. Still, it’s a helpful way to suggest that your presentation should not be changed.
#4. Share with view-only access via the cloud
If you’re sharing a PowerPoint presentation through platforms like OneDrive or Google Drive, you can select restricted access to control whether others can view, comment, or edit it. Cloud-based sharing is ideal when you need to change access later or give full control permission to just a few people.
Follow these steps:
Upload your file to a cloud service, click on Share, and set the restrict permission option to View Only. Many platforms also allow you to disable downloads entirely, thereby adding an additional layer of control.
#5. Export your presentation as a PDF
Converting your presentation to PDF format is a quick way to lock your design and avoid unwanted changes. It’s a great choice for sharing reports, event materials, or any other content that doesn’t need interaction. Plus, this method keeps your PowerPoint presentation layout and formatting intact no matter who opens it.
Follow these steps:
Click on File → Save As, and select PDF from the drop-down menu. You can choose to export all slides or just selected ones.

#6. Save the file as a PowerPoint Show
When you save your PowerPoint presentation as a PowerPoint Show (.ppsx), it opens directly in slideshow mode. This method is helpful if you’re wondering how to lock a PowerPoint from editing quickly without getting into complex tools. It doesn’t offer strong protection, but it’s great for preventing accidental edits.
Follow these steps:
Go to File → Save As, then choose PowerPoint Show (*.ppsx) as the file type. When someone opens the file, it will automatically launch in full-screen presentation mode.

#7. Add a digital signature to confirm authorship
While a digital signature won’t lock PowerPoint editing capabilities, it is a smart way to validate authorship and file integrity. If someone changes the document, PowerPoint will display a warning in the message bar saying the signature is no longer valid. This is handy for official documents and situations where verifying authorship and keeping track of edits is essential.
Follow these steps:
Open your presentation, go to File → Info → Protect Presentation → Add a Digital Signature. Select your certificate or create one via a trusted Certificate Authority. The dialog box will guide you through the process.

#8. Remove hidden data with Document Inspector
PowerPoint presentation Document Inspector is helpful for cleaning up hidden metadata, like comments, author info, or previous edits. This step doesn’t restrict access, but it helps protect your work by removing details that others could misuse or repurpose without giving you credit.
Follow these steps:
Go to File → Info → Check for Issues → Inspect Document. Choose the items you want to remove, such as comments or hidden personal data. Then click on Remove All for each one. A dialog box will appear, confirming the data that was removed.

Common Issues with Locking PowerPoint and How to Avoid Them
- Forgot your password?
Unfortunately, PowerPoint doesn’t offer password recovery. It’s best to use a secure password manager and avoid setting passwords you can’t afford to forget.
- The presentation opens in a browser with full access
If you’re sharing via cloud storage, double-check your access restrictions. If they’re not properly configured, anyone with the link might be able to freely download and edit your PowerPoint presentation.
- Collaboration becomes difficult
Password-protected files cannot be co-edited. Tools like PowerPoint Online won’t support it. To keep things smooth, use an unlocked version for your team, and only lock PowerPoint editing capabilities on the final draft.

How Securing Your Slides Pays Off
By using one or more of these tools to protect your presentation — especially iSpring Suite — you can keep your PowerPoint presentation safe and unaltered. Your slides stay under your control while still being easy for others to view.
This kind of protection is a smart move when working with clients, partners, or in competitive environments. It helps restrict access, reinforces professionalism, and prevents unauthorized use or changes being made to your PPT files.
Choosing the Right Protection Method
Choosing the right safety and restriction method depends entirely on your goals. If you need multi-level security, along with user activity analytics, iSpring Suite is the most comprehensive solution. You can book a demo today and see for yourself.
When you simply need to restrict access quickly and effectively, the built-in protect password feature in PowerPoint is also a solid option. If you want to show that the file is done and no further changes are needed, use Mark as Final. It adds clear, visible info in the message bar and discourages edits.
If you are sending out a finalized version with no edit permissions and want to avoid layout issues, converting to PDF format is a simple fix. And if you’re planning to share your PowerPoint presentation but still retain some control, uploading it to a cloud platform and choosing the restrict access option lets you decide who can view, comment, or make changes.
FAQ: Frequently Asked Questions
Here are some practical answers to the most common questions about how to lock a PowerPoint from editing or unauthorized use. We hope these answers will help you avoid mistakes and choose the most effective method for your needs.
Can I allow editing of just one slide?
No, PowerPoint doesn’t support slide-specific limitations. Any methods, such as Protect Password or Mark as Final, apply to the entire presentation. To protect specific slides, split your content into separate files.
What happens if someone opens a read-only file and saves a copy?
As mentioned, marking your presentation as Final displays a message bar but doesn’t truly restrict editing. Users can still save an editable copy. To prevent editing, use DRM tools like iSpring Suite.
Can I co-edit a presentation that is password protected?
No, because once a password is applied, real-time collaboration is disabled, including in OneDrive and PowerPoint Online. Only protect the file after all edits are complete.
How do I remove editing restrictions later?
To remove Mark as Final, go to File → Info → Unmark as Final. To remove a password, open the file with it and delete it in the Encrypt with Password section. DRM restrictions can be changed in your admin panel.
Is there a way to revoke access after sending the PPT file?
If you share the file via OneDrive or SharePoint, you can update the control permission settings or delete the link. DRM tools provide full revocation and access management via a permissions dialog box even after delivery.
Create online courses and assessments in record time.


How to Email a PowerPoint Presentation: 5 Proven Ways
How to Convert Your PowerPoint Slides to an eLearning Module
How to Create an Interactive PowerPoint Presentation
How to Remove the Background From a Picture in PowerPoint