How to Create a Training Course Outline (Template Included)

In this article, Anna Poli, Senior course developer at iSpring, will provide you with a comprehensive guide to creating a course outline.
We’ve also prepared a downloadable course outline template that will make your life a little bit easier.
Download the course outline template →
Key Takeaways
The article explains how to create an effective course outline by defining it as a structured plan that organizes a course’s topics, objectives, assessments, content types, tasks, timing, and feedback to guide both instructors and learners. It walks through steps like exploring the topic, deciding on modules and lessons, writing objectives and descriptions, choosing engaging content and activities, and reviewing the draft with stakeholders. The piece also highlights what to include in the outline, offers tips for clarity and usability, and provides a link to a downloadable template to streamline the process.
What Is a Course Outline?

Anna Poli, Senior course developer at iSpring
A course outline is a general plan of the course that structures the information in a logical order.
The purpose of a course outline is to provide an overview of the content, structure, and objectives of a course. It serves as a roadmap for both the instructor and the students, outlining the topics to be covered, the learning outcomes to be achieved, and the sequence in which they will be presented. A course outline also typically includes information about assessments, required materials, and any policies or guidelines that may be relevant to the course.
It’s an important tool that lets instructional designers significantly reduce the time spent on course development. Creating a course without a course outline is like driving to a place you’ve never been before without a planned route. You risk taking the wrong roads, getting lost, and losing tons of time trying to put things right.
A course outline is a key to success for several reasons:
- It’s your guideline. A course outline helps you understand where a learner is at the starting point, where they should be at the end of the training, and what steps they should take to reach this point.
- It makes it easier to fill the course with content. It’s much easier to work with information if it is divided into small units. Once you’ve broken down a broad topic into subtopics (training modules), it becomes clear what you should cover in each module and what kind of practical tasks you should use to help learners retain information better.
- It’s your tool for approval. Let’s say you’ve discussed with your customer what the course should be about and what goals are expected to be achieved through the training. The next topic of your negotiations is a course outline. You need to review the outline with your customer and get their approval. This may save you from a lot of unnecessary work since it’s much easier to make changes at the point of mapping out a course rather than when you’ve already created its scenario.
What Should Be Included in the Course Outline
The simplest course outline is a list of modules divided into smaller lessons. A lot of instructional designers create it precisely this way. However, we recommend considering some other important things as well when mapping out a course. Here’s an example of what it might look like:

As you can see, this outline is laid out as a simple Excel spreadsheet and includes several tables. Let’s look at each point of the training course outline in detail.
- Training module. This is a section of an online course that focuses on a specific topic. When compared to a book, training modules act as “chapters” in a course. Each of the six topics in the example below would be a separate training module:

- Lesson. A training module can be divided into submodules or lessons. Depending on the topic, some of your modules can have 3 lessons, while others may have 10. That’s absolutely alright. The most important thing is that, together, they create a holistic view of the subject.

- Description. To provide a complete picture, there should be an overview of each lesson in which you would briefly explain what that lesson is about. All the descriptions together will let you see at the very beginning if a module looks complete or lacks some important details.
- Learning objectives. You also need to define what a learner should know or be able to do after completing a lesson. Having a learning objectives in mind, you’ll not only be careful about selecting the theoretical content, but it will be easier for you to decide about activities that will let your learners better achieve their outcomes.
- Content types. A good course is not just a simple set of slides with text and images. It should provide an engaging learning experience that can be created by using various kinds of content in a mix: videos, infographics, interactions, and many others. Mention them all in your course outline.
- Practical tasks. As stated above, you can’t rely only on text, so don’t forget to incorporate role-plays, drag-and-drops, hotspots, and other interactive activities in your lessons to let your learners practice their skills. You also need to add all these activities to your course outline.


Too much to read? Get a summary from AI
- Assessments. You want your learners to retain the information longer and see how much they understood during the training, right? Then you can’t do without assessment in your course. Consider which lessons will include assessments or whether you find it relevant to create a comprehensive quiz at the end of the training module.
- Feedback. Sometimes underestimated, this is an extremely important element of a course. Decide where in your course you would like to incorporate the feedback. You’re likely to at least add answer feedback to your quiz. By explaining why an answer is incorrect or praising for correct answers, you’ll help your learners improve their performance and strive for more learning. But bear in mind that you need to add feedback only to training tasks and quizzes. If the purpose of the test is only to assess your employees’ or students’ knowledge, feedback is not needed.

- Timing. Adults are busy people who have a job, children, parents, pets, etc. It’s crucial for them to be able to plan and manage their time efficiently. That’s why adding timing for each lesson is a must. Keep in mind that a lesson should not be longer than 10-15 minutes.

How to Create a Course Outline Step by Step
Let’s say you’re tasked with creating a time management course from your boss and are even provided a learning analysis — the audience has been explored and the training goals have been identified. Once you’ve reviewed the goals with your boss and have gotten their approval, you can proceed to map out your future course. Here’s how to create an effective course outline step by step:
Step 1. Explore the topic
You shouldn’t conduct thorough research at this stage, you just need to see what kind of information is available on your topic. Here are a few resources you might find helpful:
- Study the material provided by SMEs. Subject matter experts are your most trustworthy resource but it’s likely you haven’t connected with them at this stage yet and no aids have been provided. But if possible, try to get any possible material from SMEs. Perhaps they have video recordings, PDF manuals, or at least notes they used when hosting training face to face.
- Explore books on the topic. Chances are there are a lot of books written on your course subject. Collect a selection of books and check out what kind of information authors provide. Books typically have multiple chapters that respectively comprise discrete themes. They can be your key to further splitting your course into modules and lessons. But if you use books as a source, make sure to cite them in your course.
- See references. If your content is not highly specific, you’re likely to find similar courses on the Internet. For example, check out what platforms like Udemy, Lynda.com, and Coursera offer. You certainly can’t just copy their courses, but you can use their structure for inspiration and idea generation.
- Search the Net. Examine what search engines rank on your course topic and make notes about what you might want to add to your course.
Step 2. Decide on training modules and lessons
As you begin to plot your online course, think about how to guide your learners toward it’s end goal. Brainstorm ideas on what a learner should know to achieve it and put them in the correct order. This way, you’ll divide your course into modules. Then think about what should be covered in each module and break it down into lessons. It’s also worth seeking help from your SME and taking a closer look at the books you’ve already selected and course references.
This is an example of how you might want to divide a course on setting up purchase orders into modules:

There’s also another way to split your course into modules. You can take the end goal and break it down into learning outcomes that learners should attain once they complete a course, as in this example:

In fact, if you set up the learning objectives correctly, it will be extremely easy for you to map out the course. Just keep the objectives in mind and split the topic into respective training modules, as in the example below:

You can go further and break each module into smaller lessons.
Step 3. Write learning objectives and descriptions for each lesson
If you’ve followed the second route, when mapping out your course, you already have learning goals and objectives in front of you. Just put them down next to your modules/lessons. If you went the first way, think of the desired outcomes that learners should achieve by the end of each lesson.
To make learning objectives more actionable, and thus tangible and measurable, be sure to add action verbs, as in this example:

Also, provide a description of each lesson — just a couple of sentences. It will be great if the description not only covers the topic but also translates the value that a learner will gain from a lesson. That way, you’ll turn your description into an exciting logline that you can put on the slide with the lesson title. It will engage your learners and encourage them to take the lesson.
Step 4. Define the content types
Now that you’ve broken your course down into modules and lessons and identified learning objectives for each one, it’s time to decide how you can help your audience achieve these learning objectives. In other words, you need to consider what type of content and interactive tasks you’ll provide in each lesson so your employees can remember the information better.
For example, if you want to train your merchandisers on how to arrange goods in a supermarket, you would provide slides with the theory on the subject, add a demonstration video on how to place items on the shelves, and finalize this with drag-and-drop activities so employees can practice their merchandising skills. And if you want your sales professionals to be able to handle customer objections, you’ll definitely need to add a role-play to your online courses.
So, the bottom line is that to create an online course, you need to support the theory with media and practical tasks. But keep in mind that your hands-on activities should be consistent with the knowledge and skills you want your learners to obtain.
This means that you can’t offer a role-play simulation to factory workers if you want them to learn how to operate specific machinery. But a role-play will be a perfect solution for the learners that need to develop their communication skills, like learning how to provide feedback to an employee.
Below, you can see exactly which eLearning content types you can use in your course:

Let’s take a look at some of them in greater detail. You can create all these content types with the iSpring Suite authoring toolkit, even if you have no tech or design skills.
iSpring Suite AI
Fully-stocked eLearning authoring toolkit for PowerPoint. No training required to start!

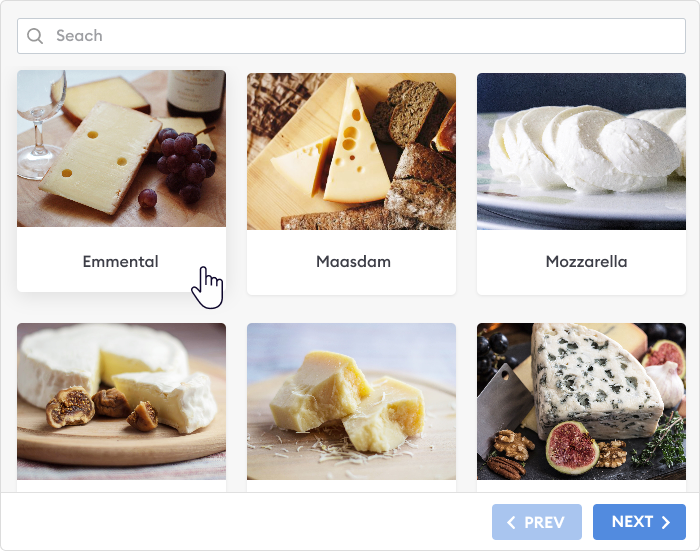
Interactions
Interactions are an engaging way to present your learning material. They can help you show the history of your company, product development stages, transaction cycles, and much more. In the example below, you can see an interactive catalog that includes various kinds of cheese. It was created specifically to acquaint employees with the products offered by the company.
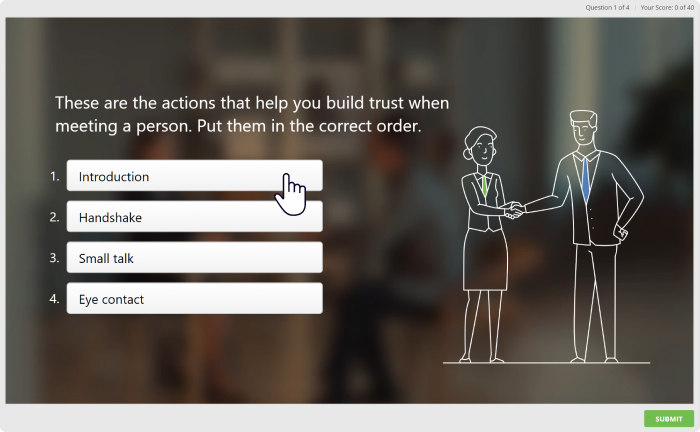
Quizzes
To check your learners’ knowledge and provide them with even more opportunities for practicing skills, compliment your courses with interactive quizzes. Try to use a variety of question types to make a quiz even more effective and fun, as shown in this demo:
Drag-and-drop activities
The abovementioned drag-and-drop tasks require learners to drag a piece of text or an image and drop it in the corresponding place. To see how it all works, check out the demo below — learn whether you can sort the food into healthy and unhealthy items correctly:

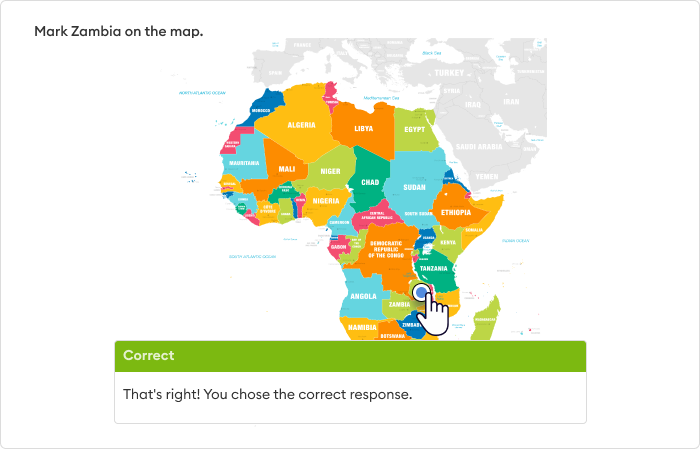
Hotspot activities
Hotspots are really engaging tasks that require learners to mark a specific area of an image. Learn how good you are at geography. Can you find Zambia on the first try?
Role-play simulations
If you want your employees to master their communication skills in a safe-to-fail environment, with no chance of ruining a deal or damaging relationships with a customer, include role-plays in your course. For example, this role-play is designed to train car sales staff to use tact, know-how, and just a bit of assertiveness to seal the deal:

Step 5. Show your course outline to stakeholders
As we mentioned at the beginning of the article, it’s much easier to redo a course at the stage of building an outline than after you’ve created a scenario, or even worse, designed the course. That’s why, after the draft of your course outline is ready, it is a good idea to provide it to SMEs and a customer for review. Once it’s approved, you can start working on a course scenario and eLearning storyboard.
Training Course Outline Template
To make the process of creating an course outline easier for you, we’ve created a template that you can easily customize according to your eLearning project.
Download the course outline template →
Tips for Creating an Effective Course Outline
Here are a few more helpful things to keep in mind when creating a course outline.
Consider other course elements
Modules and lessons are the core of any online course. But there are several other important elements you need to consider. If needed, you can also include them in your course outline.
- Welcome slide. This is where you will add your course title and description.
- Learning objective slide. It will list the learning objectives of the course.
- Navigation slide. This will let you set up your main navigation menu. It’s where you will list your modules and/or lessons so learners can move around from one to another.
- Summary slide. It will sum up the content presented in the course and highlight key learning points.
If you build courses with an authoring toolkit like iSpring Suite, creating these slides will be a breeze. The software comes with the built-in Content Library that provides access to hundreds of preset slide templates.

Use the tools to enhance the course outline
Some people can map out a course with just pen and paper or by playing with stickers, but using digital course outlines makes it easier to edit and customize your course outline. You can use anything from to-do lists to note apps.
Most people put their ideas in Microsoft Word or Excel documents, as they’re simple and clear for everyone. If you prefer brainstorming using stickers, opt for mind mapping tools like Miro or free Coggle.
FAQ on Creating a Course Outline
Let’s take a brief look at several frequently asked questions about creating a course outline.
Who should I involve in mapping out a course?
Creating an course outline is entirely a course developer’s job, but as mentioned above, you should involve your customer and SME in this process. Moreover, you need to discuss the outline with your stakeholders at least twice — at the initial stage, when defining course requirements, and once the draft outline is ready.
Why should I mention learning objectives, content types, assessments, etc. in the course outline?
Of course, you can simply break down the course into modules and lessons. However, you should keep in mind that a well-prepared outline is only half the job. You know what each lesson will be about, what outcomes your learners should achieve, and how they will master their skills. What’s left is collecting the content and putting it together with an authoring tool.
Final Thoughts
Getting in the habit of creating a course outline will help you build more effective and engaging courses and streamline the development process. If you still haven’t downloaded the course outline template, get it now for free. Are you looking for a powerful authoring tool that will let you create eLearning courses in no time? Then try iSpring Suite for 14 days without spending a cent.
Create online courses and assessments in record time.


How to Write a Course Description [+Examples]
Making Your Online Course Interactive: Full How-To (and Why) Guide
eLearning Storyboard Template: From Idea to Engaging Course
How to Create an Online Course: A Comprehensive Guide