How to Make an Interactive Game in PowerPoint: A Step-by-Step Guide


Games are a great eLearning asset to keep your audience focused and engaged while effectively learning or revising new information. In this article, we will show you how to build engaging, interactive presentation games in PowerPoint from scratch. You’ll learn to create trigger and animation tricks, set up navigation by using hyperlinks, and implement a strict navigation scenario.
As an example, we’ll demonstrate step-by-step how to make a complete interactive game
in PowerPoint.
Key Takeaways
The article explains how to build an interactive mini-game in PowerPoint using built-in features like triggers, animations, and hyperlinks to create engaging navigation and gameplay. It describes several game types you can make directly in slides and then walks through creating a simple example where users click objects in sequence, receive feedback, and can’t move forward until tasks are completed. The guide emphasizes that no additional software is needed to build such games, though external tools like iSpring Suite can add advanced features and tracking.
Types of Interactive Games You Can Create in PowerPoint
PowerPoint games are a great audience engagement tool that’s part of an interactive presentation. While this tool may seem simplistic, you can build numerous games in PowerPoint to have more fun in your digital classroom. The most popular types of ppt games are:
- Choice-based PowerPoint games. These include such games as “would you rather”, “true or false” or scenario-based games.
- Quizzes. Quizzes with multiple answer options are a great way to test your students’ knowledge and skills or present a trivia game. Read our tutorial and learn how to make a quiz in PowerPoint in a few clicks.
- Jeopardy. You can easily create a jeopardy game in PowerPoint and use it as one of fun competitive team building exercises. Watch our video jeopardy game tutorial if you prefer visual instructions. It’s a great game to play in two teams or among individual learners.
- Matching games. The tool allows you to create a drag-and-drop game in PowerPoint similar to Google slides, or work with other simple matching activities. You can even build a hangman game with PowerPoint resources. Learn more how to create a matching quiz questions.
- Memory card games. A memory game with cards helps your learners remember new material through visual means. Create a flipping game and make them find two cards with identical images. Alternatively, create PowerPoint flashcards for your students. The cards can also be used for a word puzzle game or other activities.
Below, you’ll find a step-by-step guide showing you how to create an interactive game
in PowerPoint quickly and easily with useful tips along the way.
How to Make an Interactive PowerPoint Game: Step-by-Step Guide
Our example tutorial is a PowerPoint game with a simple game play in which the player
should pick tools and ingredients to cook an omelet. And we can’t unlock the next slide
until we select all the right objects :) Let’s see how the game works in the slideshow mode:

Before you start, feel free to download and save the game board resource for
our ppt mini game template.
Now let’s create your own PowerPoint game step by step so you can learn how to use the same tricks in your own PowerPoint presentations.

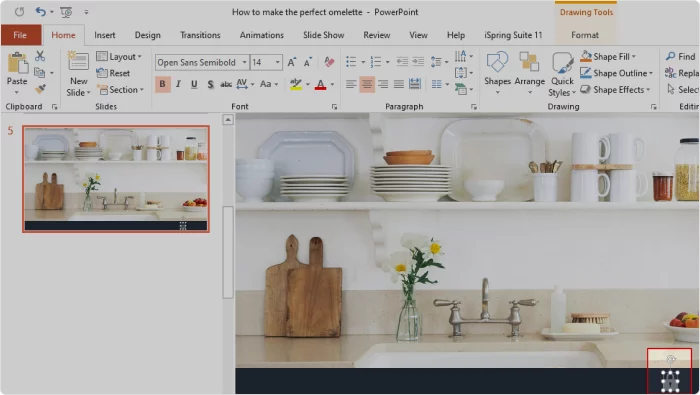
Step 1. Inserting objects
1. Open PowerPoint and create a blank presentation new slide for your interactive game.
To describe the main idea of how it works, we’ll use just one correct object (the bowl) and
one incorrect object (the cat). You can add the rest of the objects later using the same instructions.
2. Get the background picture from the resource folder and add it to the slide. Go to
the Insert tab → Pictures and find your downloaded folder with all the files and
choose the object called “Background”. Put it on the slide so that there is a blank space
for inserting the bottom panel.

Step 2. Inserting the bottom panel and the Next button
3. After that, insert the bottom panel. To do this, go to Insert tab→ Pictures, select the picture “Bottom panel”, and place it in the corresponding blank field.

4. Now, insert the Next button, which we need to go to the next slide of our presentation. (Insert → Pictures → Next button).

5. To block the slide navigation, add a dark rectangle over the button.
Select Insert → Pictures → Dark rectangle.
6. To make our mini game more interactive, let’s add a lock to the bottom panel
(Insert → Pictures → Lock).
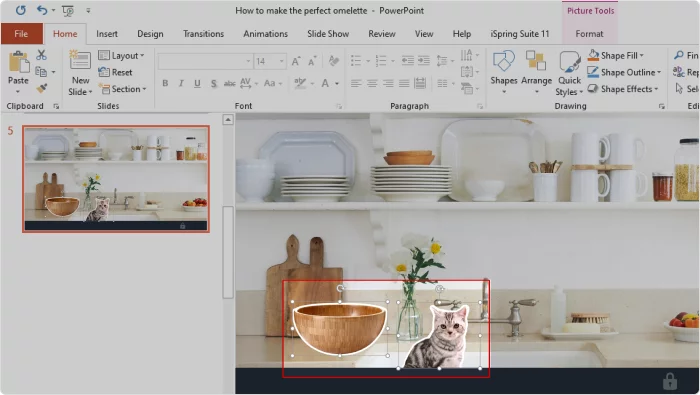
7. For the next objects, the cat and the bowl, we will create triggers and animation effects.
Add the pictures called “Cat” and “Bowl” from the resource folder.
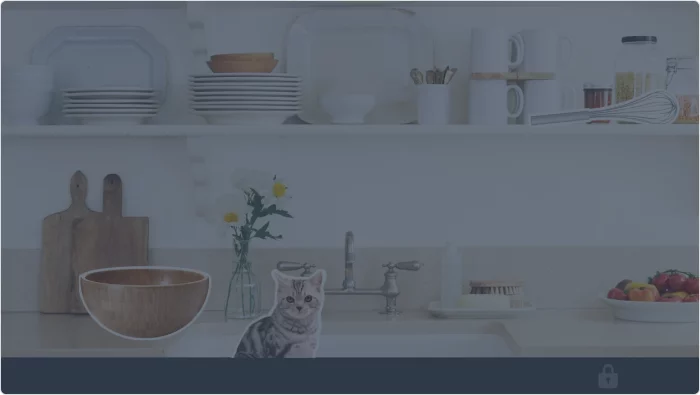
8. To highlight a feedback message and prevent users from accidentally clicking
on another object, add a transparent layer over our objects (Insert → Pictures → Transparent Layer).
Too much to read? Get a summary from AI
Step 3. Creating feedback messages
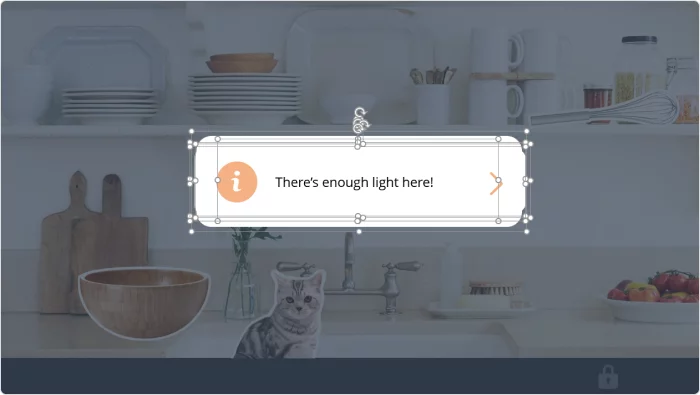
Now let’s add correct answer and incorrect answer messages for the cat and the bowl
(you can find them in the resource folder too). These messages will signal the right
and the wrong answer. Please set the correct message under the incorrect one. You
can later experiment with font size and style in each text box.
Tip: Rename all the objects so you don’t mix them up. To do that, go to Home → Arrange → Selection pane.
Step 4. Creating triggers for the objects
A trigger is a PPT effect that tells an object to do something at a certain time. For example, there is an object called “Cat”, and if the player clicks on it in a PowerPoint slide, it will trigger the appearance and further disappearance of the incorrect message text box (because we obviously don’t need a cat to cook an omelet. It can help us eat the meal later though).
Let’s create triggers for the objects on the PowerPoint slide and animate them. We should send the transparent layer and the incorrect message text box to the bottom of the presentation slide to work with the main objects first.
Creating animations and triggers for the correct answer object
- Let’s start with the bowl’s animation. First, you need to create the entrance animation for the correct message text box. Select the message on the slide, go to Animations → Add animation → Entrance → Fade. After this, we should add the animation by clicking on the bowl, and this is what is called the trigger.
- To add a trigger, select the correct message text box once again. Then go to the Animations → Trigger → On click of and select the correct object (the bowl).

3. Block the background to prevent an infinite loop of clicking on the bowl. To do that, we need the transparent layer that we transferred to the bottom of the slide. This layer allows us to see the background with the kitchen but doesn’t allow us to click any other objects like the cat. It must appear after clicking on one of these objects, so we have to make an animation with it, too.
4. Then select the transparent layer and drag it back to the slide. After that, go to the Animations tab, choose the Fade animation, and transfer it to the previous animation in the Animations list to make them play at the same time. Then set up both of these animations to start with the previous ones.

5. To see the result after previewing the slide, you should also uncheck the
On Mouse Click checkbox in the Transitions tab.

Now we can’t click on the bowl once again due to the layer, but we can’t return back
to the previous state where we can click on something else. To do that, we’ll add
an additional trigger and exit animations.
6. Click on the correct message, go to Animations and add the Exit animation
(the Fade effect). Then add a trigger and choose On click of the previous animation
(in our case it is the correct message animation).

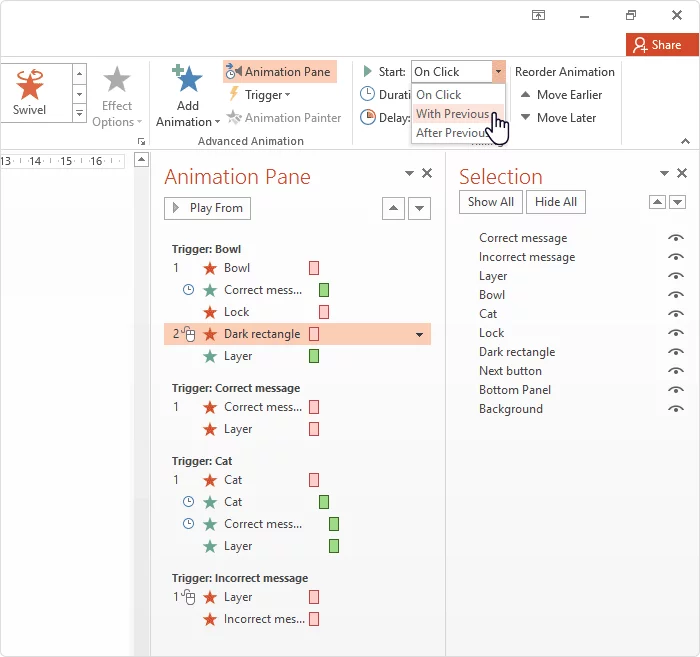
7. Let’s also add a Fade animation to the transparent layer. Select the layer, go to the Animations tab, and add the Fade exit animation. Now group both of these animations using the Start with previous option. To do that, transfer the layer animation after the correct message animation, select them both, and select the Start with previous option:

8. After that, move them under the entrance animations in the Animation pane.
Let’s reproduce these steps in slideshow mode. When you click on the bowl, the correct message appears. And after clicking on the same message, the transparent layer disappears, and we’re able to click on other objects.
Making the correct answer object disappear
Now we need to make the bowl disappear after choosing it to create the impression that we’ve added it to our inventory. There are two ways to do this: transfer the transparent layer to the bottom once again, or select the bowl in the selection pane and create an Exit animation for it.
1. Open the Selection Pane: go to the Home tab → Arrange → Selection pane. Click on the bowl in the drop-down list and create an Exit animation for it.
2. Go to Animations → Add animation → select the Fade exit animation for the bowl. Then drag this effect to the bowl’s list of animations, put it in the second spot to make the bowl disappear after clicking on it, and click on Start with previous.
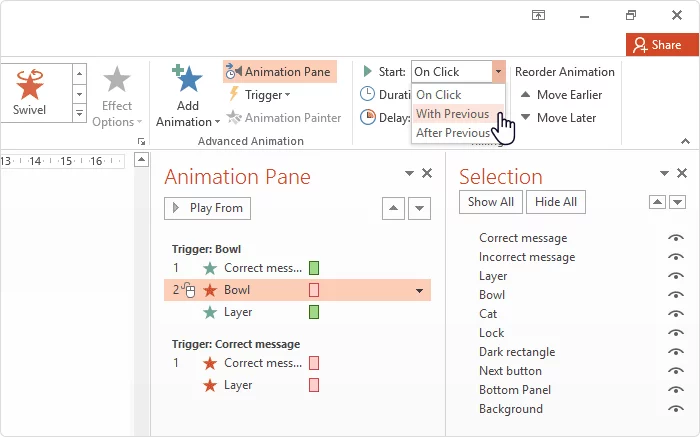
3. We can also make the bowl disappear before the message appears. To do this, move the exit animation to the top of the bowl’s list and select After previous for the rest of the animations.
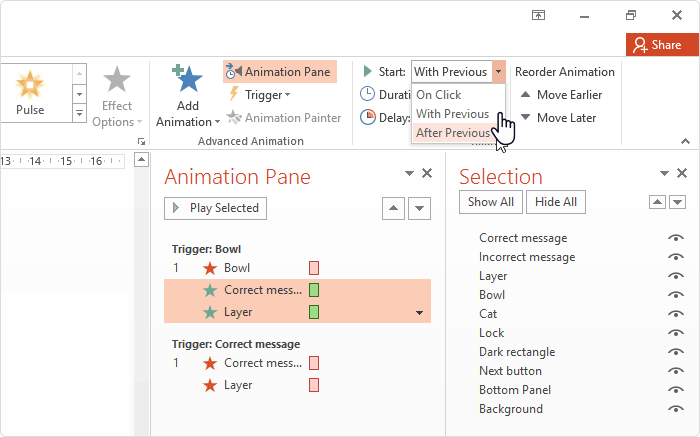
4. Make sure that you also customize the last animation of the transparent layer and set
the “With previous” option for it.
Congratulations! We’ve finished creating all the animations and triggers for our correct
object on the slide.
Creating Animations and Triggers for the Wrong Answer object
Let’s repeat almost all these steps to make the animations and triggers work for the cat.
1. Drag the incorrect message over the correct one, right-click it and select Bring to front to make the message box visible.
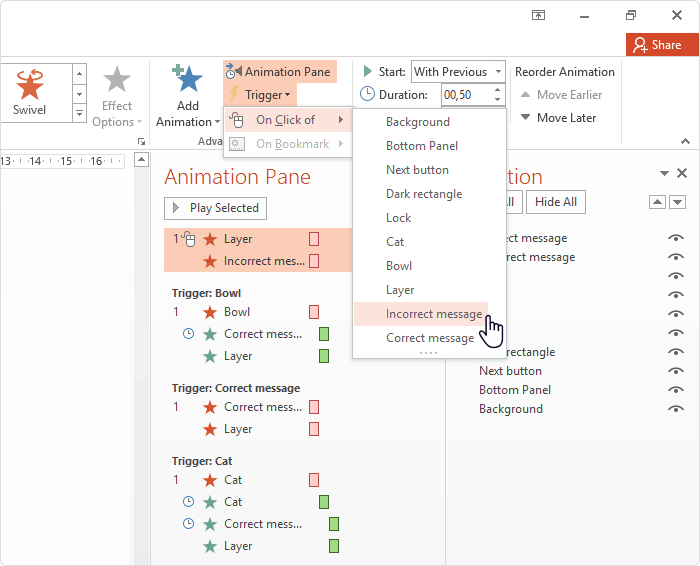
2. Select the cat in the Selection pane and add an Exit animation for it (Animations → Add animation → Exit → Fade). We also need to add an entrance animation to show that the cat was selected incorrectly.
3. Make a trigger for these two animations. To do this, select both of the Cat animations, go to Trigger → On click of and choose Cat.

4. Select the Start with previous option for them.

5. Add the entrance animations for the transparent layer and this message (same
as we did it before).
6. Drag the entrance animations to the new trigger with the cat.
Here’s how it will look:

7. Make the same settings as for the bowl (you should also set the After previous option for the cat’s entrance animation, After previous for the 3rd animation of the layer, and With previous for the 4th, the incorrect message).
8. Now we should set up the same exit animations for the incorrect message. Select the transparent layer and the incorrect message on the slide once again, set the exit animations for them, and create a trigger for the incorrect object:
Step 5. Setting the animations for the Next button
Now, we have to add animations for the lock on the bottom panel to make our game more interactive and to show the learners that they’ve successfully selected all the tools to unlock the navigation.
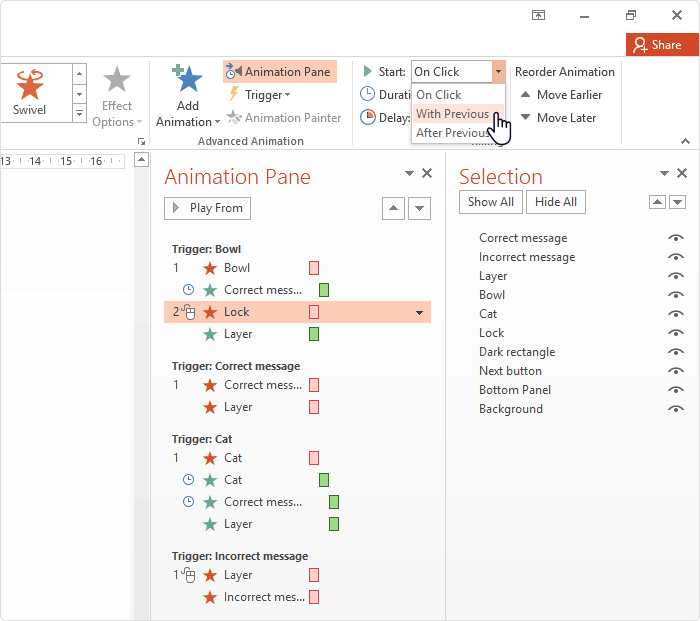
1. Select the lock and add an exit animation for it. Drag this animation to the place between the entrance of the correct message and the transparent layer in the Bowl’s list of animations, and set the With previous option:
2. The last step is to make the Next button visible after the lock disappears. There’s
an interesting trick with the dark rectangle which we put over the button. If we click
on the correct object (in our case, it’s the bowl), the disappearance of the lock on
the bottom panel will provoke the disappearance of this dark rectangle, and the
Next option will be available.
3. Select the dark rectangle in the Selection pane and add the exit animation for it.
Drag this animation to the bowl’s trigger under the lock animation and set the option
With previous.
Note: This dark rectangle you created and placed on the bottom panel has a restrictive
function by hiding the Next button to help students navigate the game. It’s also very
important that this dark rectangle hides the Next option with the hyperlink completely to
avoid accidentally redirecting your learner to the next slide. So your users will go to the
next slide only after choosing all the correct objects on the slide.
This rectangle shouldn’t have any hyperlinks or transparent layers that allow you to go to the next slide; only the next button has these features. To perform this trick, it is very important to have a solid background or a solid bottom panel.
Step 6. Setting up the link for the Next button
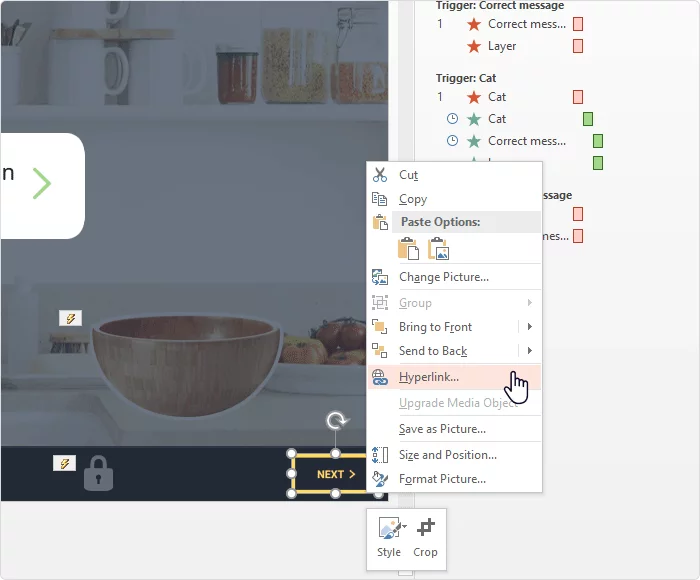
The next step in the process is adding a hyperlink to the Next button. Move the dark rectangle to the bottom for now. Actually, we have an image called Next button, and to add the hyperlink to this button, you should right-click on the picture, choose Hyperlink in the drop-down list, and select a place in the document.
Thanks to these tricks, your learners have to click on all these objects to go to the next slide of the presentation, and they’ll read some useful information in the pop-up messages so they can’t miss these objects. It’s a very convenient way to take information and share it with your learners, and it’s also quite a simple way to create your own mini game.
FAQ on PowerPoint Games
Do I need any special software or tools to create interactive games in PowerPoint?
No, you don’t need any specialized software. PowerPoint itself has all the relevant features to create complete interactive games on your computer. You can use animations, hyperlinks, and triggers within PowerPoint for an engaging slide mini game. However, for more advanced graphics and design elements like sound effects or complex animations, consider other tools with more available resources to build a robust game play.
What interactive presentation games can I create in PowerPoint?
You have many possibilities for creating interactive games in PowerPoint. You can design quizzes, simple choice-based games such as two truths and one lie, puzzles, trivia games, jeopardy game, and simulations, among others. You can experiment and find more creative ways to build games within your interactive presentation. You can also find free PowerPoint game templates online.
Can I track user progress or see scores in my PowerPoint game?
No, you can’t track or record learners’ scores, progress, or results in interactive presentation games without the help of additional software. So, if you want to access such data as your students’ game completion status or how many points they’ve scored with their answers/actions, go for advanced authoring tools like iSpring Suite. You’ll be able to create PowerPoint-based learning activities, like building a timed quiz, with extended functionality and get quiz reports sent to you via email.
Summary
Now you know how to make PowerPoint games by combining such features as triggers, animations, and hyperlinks. You can grab our tutorial and resources to practice or go on and create your own fun mini PPT game for your students. Share your experiences with building PowerPoint games in the comment section!
If you want to create even richer and more engaging PowerPoint presentation games, try iSpring Suite. With this easy authoring tool, you can also share your games online, track your learners’ progress, and more.
Create online courses and assessments in record time.


The Best Interactive Presentation Software and Tools for 2026
How to Create an Interactive Map in PowerPoint [Template Inside]
4 Easy Gamification Tricks for PowerPoint and iSpring Suite