How to Make a Video Presentation in PowerPoint


People love watching videos. According to a report by Idomoo, 83% of users want more videos from brands rather than documents, articles, and other forms of plain media. This is why more and more companies are using them for video marketing and other business needs. One of the more popular forms is a video presentation.
Key Takeaways
The article explains what a video presentation is and why it’s effective for engagement, retention, accessibility, and efficiency. It outlines essential tools for creating video presentations and then provides a step-by-step tutorial on making a video presentation in PowerPoint using the iSpring Suite add-in. The steps cover installing iSpring Suite, adding or recording video narration, syncing video with slides and animations, choosing slide layouts, customizing the player, and publishing the presentation. The guide emphasizes how iSpring Suite enhances PowerPoint to help you produce professional, synchronized video presentations easily.
What Is a Video Presentation?
A video presentation is a popular format of content, typically lasting several minutes, that shows the benefits of a product, service, or new idea with the help of relevant images, concise text, and appropriate audio narration.
People use video presentations in various aspects of business to keep their audiences engaged. As such, they can be used in employee training and onboarding, B2B communication, marketing campaigns, and sales presentations for new clients, as well as to present an enterprise at expos or conventions.
Why Create a Video Presentation?
Why should you press that presentation record button? Besides being more appealing and persuasive than a basic cut-and-dry content piece, video presentations also help the viewer retain more training knowledge. They’re also easy to use, readily accessible, and time-efficient. Let’s see why choosing this type of presentation is the ideal presentation choice.
1. Appealing and persuasive
Video presentations are more effective at persuading your target audience by way of audio-visual design, storytelling, and bringing ideas sounds and engendering emotions. Moreover, videos can offer voices (audio) and faces. Instead of reading plain text, people will hear you, become familiar with your tone, and read your body language. This brings people closer.
2. Better for information retention
Insivia reports that viewers retain 95% of a message when presented as video — compared to 10% when reading it in text. Thus, educators often use video presentations within the framework of the digital storytelling concept or when installing new educational material.
3. Accessible anytime, anywhere
Emarketer found that 75% of all videos are played on cell phones and tablets. This means you can offer your courses to learn on the go. Videos don’t require reading long texts attentively, so your learners won’t need to carve out time for learning. They will simply replace entertaining videos with your useful trainings, or at least listen to their audio.
4. Time-efficient
Video presentations are designed to convey information in smaller chunks that are easy to process. This allows viewers to explore larger amounts of information more quickly and easily. There’s no need to spend hours learning at home or at the office if people can watch short videos at their convenience. You’ll see that it will result in greater knowledge!
5 Essential Tools for Making Video Presentations
To create your own video presentation, consider the tools you’ll need to do this successfully. These apps range from simple presentation tools to video or audio recording software.
1. Video recording tool
If you create your presentation from scratch, you’ll probably need a video presentation maker and a presentation recorder that allows you to make professional-quality presentations. The ingredients are your photos, texts, pre-made templates, and stock footage.
2. Audio recording tool
How do you make a presentation with audio? The classic way to add your audio to a presentation is to record the audio narration and simply import it into your presentation. You can use free recording studio options with simple features, such as Audacity, or opt for paid tools with professional sound studio features like Adobe Audition. Another option is to use embedded audio recording features, such as using PowerPoint together with iSpring Suite.
3. Animation tool
Animation is a universal language without limits — it instantly grabs any audience’s attention. To create animations, you’ll need an animated presentation maker! You can start from scratch with drawing tools or use ready-made scenes and layouts offered by simple solutions like Powtoon. As for the interactive animations, such as flipping pages, stronger tools are needed.
4. Presentation creation tool
If you want to speed up the process of creating a presentation, you’ll need a presentation maker. Tried-and-true PowerPoint will work fine here. Later in this post, I’ll share a step-by-step tutorial for creating a video presentation right in PowerPoint.
5. Course authoring tool
Finally, if you feel you don’t want to create audio, video, and animation in separate tools, but PowerPoint is insufficient to handle your creativity, consider a course authoring tool like iSpring Suite. It has everything in one place, from video recording to adding closed captions, providing all the capabilities for a professional video training course.
Now, let’s move to the most popular and easy-to-start solution: PowerPoint.
How to Make a Video Presentation with PowerPoint
Here, you’ll learn how to make a great video presentation right in PowerPoint using the iSpring Suite add-in. This is an easy-to-use tool with robust recording functionality and lots of presentation templates. Follow these six steps to make a video presentation within minutes.
Step 1. Get iSpring Suite for free.
Step 2. Add a video narration.
Step 3. Synchronize it with the slides.
Step 4. Switch layouts in Slide Properties.
Step 5. Customize your player template.
Step 6. Publish your presentation.
Step 1. Get iSpring Suite for free
If you don’t have iSpring Suite, download the tool for free and install it on your computer. Next, open an existing PowerPoint file that contains a training course or lecture. Once installed, the iSpring Suite tab will automatically appear on the PowerPoint ribbon.

Step 2. Add a video narration
Go to the iSpring Suite tab and click on Manage Narration. This can function as a video presentation maker.

Once the iSpring Narration Editor window appears, you can either record a narration or import an existing video file.
How to import a video file
To import an existing file, click on the Video button in the Import tab.

Find the file and click on the Open button.
Pro tip: You can insert multiple videos simultaneously. To do that, press and hold the Ctrl key while selecting several files.
In the Import Video window, you have the option of importing your video at the current cursor position or at the beginning of the slide of your choice.

Note: If you choose to import your video at the beginning of a particular slide, you can select the Adjust slide duration option. This will adjust the selected slide to match the length of your video.

Too much to read? Get a summary from AI
How to record a video in PowerPoint
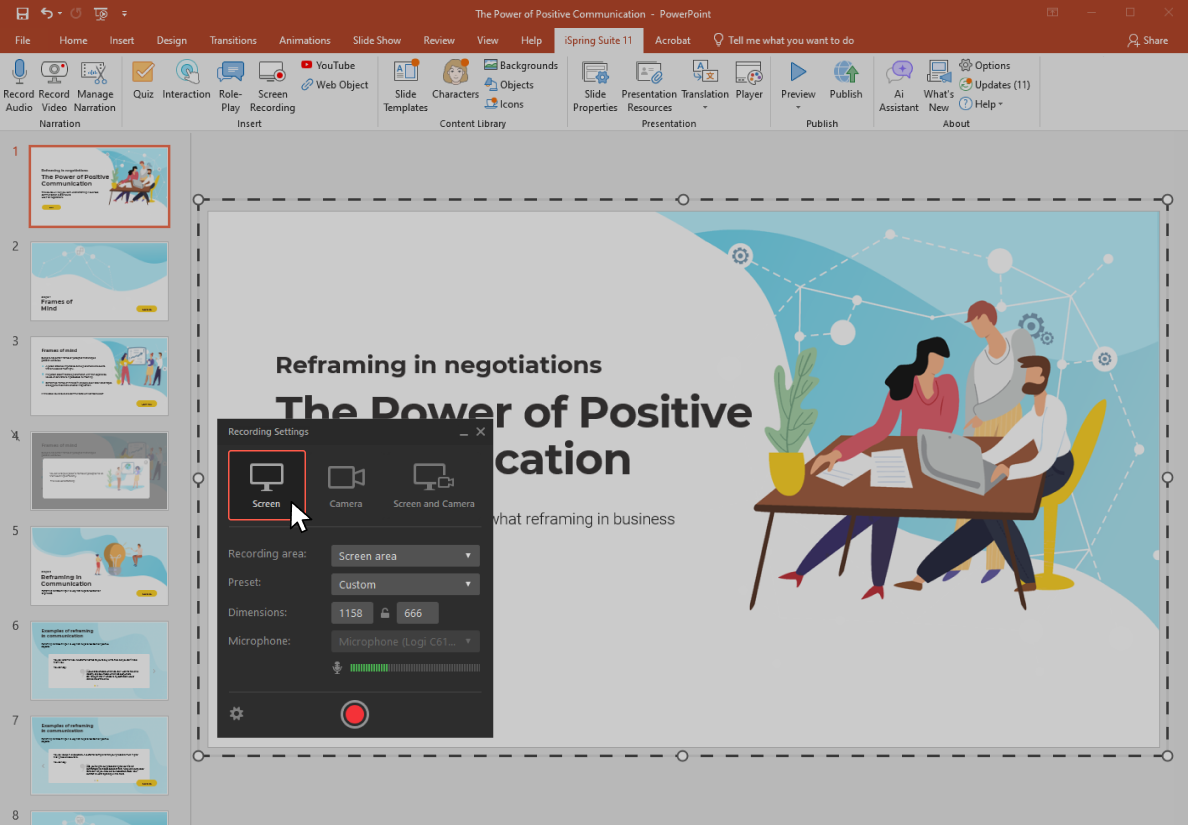
To film yourself on a webcam, you can use the video narration feature. Click on the Record Video button on the editor’s toolbar.

The Record Video Narration panel will appear.
You can add a video narration for one or several slides at a time. To start recording video for the current slide, select Process current slide only.

One more tip: if your video is already on YouTube, you can easily add it to your presentation. Read about embedding YouTube videos here.

Step 3. Synchronize it with the slides
Now it’s time to finish recording and synchronize your video with your slides and animation effects. The latter are displayed as yellow bars on the Slides timeline. The great thing is that you’ll be able to choose the exact moment when an animation will appear. This way, the effects will correspond perfectly to the narration in your video presentation.
Note: This is only applicable if you have animation effects attached to your slides.
The syncing process is quite simple to use. Just place the cursor where the syncing should begin and click on the Sync button on the toolbar.

A Sync panel will appear above the timeline. Click on the Start Sync button to start the process.
The Start Sync button will be replaced with the Next Slide or Next Animation button, depending on the next element in the sequence. Click on those buttons at the appropriate moment. Hit the Next Animation button at the point in the narration where you would like to start the next animation. For example, if you’re listing information, you can have each new item appear when the narrator mentions it in the video narration.

Once you have finished, click on Done to quit the Sync mode. Then, hit the Save & Close button in the upper-left corner.
Step 4. Switch layouts in Slide Properties
iSpring Suite allows you to publish materials using one of two players: the highly customizable Universal player or the Video Lecture player. The latter displays the presentation in a 50/50 layout and allows viewers to change the proportion between video and slides at any time.
The Universal player features three layouts:
- The Full layout displays the slide, sidebar, and navigation panel.

- The No Sidebar layout displays the slide and the navigation panel only.

- The Maximized Video layout displays the video in the center, the slide on the sidebar, the next slide, and the navigation panel.

Your presentation doesn’t need to use the same layout on every slide — make your next one different. You can highlight key points by changing the proportion between the on-screen information and the video for each slide.
To do that, click on Slide Properties on the toolbar.

In the Layout column, pick the desired layout for a particular slide from the drop-down list.

The layouts for the Video Lecture player can be changed at any time during playback. You can still preset them, and they’ll work as follows:
- The Full layout displays video and the presentation in equal proportions.

- The No Sidebar layout displays the whole slide with a miniaturized video.

- The Maximized Video layout displays the enlarged video alongside a smaller slide.

It is recommended that you set slides to advance automatically during the entire presentation. To do this, in Presentation Explorer, select all slides and click on the Auto button.
Step 5. Customize your player template
The built-in presentation player has flexible customization options for creating presentation templates: you can provide your viewers with the presenter’s info, a brand logo, an outline, an interactive play button, and more. First, let’s choose which player to use. Click on Player on the product ribbon, and then choose either the Universal or Video Lecture player, as shown in the image below.

For this guide on making a video presentation, I’ll use the Universal player. To customize it, click on Templates. There are several player templates to choose from. I’ll use the Online Lecture with Video template as an example.

You can also experiment with the settings, doing things like turning off the outline and notes by clicking on the Layout button on the ribbon. Here’s what the player will look like:

Additionally, you can customize a presentation to match your brand colors by choosing one of the built-in color schemes or creating your own.

When you have finished customizing the player, click on Apply & Close in the upper left corner. Well done! You’ve put the finishing touches on your presentation.
Step 6. Publish your presentation
When your presentation is ready, the last step is to publish it in a web format so it can be accessed easily via a browser.
In the Publish Presentation window, select the My Computer tab from the menu on the left. Enter the presentation title and select a local folder where you want the presentation to be saved. Under Output Options, choose a format. I’ll be publishing in HTML5 format to ensure the presentation plays seamlessly across all platforms and devices.

How to Turn Your PowerPoint Presentation into a Video
How do you make a video presentation out of a PowerPoint presentation? By default, you can convert your PowerPoint presentation into a video by saving it in that format. And if you need some individual slides with narrations, you’ll still be able to record narrations from that menu without going back to the original PowerPoint presentation.
Here’s how to download your slides as a video in PowerPoint:
- With the presentation open, head over to File on the PowerPoint toolbar and select Export to view the export options.

- In the Export menu, select Create a Video. You are now ready to save the presentation as a video.

- In the drop-down menu, you can choose how to export the presentation: with narration (if you’ve already recorded it) or without. If you want to record a narration at this point, click on Record Timings and Narration.

- Choose how long individual slides will appear. Manage the speed of the demonstration in the small drop-down menu.

- Click on the Create video tab to start downloading.
Tips and Best Practices for Making Video Presentations
To make your presentation even better, consider the following tips:
- Make your videos short and sweet. Keep your video clips long enough to capture the attention of your target audience but short enough to maintain their curiosity. Your goal is to sustain the viewer’s interest. Remember, the optimal length of a presentation is no longer than 4-7 minutes.
- Stay on point. Make your goals and objectives clear at the start of the presentation, and remain focused on the message. Select records that relate to the subject matter and don’t detract from the goal of your presentation.
- Add engaging elements. Enhance your video presentation with engaging and informative content. For example, add background music, colorful infographics, embed YouTube videos, or insert interactive quizzes to engage learners.
- End on a meaningful note. Leave your audience with something they can take away from the presentation. A new idea, a short story, a visual representation of your product, or even a link to your website all work to provide the strong ending needed to create a lasting impression.
To Sum Up
I hope this tutorial will help you turn static slides into engaging video presentations that captivate your audience. To start creating video presentations and other kinds of eLearning content, try iSpring Suite. Get a 14-day free trial and test-drive all of its advanced features.
Useful Resources
- How to Convert PowerPoint to MP4 Video on Windows and macOS
- What Is Lecture Capture? A Complete Guide to Modern Learning Tools
- How to play a PowerPoint presentation on iPad
- How to Loop a PowerPoint Presentation
FAQ on Creating Video Presentations
Here are answers to some popular questions about making a video presentation.
How do I make a presentation video?
As a fundamental solution, you can start recording with a separate presentation recorder or a simple screen recorder. However, even standard solutions like PowerPoint offer exporting audio-video versions of your presentations. With other authoring tools, such as iSpring Suite, you can also fine-tune your future video before exporting.
How can I make an effective video presentation?
First and foremost, consider your target audience when creating video presentations. What are their ages, genders, and occupations? What is their prior knowledge of a topic or their level of proficiency? After defining the audience, choose the presentation method accordingly. You should connect with your audience emotionally and ‘speak their language.’ In this way, you’ll communicate the right message to the viewers.
Second, it will be useful to prepare a script for your video. Of course, seeing the next slide and using closed captions will support you, and you can base your speech on its content. But if you write an intro, outro, some key points, and transition phrases between slides in advance, you’ll record with greater confidence and reduce rambling or unnecessary pauses. This will help you focus on the effectiveness of your message.
How can I record myself giving a presentation?
Make sure you’re physically and technically prepared. When delivering a presentation, prevent your mouth and throat from getting dry. This will make you sound better, and your recording will be clearer. When using a recording studio, it’s better to choose a smaller, quieter space to avoid echoes and check your microphone’s sound. When you’re ready, just click on the record button and go!
How can I make a presentation video with voice narration?
You can start recording audio with a separate recording studio and add this voiceover to your presentation later. However, it is easier and more efficient to record audio straight in PowerPoint or another authoring tool you are using.
What is the 10/20/30 rule in presentations?
It is recommended that you include a maximum of 10 slides and ensure that your presentation lasts less than 20 minutes from the time the play button is clicked. The “30” rule applies to the font size: it shouldn’t be smaller than 30 points. The key tips here are to make sure your presentation is easy to read, that each subsequent slide is connected to the previous one, so 10 slides would be sufficient, and that the recording is not too longHow do you make a video presentation out of a PowerPoint presentation?//www.idomoo.com/resources/state-of-video-technology-report/” target=”_blank” rel=”nofollow noopener”>Idomoo, 83% of users want more videos from brands rather than documents, articles, and other forms of plain media. This is why more and more companies are using them for video marketing and other business needs. One of the more popular forms is a video presentation.
Key Takeaways
The article explains what a video presentation is and why it’s effective for engagement, retention, accessibility, and efficiency. It outlines essential tools for creating video presentations and then provides a step-by-step tutorial on making a video presentation in PowerPoint using the iSpring Suite add-in. The steps cover installing iSpring Suite, adding or recording video narration, syncing video with slides and animations, choosing slide layouts, customizing the player, and publishing the presentation. The guide emphasizes how iSpring Suite enhances PowerPoint to help you produce professional, synchronized video presentations easily.
What Is a Video Presentation?
A video presentation is a popular format of content, typically lasting several minutes, that shows the benefits of a product, service, or new idea with the help of relevant images, concise text, and appropriate audio narration.
People use video presentations in various aspects of business to keep their audiences engaged. As such, they can be used in employee training and onboarding, B2B communication, marketing campaigns, and sales presentations for new clients, as well as to present an enterprise at expos or conventions.
Why Create a Video Presentation?
Why should you press that presentation record button? Besides being more appealing and persuasive than a basic cut-and-dry content piece, video presentations also help the viewer retain more training knowledge. They’re also easy to use, readily accessible, and time-efficient. Let’s see why choosing this type of presentation is the best option.
1. Appealing and persuasive
Video presentations are more effective at persuading your target audience by way of audio-visual design, storytelling, and bringing ideas sounds and engendering emotions. Moreover, videos can offer voices (audio) and faces. Instead of reading plain text, people will hear you, become familiar with your tone, and read your body language. This brings people closer.
2. Better for information retention
Insivia reports that viewers retain 95% of a message when presented as video — compared to 10% when reading it in text. Thus, educators often use video presentations within the framework of the digital storytelling concept or when installing new educational material.
3. Accessible anytime, anywhere
Emarketer found that 75% of all videos are played on cell phones and tablets. This means you can offer your courses to learn on the go. Videos don’t require reading long texts attentively, so your learners won’t need to carve out time for learning. They will simply replace entertaining videos with your useful trainings, or at least listen to their audio.
4. Time-efficient
Video presentations are designed to convey information in smaller chunks that are easy to process. This allows viewers to explore larger amounts of information more quickly and easily. There’s no need to spend hours learning at home or at the office if people can watch short videos at their convenience. You’ll see that it will result in greater knowledge!
5 Essential Tools for Making Video Presentations
To create your own video presentation, consider the tools you’ll need to do this successfully. These apps range from simple presentation tools to video or audio recording software.
1. Video recording tool
If you create your presentation from scratch, you’ll probably need a video presentation maker and a presentation recorder that allows you to make professional-quality presentations. The ingredients are your photos, texts, pre-made templates, and stock footage.
2. Audio recording tool
How do you make a presentation with audio? The classic way to add your audio to a presentation is to record the audio narration and simply import it into your presentation. You can use free recording studio options with simple features, such as Audacity, or opt for paid tools with professional sound studio features like Adobe Audition. Another option is to use embedded audio recording features, such as using PowerPoint together with iSpring Suite.
3. Animation tool
Animation is a universal language without limits — it instantly grabs any audience’s attention. To create animations, you’ll need an animated presentation maker! You can start from scratch with drawing tools or use ready-made scenes and layouts offered by simple solutions like Powtoon. As for the interactive animations, such as flipping pages, stronger tools are needed.
4. Presentation creation tool
If you want to speed up the process of creating a presentation, you’ll need a presentation maker. Tried-and-true PowerPoint will work fine here. Later in this post, I’ll share a step-by-step tutorial for creating a video presentation right in PowerPoint.
5. Course authoring tool
Finally, if you feel you don’t want to create audio, video, and animation in separate tools, but PowerPoint is insufficient to handle your creativity, consider a course authoring tool like iSpring Suite. It has everything in one place, from video recording to adding closed captions, providing all the capabilities for a professional video training course.
Now, let’s move to the most popular and easy-to-start solution: PowerPoint.
How to Make a Video Presentation with PowerPoint
Here, you’ll learn how to make a great video presentation right in PowerPoint using the iSpring Suite add-in. This is an easy-to-use tool with robust recording functionality and lots of presentation templates. Follow these six steps to make a video presentation within minutes.
Step 1. Get iSpring Suite for free.
Step 2. Add a video narration.
Step 3. Synchronize it with the slides.
Step 4. Switch layouts in Slide Properties.
Step 5. Customize your player template.
Step 6. Publish your presentation.
Step 1. Get iSpring Suite for free
If you don’t have iSpring Suite, download the tool for free and install it on your computer. Next, open an existing PowerPoint file that contains a training course or lecture. Once installed, the iSpring Suite tab will automatically appear on the PowerPoint ribbon.
Step 2. Add a video narration
Go to the iSpring Suite tab and click on Manage Narration. This can function as a video presentation maker.
Once the iSpring Narration Editor window appears, you can either record a narration or import an existing video file.
How to import a video file
To import an existing file, click on the Video button in the Import tab.
Find the file and click on the Open button.
Pro tip: You can insert multiple videos simultaneously. To do that, press and hold the Ctrl key while selecting several files.
In the Import Video window, you have the option of importing your video at the current cursor position or at the beginning of the slide of your choice.
Note: If you choose to import your video at the beginning of a particular slide, you can select the Adjust slide duration option. This will adjust the selected slide to match the length of your video.
Too much to read? Get a summary from AI
How to record a video in PowerPoint
To film yourself on a webcam, you can use the video narration feature. Click on the Record Video button on the editor’s toolbar.
The Record Video Narration panel will appear.
You can add a video narration for one or several slides at a time. To start recording video for the current slide, select Process current slide only.
One more tip: if your video is already on YouTube, you can easily add it to your presentation. Read about embedding YouTube videos here.
Step 3. Synchronize it with the slides
Now it’s time to finish recording and synchronize your video with your slides and animation effects. The latter are displayed as yellow bars on the Slides timeline. The great thing is that you’ll be able to choose the exact moment when an animation will appear. This way, the effects will correspond perfectly to the narration in your video presentation.
Note: This is only applicable if you have animation effects attached to your slides.
The syncing process is quite simple to use. Just place the cursor where the syncing should begin and click on the Sync button on the toolbar.
A Sync panel will appear above the timeline. Click on the Start Sync button to start the process.
The Start Sync button will be replaced with the Next Slide or Next Animation button, depending on the next element in the sequence. Click on those buttons at the appropriate moment. Hit the Next Animation button at the point in the narration where you would like to start the next animation. For example, if you’re listing information, you can have each new item appear when the narrator mentions it in the video narration.
Once you have finished, click on Done to quit the Sync mode. Then, hit the Save & Close button in the upper-left corner.
Step 4. Switch layouts in Slide Properties
iSpring Suite allows you to publish materials using one of two players: the highly customizable Universal player or the Video Lecture player. The latter displays the presentation in a 50/50 layout and allows viewers to change the proportion between video and slides at any time.
The Universal player features three layouts:
- The Full layout displays the slide, sidebar, and navigation panel.
- The No Sidebar layout displays the slide and the navigation panel only.
- The Maximized Video layout displays the video in the center, the slide on the sidebar, the next slide, and the navigation panel.
Your presentation doesn’t need to use the same layout on every slide — make your next one different. You can highlight key points by changing the proportion between the on-screen information and the video for each slide.
To do that, click on Slide Properties on the toolbar.
In the Layout column, pick the desired layout for a particular slide from the drop-down list.
The layouts for the Video Lecture player can be changed at any time during playback. You can still preset them, and they’ll work as follows:
- The Full layout displays video and the presentation in equal proportions.
- The No Sidebar layout displays the whole slide with a miniaturized video.
- The Maximized Video layout displays the enlarged video alongside a smaller slide.
It is recommended that you set slides to advance automatically during the entire presentation. To do this, in Presentation Explorer, select all slides and click on the Auto button.
Step 5. Customize your player template
The built-in presentation player has flexible customization options for creating presentation templates: you can provide your viewers with the presenter’s info, a brand logo, an outline, an interactive play button, and more. First, let’s choose which player to use. Click on Player on the product ribbon, and then choose either the Universal or Video Lecture player, as shown in the image below.
For this guide on making a video presentation, I’ll use the Universal player. To customize it, click on Templates. There are several player templates to choose from. I’ll use the Online Lecture with Video template as an example.
You can also experiment with the settings, doing things like turning off the outline and notes by clicking on the Layout button on the ribbon. Here’s what the player will look like:
Additionally, you can customize a presentation to match your brand colors by choosing one of the built-in color schemes or creating your own.
When you have finished customizing the player, click on Apply & Close in the upper left corner. Well done! You’ve put the finishing touches on your presentation.
Step 6. Publish your presentation
When your presentation is ready, the last step is to publish it in a web format so it can be accessed easily via a browser.
In the Publish Presentation window, select the My Computer tab from the menu on the left. Enter the presentation title and select a local folder where you want the presentation to be saved. Under Output Options, choose a format. I’ll be publishing in HTML5 format to ensure the presentation plays seamlessly across all platforms and devices.
How to Turn Your PowerPoint Presentation into a Video
How do you make a video presentation out of a PowerPoint presentation? By default, you can convert your PowerPoint presentation into a video by saving it in that format. And if you need some individual slides with narrations, you’ll still be able to record narrations from that menu without going back to the original PowerPoint presentation.
Here’s how to download your slides as a video in PowerPoint:
- With the presentation open, head over to File on the PowerPoint toolbar and select Export to view the export options.
- In the Export menu, select Create a Video. You are now ready to save the presentation as a video.
- In the drop-down menu, you can choose how to export the presentation: with narration (if you’ve already recorded it) or without. If you want to record a narration at this point, click on Record Timings and Narration.
- Choose how long individual slides will appear. Manage the speed of the demonstration in the small drop-down menu.
- Click on the Create video tab to start downloading.
Tips and Best Practices for Making Video Presentations
To make your presentation even better, consider the following tips:
- Make your videos short and sweet. Keep your video clips long enough to capture the attention of your target audience but short enough to maintain their curiosity. Your goal is to sustain the viewer’s interest. Remember, the optimal length of a presentation is no longer than 4-7 minutes.
- Stay on point. Make your goals and objectives clear at the start of the presentation, and remain focused on the message. Select records that relate to the subject matter and don’t detract from the goal of your presentation.
- Add engaging elements. Enhance your video presentation with engaging and informative content. For example, add background music, colorful infographics, embed YouTube videos, or insert interactive quizzes to engage learners.
- End on a meaningful note. Leave your audience with something they can take away from the presentation. A new idea, a short story, a visual representation of your product, or even a link to your website all work to provide the strong ending needed to create a lasting impression.
To Sum Up
I hope this tutorial will help you turn static slides into engaging video presentations that captivate your audience. To start creating video presentations and other kinds of eLearning content, try iSpring Suite. Get a 14-day free trial and test-drive all of its advanced features.
Useful Resources
- How to Convert PowerPoint to MP4 Video on Windows and macOS
- What Is Lecture Capture? A Complete Guide to Modern Learning Tools
- How to play a PowerPoint presentation on iPad
- How to Loop a PowerPoint Presentation
FAQ on Creating Video Presentations
Here are answers to some popular questions about making a video presentation.
How do I make a presentation video?
As a fundamental solution, you can start recording with a separate presentation recorder or a simple screen recorder. However, even standard solutions like PowerPoint offer exporting audio-video versions of your presentations. With other authoring tools, such as iSpring Suite, you can also fine-tune your future video before exporting.
How can I make an effective video presentation?
First and foremost, consider your target audience when creating video presentations. What are their ages, genders, and occupations? What is their prior knowledge of a topic or their level of proficiency? After defining the audience, choose the presentation method accordingly. You should connect with your audience emotionally and ‘speak their language.’ In this way, you’ll communicate the right message to the viewers.
Second, it will be useful to prepare a script for your video. Of course, seeing the next slide and using closed captions will support you, and you can base your speech on its content. But if you write an intro, outro, some key points, and transition phrases between slides in advance, you’ll record with greater confidence and reduce rambling or unnecessary pauses. This will help you focus on the effectiveness of your message.
How can I record myself giving a presentation?
Make sure you’re physically and technically prepared. When delivering a presentation, prevent your mouth and throat from getting dry. This will make you sound better, and your recording will be clearer. When using a recording studio, it’s better to choose a smaller, quieter space to avoid echoes and check your microphone’s sound. When you’re ready, just click on the record button and go!
How can I make a presentation video with voice narration?
You can start recording audio with a separate recording studio and add this voiceover to your presentation later. However, it is easier and more efficient to record audio straight in PowerPoint or another authoring tool you are using.
What is the 10/20/30 rule in presentations?
It is recommended that you include a maximum of 10 slides and ensure that your presentation lasts less than 20 minutes from the time the play button is clicked. The “30” rule applies to the font size: it shouldn’t be smaller than 30 points. The key tips here are to make sure your presentation is easy to read, that each subsequent slide is connected to the previous one, so 10 slides would be sufficient, and that the recording is not too long.
Create online courses and assessments in record time.


How to Create a Video Tutorial People Actually Want to Watch
PowerPoint Add-ins and Plug-ins: 13 Essential Picks for 2026
How to Create Training Videos: A Complete Guide & 5 Examples (2026)
Instructional Video Made Easy: Types, Costs, Guides, and Tips