How to Voice Over a PowerPoint Training Presentation


You can narrate your presentation with PowerPoint native tools via Recording → Record Slide Show. Unless… you need to generate an automatic voice-over or edit recorded audio to remove noise or add silence.
If you’re looking for a quick and easy way to add quality voice-overs to your training materials right in PowerPoint, I’ll show you how.
In this post, I’ll walk you through the entire process of narrating a PowerPoint presentation. From adding a voice-over in one of three ways to editing and exporting your PowerPoint training material with a voice-over in a chosen format (including video, HTML5, and SCORM), you’ll nail the workflow for your current and future projects.
Key Takeaways
The article explains how to add narration to a PowerPoint presentation, focusing on using the iSpring Suite add-in for higher-quality voice-overs and easier editing. It guides readers through preparing a narration script and adding a voice-over by generating it automatically, recording it directly, or importing audio, then fine-tuning timing and audio quality. It also covers editing tools such as trimming and noise removal, adding captions, generating narration in multiple languages, and exporting the finished narrated presentation in formats such as video or SCORM for LMS use. The guide also includes tips and options for Mac users.
The Tool I Use for PowerPoint Voice-Over Tasks
I chose iSpring Suite (a PowerPoint-based authoring tool) over alternative solutions. And here’s why.
One of the major reasons is that with iSpring Suite, you don’t need to juggle several solutions (not always free and user-friendly) to reach the required recording quality and creation speed.
iSpring Suite lives right in your PowerPoint as an add-in and gives you access to:
- An audio recorder that synchronizes with slides, animations, and transitions.
- A text-to-speech feature that allows you to create auto-generated, naturally sounding voice-overs in 53 languages.
Note: PowerPoint has a Speak feature (also called text-to-speech and added via the Customize Ribbon tab). However, it only reads selected text aloud — it doesn’t record or save audio to the slide. - Generating captions from your voice-over or video in 13 different languages.
- An audio editor to make your recording just right without background noise, plosives (popping sounds), and awkward pauses.
Another reason to use iSpring Suite is that, beyond audio narration, it has a full set of features for turning a basic PowerPoint presentation into an interactive course that’s ready to publish to your LMS.
One more reason is that all the features are very intuitive. You don’t need to check the help center to understand what things mean or how they work.
To substantiate my evaluation, here is the feedback from iSpring Suite user Jonathan H., Director of Learning & Organizational Development on G2:
“I think the text-to-voice feature is a great way to quickly add richness to the existing content. We were able to take a previously designed PowerPoint file, then add in graphics, interactive elements, and voiceover in a very short time. The system is easy to use, and quick to learn.”
So, in case you’re looking for this kind of experience in narrating your PowerPoint presentations, download iSpring Suite and follow our guide. For anyone who needs to complete a one-off task, don’t worry because the tool offers a 14-day free trial.
Note: Dear Mac owners, iSpring Suite works on Windows only. Jump to the FAQ section to see the available options for Mac users.
How to Voice Over a PowerPoint Presentation
Here is the full workflow of adding a voice-over to your PowerPoint presentation.
Step 1. Prepare the script
If you plan to record your voice-over, you need to prepare a script: rewrite your training material into clear, spoken language that’s easy to follow.
Here are some recommendations:
- Dedicate each part of the text to the corresponding slide and consider slide timings. To move rhythmically through the slides, aim for about a minute of narration per slide. Use a tool like wordstotime.com to estimate how long your narration will take and match the text to the slide duration.
- Rewrite the text in spoken language, but spoken ≠ verbal filler (ex.: okay, um, so, like, we’re just gonna kinda dive in). Reading the text out loud will help you with the task. Choose simpler, more direct words that are easier to say and follow in one pass. Spot clunky transitions, long phrases that are hard to breathe through, and awkward consonant clusters.
- Add breathing room to the script. If it’s too dense, it’s harder to process. Insert occasional soft openers like “Alright, here’s how it works…” to give listeners a mental break.
- Don’t repeat what is on the slide.
- Record the entire script in one session, if possible. It keeps volume, tone, and background noise consistent, which makes editing easier and the final result cleaner.
Step 2. Add a voice-over (3 ways)
Alright, let’s dive into the main task.
There are three ways to add a voice-over to your presentation:
- Generate it automatically using computer-generated voices.
- Physically record the audio.
- Import a pre-recorded audio file.
Feel free to jump to the method you need.
Too much to read? Get a summary from AI
How to generate a voice-over for PowerPoint automatically
To save time on audio recording, get a voice-over in another language, or handle narration without a speaker, use iSpring Suite’s built-in text-to-speech tool. It enables you to turn texts into natural-sounding voice-overs with clear pronunciation and dulcet tones within minutes. Here’s how it works:
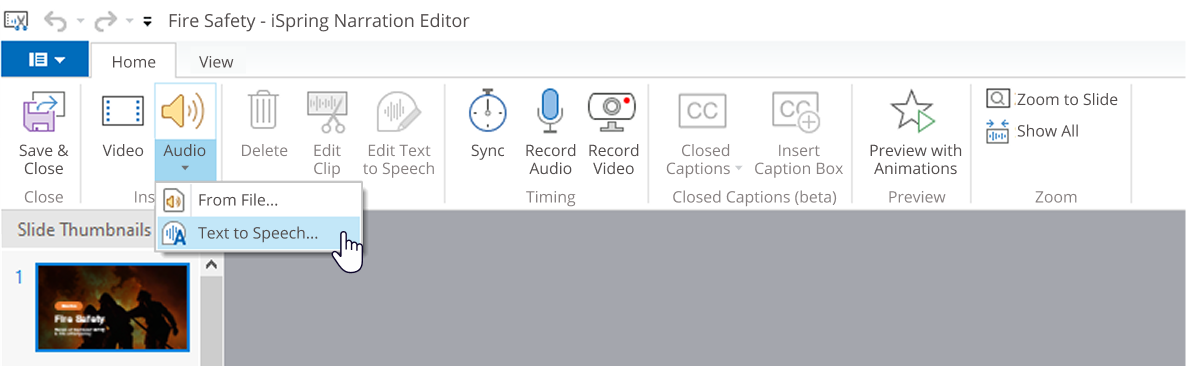
- Head over to Manage Narration on the iSpring Suite toolbar.

- Press the Audio button down arrow and choose Text to Speech.

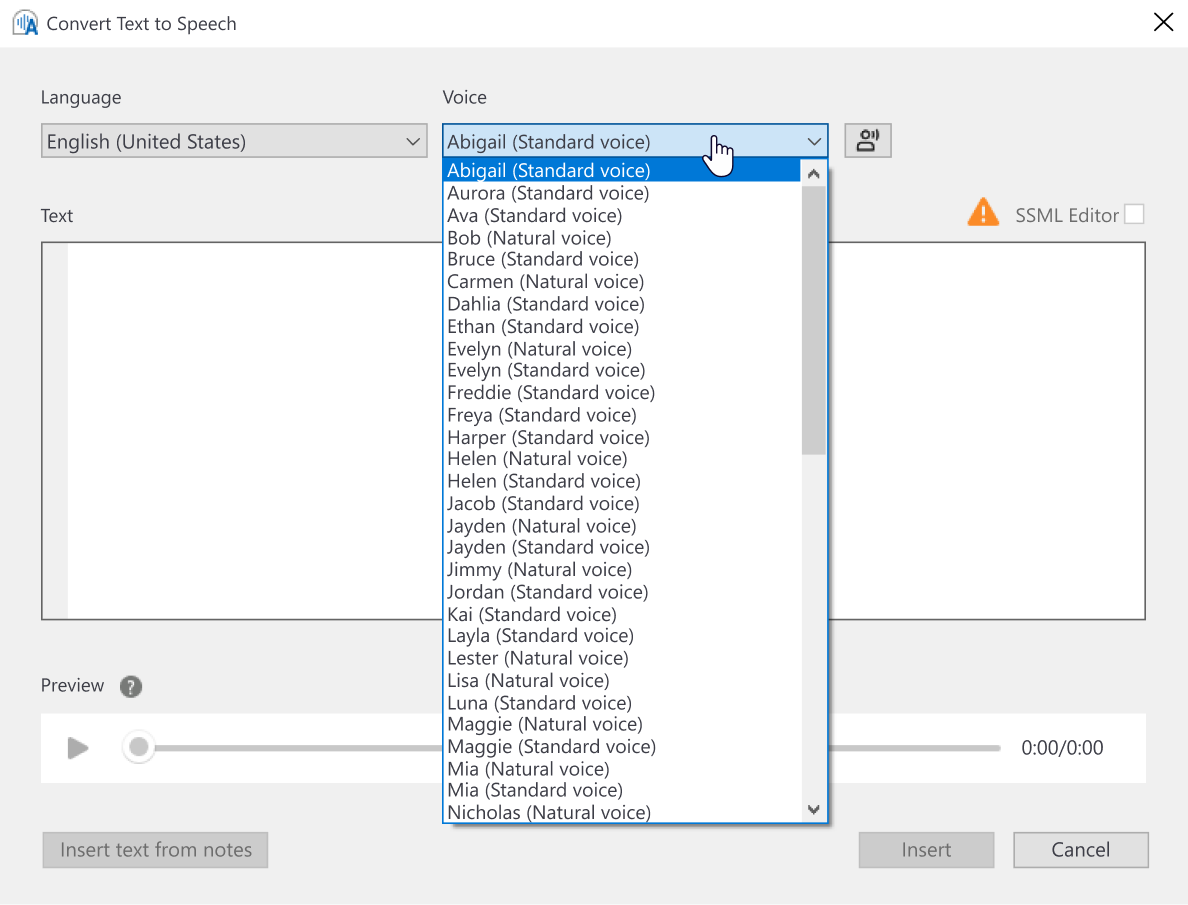
- Select the language and voice.

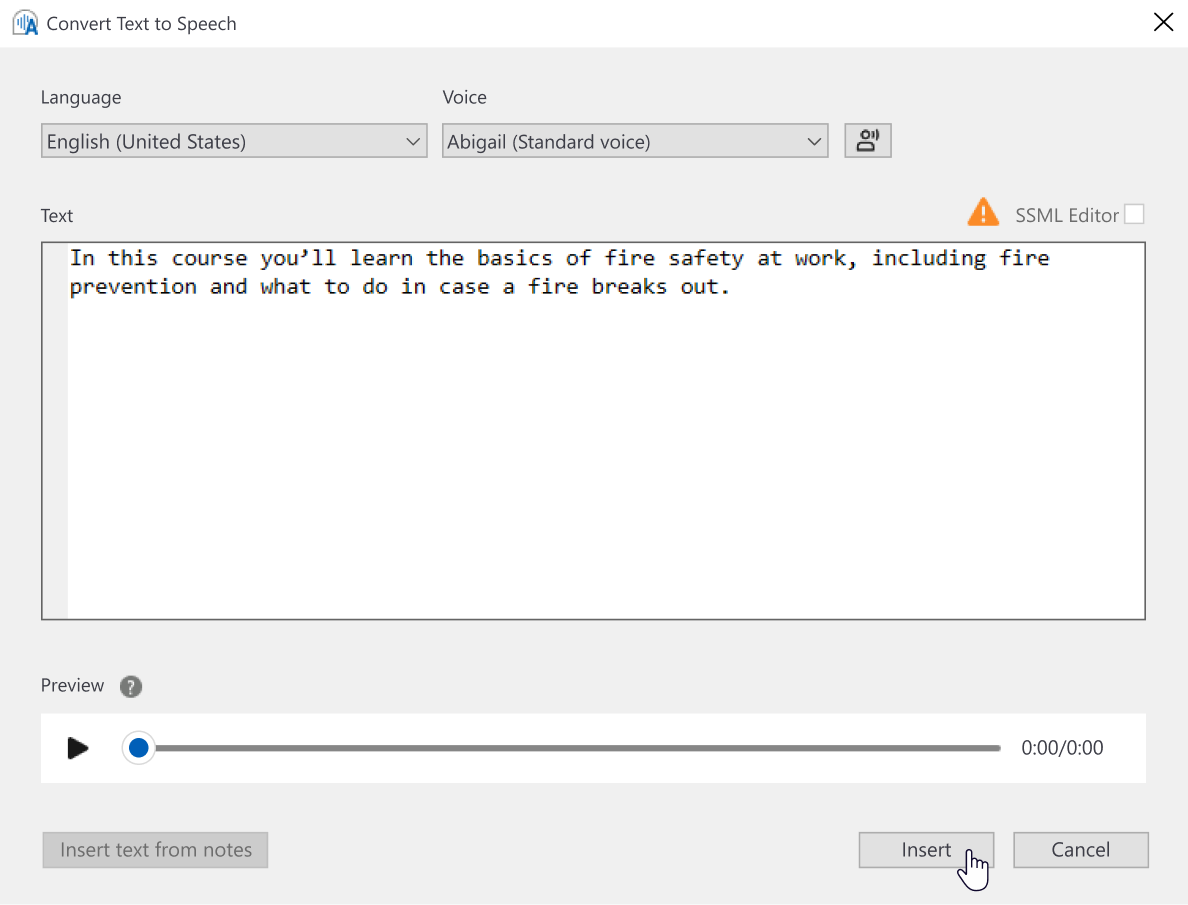
- Add text to the empty text field and hit the Insert button.
- Choose when to start playing the narration. You can set it to play automatically as soon as the slide loads or delay the playback for a specific amount of time.


Great! Your voice-over is ready to go. Optionally, you can also add speaker notes to go along with your presentation.

How to record a voice-over in PowerPoint
Here’s the traditional way to create a voice-over in a PowerPoint presentation, powered by iSpring Suite features to simplify the workflow and boost the final quality.
- Open your PPT presentation and head over to the iSpring Suite tab.
- Click on Record Audio.
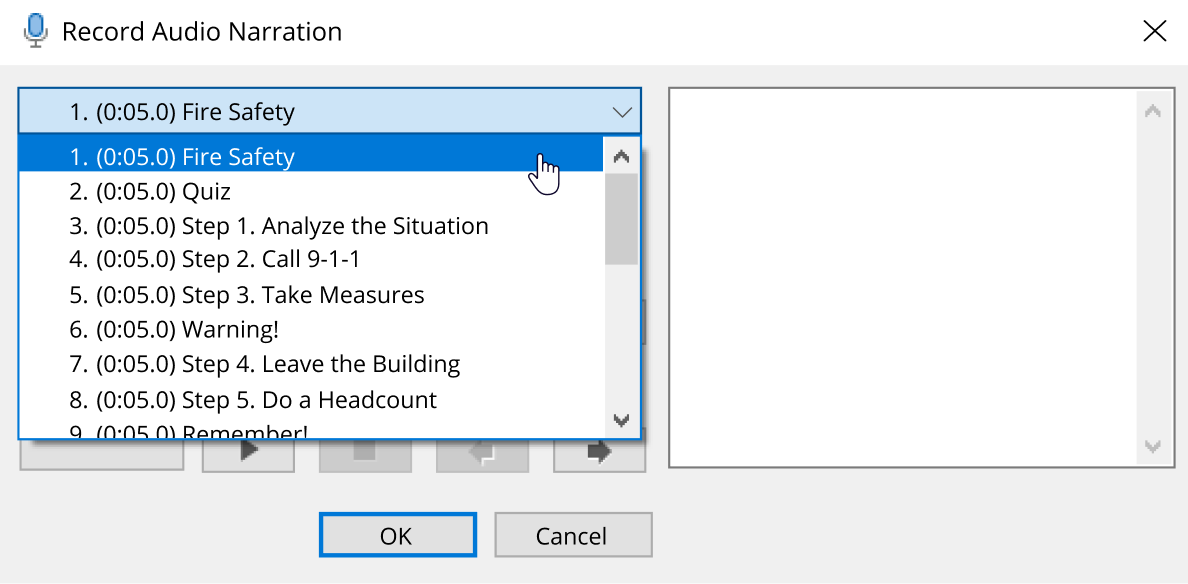
- In the recording window, select the slide you want to start your narration from.
 It’s also possible to record your voice for a single slide. To do this, check the Process this slide only box.The Narration Recorder in iSpring Suite includes built-in slide notes on the right, where you can paste your script.By clicking Options, you can configure the desired audio parameters. For example, adjust the volume and set noise removal.
- When you’re ready, click on Start Recording. To sync your narration with animations and transitions, use the Next Slide, Next Animation, or Skip Transition buttons. They’ll appear in place of Start Record after you begin recording whenever an effect appears.
You can pause playback at any time and then continue the recording process again. - Once you’ve recorded your narration, click on OK to save it.
- Put the timeline marker on the timeline to the recorded voice-over and click on Play to preview the individual audio.


 It’s also possible to record your voice for a single slide. To do this, check the Process this slide only box.The Narration Recorder in iSpring Suite includes built-in slide notes on the right, where you can paste your script.By clicking Options, you can configure the desired audio parameters. For example, adjust the volume and set noise removal.
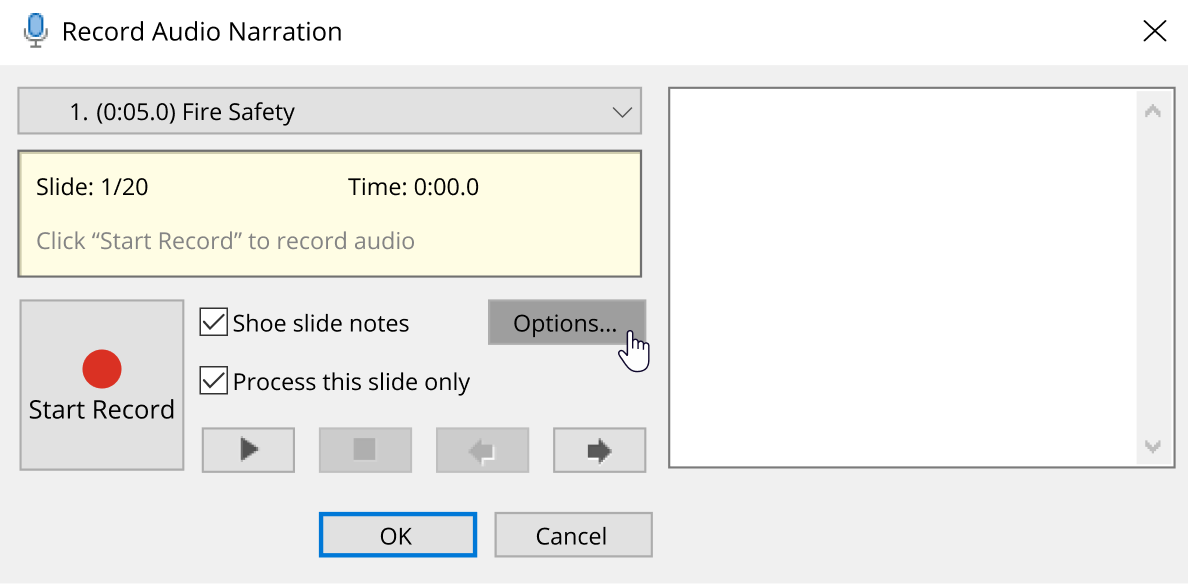
How to add a voice recording to PowerPoint
Compared to PowerPoint’s native capabilities, adding a previously recorded narration via iSpring Suite allows you to adjust the slide and animation timings with your narration.
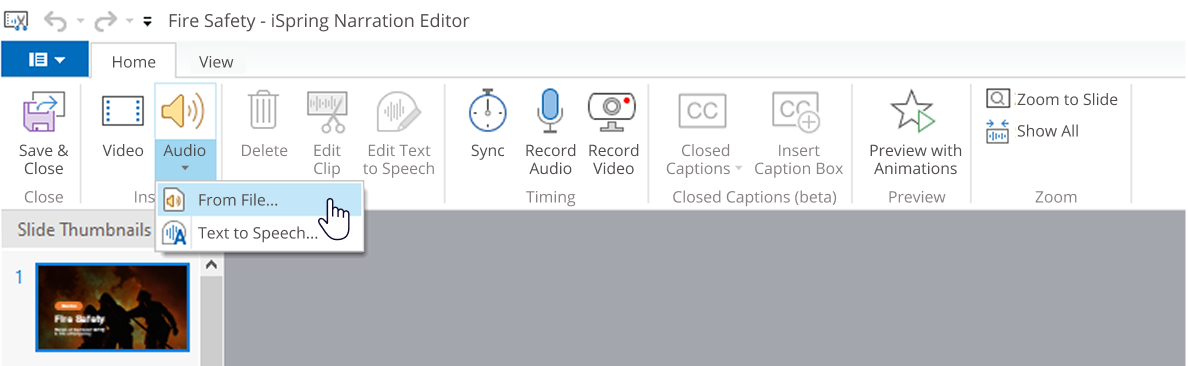
- To add a voice-over file via iSpring Suite, go to Manage Narration on the iSpring Suite tab.
- The Narration Editor shows a second-by-second timeline of slides and audio, where you can adjust the recorded slide show timing. To begin the audio at a specific moment, place your cursor at that point in the timeline.

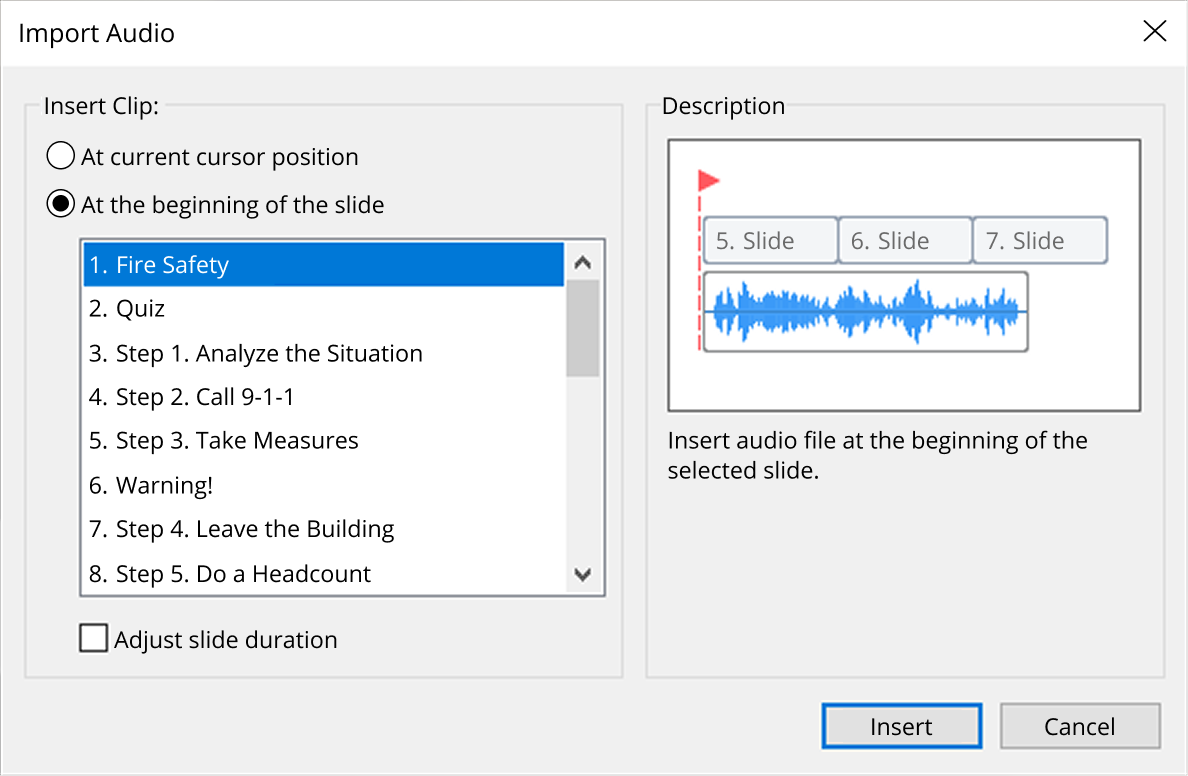
Then click on Audio on the Narration Editor ribbon and browse the file you want to add. iSpring Suite supports the following audio options: WAV, MP3, WMA. - Once you choose the file, you’ll see the Import Audio window. Choose where to insert the audio: at the current cursor position or the start of the currently selected slide. To match each slide’s duration to the narration automatically, check the Adjust slide duration box.If you add multiple files, they’ll be imported in alphabetical order. All audio files are automatically saved in the presentation’s resource folder, so they won’t be lost even if you move the presentation to another folder or computer.


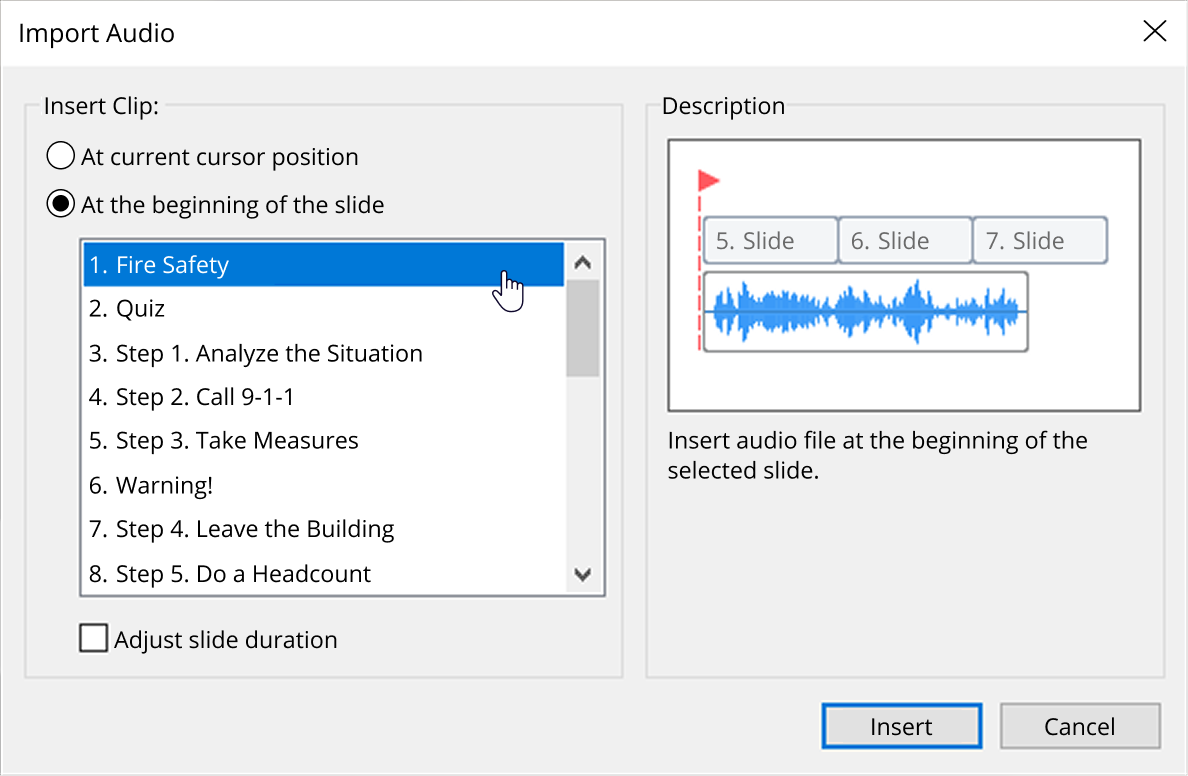 If you add multiple files, they’ll be imported in alphabetical order. All audio files are automatically saved in the presentation’s resource folder, so they won’t be lost even if you move the presentation to another folder or computer.
Step 3. Adjust the PowerPoint presentation’s voice-over
To fine-tune your PowerPoint’s voice-over, go to Manage Narration on the iSpring Suite tab.

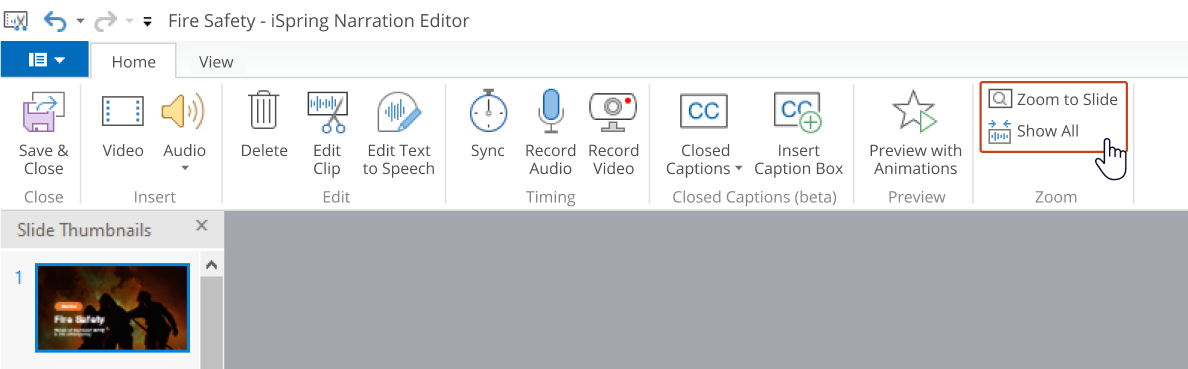
- The main part of the Narration Editor is the timeline that shows the sequence of inserted clips and slides. To see your entire timeline without scrolling, you can adjust its scale. Use the Zoom to Slide and Show All buttons on the editor’s ribbon to zoom in on a single slide quickly or view all slides at once.

- Use the arrows to jump between the previous and next slides while reviewing timing.
- To change recorded slide timings, drag its border on the timeline. The positions and durations of other slides stay the same.
- To delete one of the inserted clips, select it on the timeline and press the Delete key on your keyboard or the Delete button on the ribbon.
Edit a presentation voice-over
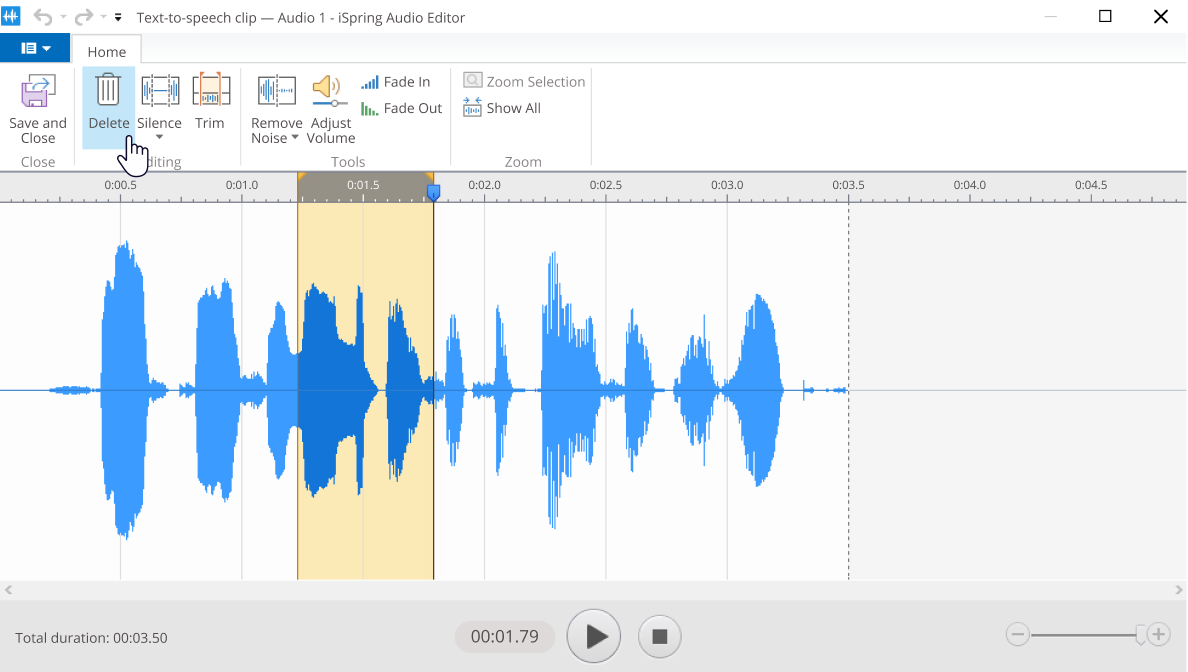
iSpring Suite’s built-in Audio Editor lets you:
- Add silence
- Trim clips
- Remove noise
- Apply fade effects
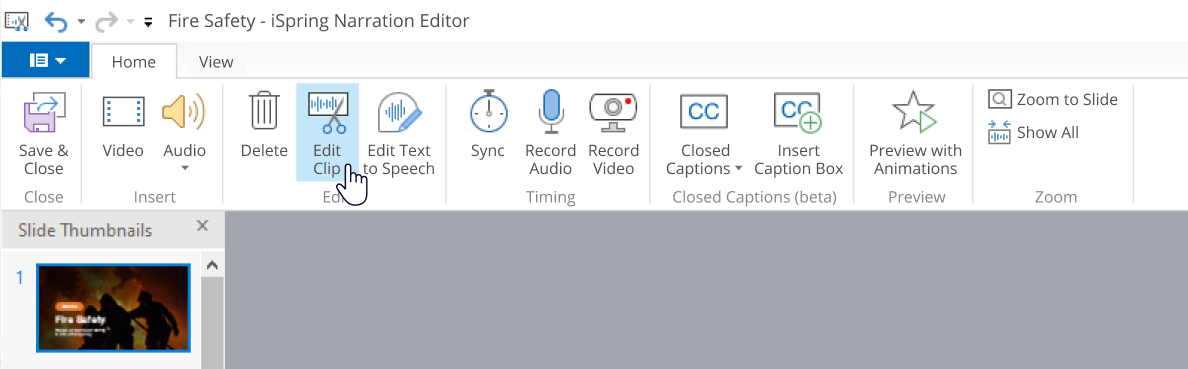
To access the Audio Editor, select a clip on the timeline and click on the Edit Clip button on the toolbar.
Here’s how you can improve your audio with the tool.
Delete fragments
Click and drag to select the fragment you need to remove on the timeline; then click on Delete on the toolbar.
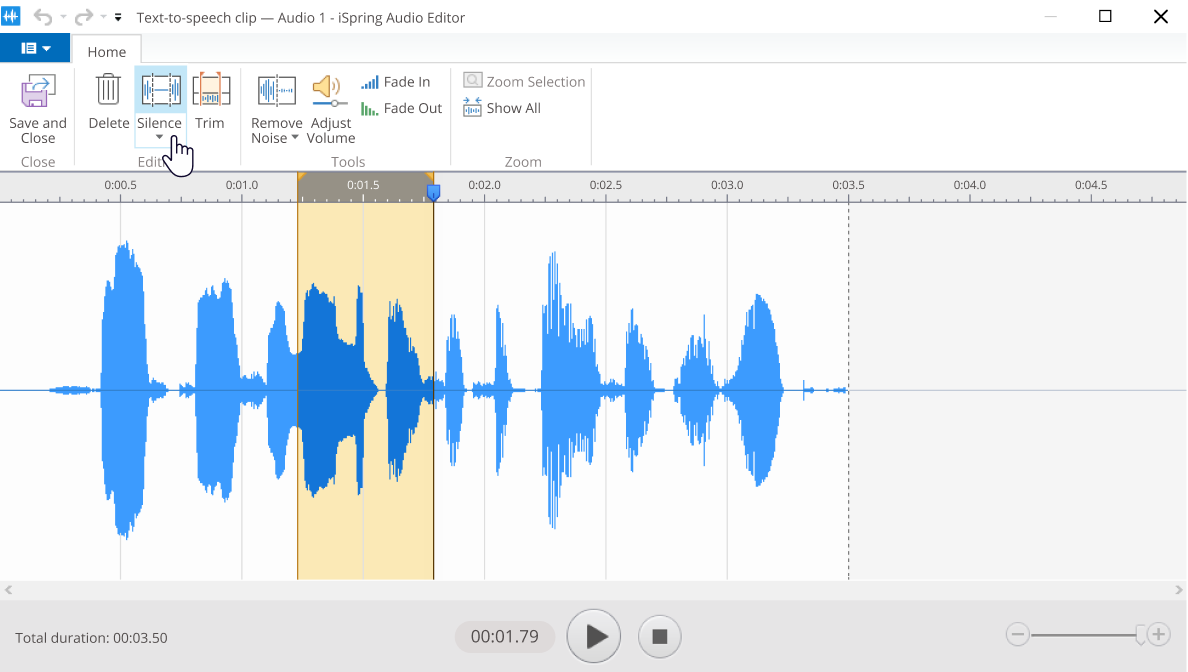
Add silence
To insert some seconds of silence at any point of your voice-over, place the cursor at the beginning of the portion you wish to mute. Then click on the Silence button on the ribbon. Specify the duration of silence and click on OK.
Trim clips
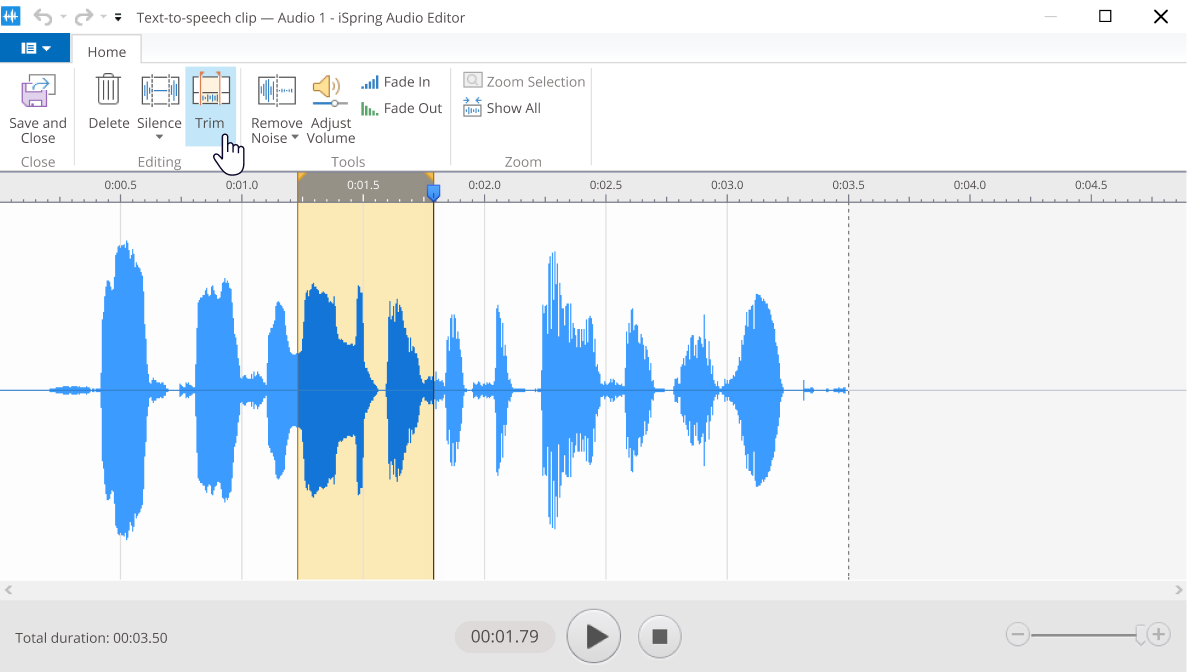
If the start or end of the recorded slide segment concludes with unnecessary audio, you can trim it off.
To do this, select the part of your audio that you want to keep, and then click on the Trim button on the toolbar. Sections of your audio clip outside the selected area will be removed.
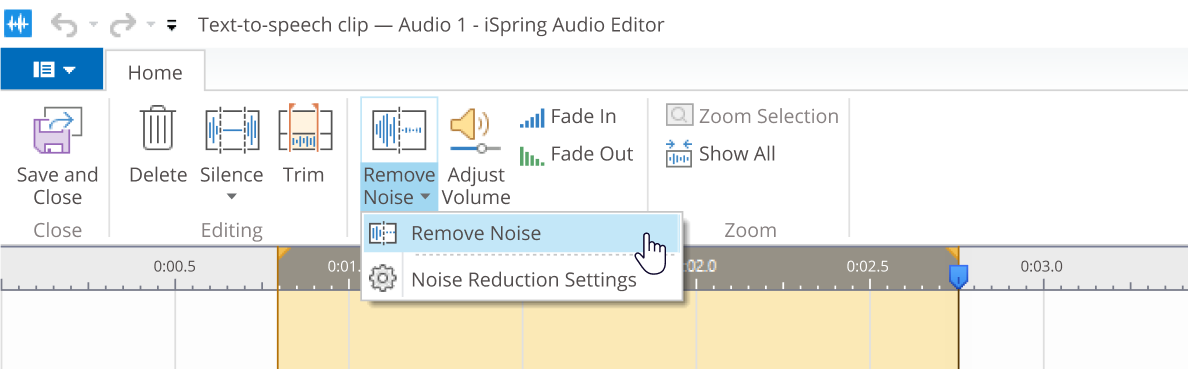
Remove noise
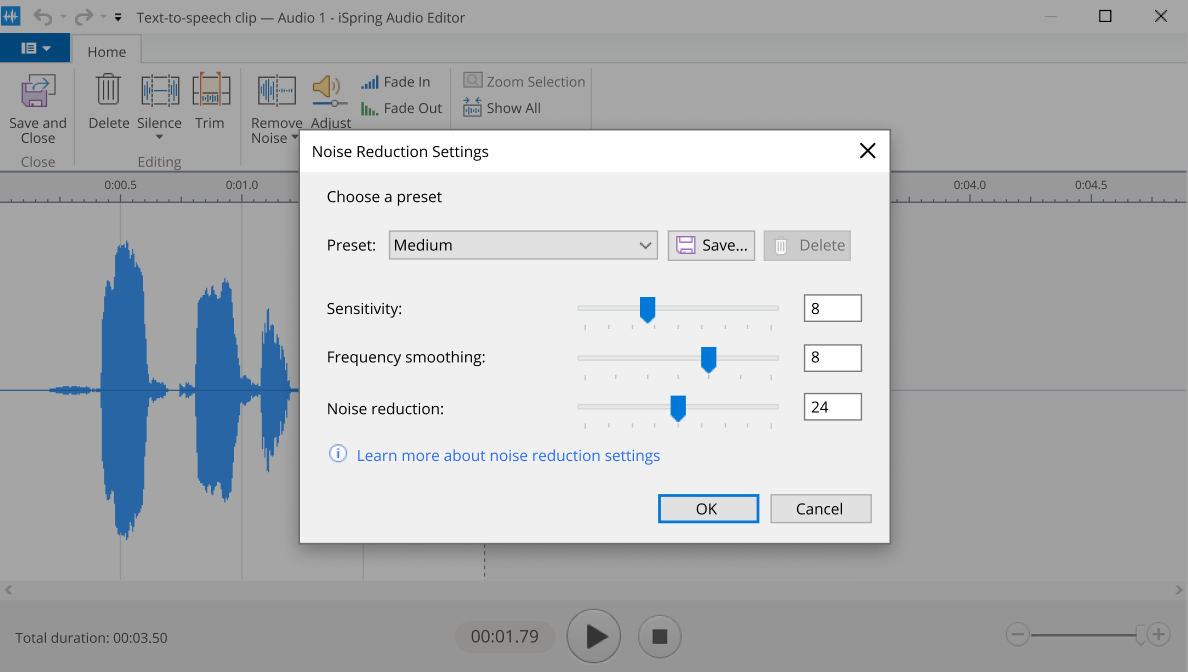
If you notice there’s some background noise in your audio, select the noisy part on the timeline, click on Remove Noise on the toolbar, and then choose Remove Noise again.
In Noise Reduction Settings, you can set sensitivity, frequency smoothing, and noise reduction levels for all future voice-overs.
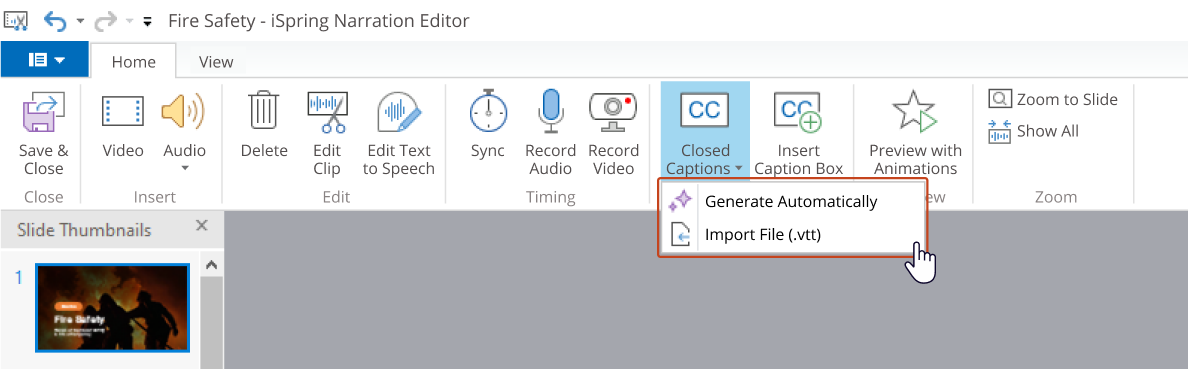
Generate or add a closed caption file
Closed captions help meet accessibility standards and improve understanding. They let learners absorb content through both sound and sight, which makes the content easier to absorb. Plus, they can pause and re-read the material they didn’t understand the first time.
In iSpring Suite’s Narration Editor, you can create closed captions automatically or import your own.
Create voice-overs for multiple language versions
With the text-to-speech feature, you can generate voice-overs in different languages within minutes. To do this:
- Duplicate your original presentation (without a voice-over).
- In Step 2, choose the first method (generating narration automatically) to add a voice-over.
- Select a different language.
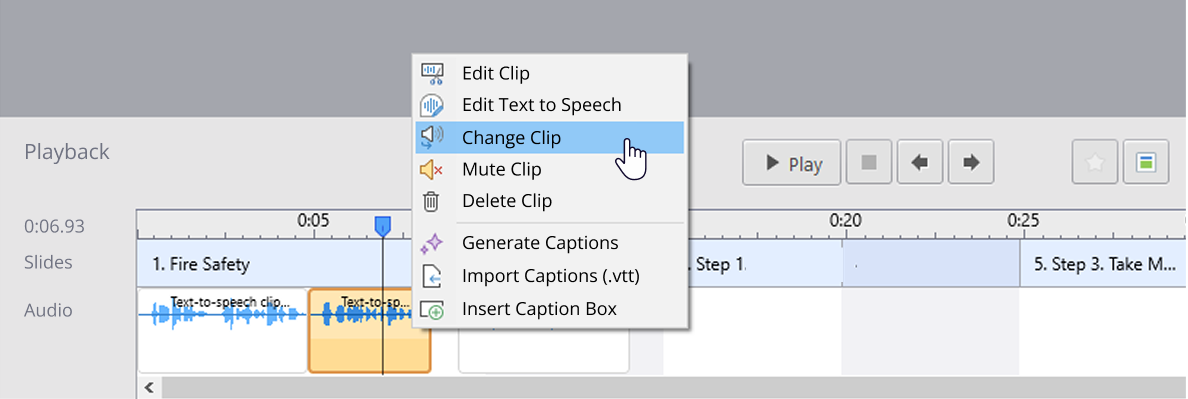
Replace the audio for an individual slide
To replace a clip for a specific slide with another audio without deleting all the timings, right-click on the clip on the timeline and choose the Change Clip option from the drop-down list.
To re-record audio for a slide, delete the clip and repeat the recording narration workflow from Step 2 just for this one slide.
Step 4. Export a PowerPoint training presentation with a voice-over
To export your finished training material, click on Publish on the iSpring Suite toolbar.

Then, select where and in what format you want to publish your presentation:
- Video – if you’d like to upload your slide deck to YouTube
- SCORM or xAPI – if you want to upload your presentation to an LMS
- HTML5 – if you need to upload your slideshow to a website
Finally, click on Publish.
Congrats! Your presentation with a voice-over is ready.
How to Quickly Turn PPT Presentations into Training Materials
Consider iSpring Suite if you need to turn PowerPoint presentations into professional training materials regularly with:
- Audio or video narration
- Quizzes
- Interaction templates
- Templates, characters, backgrounds, and images
- Role-play simulations
By having all the necessary tools to make your presentation engaging and effective right in PowerPoint, you’ll save hours of work. For example, one of iSpring Suite’s customers, Safety Bee Training, reduced course-building time by 3x (while receiving positive feedback from learners).
Book a live 30-minute demo with our eLearning experts to see if iSpring Suite is a good investment for your use case.
FAQ on How to Voice Over a PowerPoint Course
Here are answers to common questions trainers have when exploring how to record a voice-over on PowerPoint.
How can you listen to a voice-over in PowerPoint?
Once your narration is ready, you can go back to the slides and listen to it. Here’s how to play audio:
- Select the slide with the voice-over.
- Find the audio icon on the slide.
- Hover over this icon and click on Play.
How can you add a voice-over to PowerPoint on a Mac?
You can:
- Use PowerPoint’s built-in Record Slide Show tool for quick slide-by-slide narration. You’ll find the Record Slide Show button on either the Recording tab or the Slide Show tab.
- Record the audio in an audio editor (e.g., GarageBand or Audacity) and insert it to play across all slides.
You’ll have a sound icon on each slide with a voice-over, which you can click to edit the audio.
When a voice-over is in place, go to the File tab → Export to save your presentation as a video with narration.
- Employ screencasting software (e.g., ScreenFlow or Camtasia) to record and edit your screen with presentation + narration with timeline control and caption generation.
Choose based on how much editing and polish you need.
How can you record video narration for a PowerPoint course?
- Open PowerPoint and go to the iSpring Suite tab.
- Click on Record Video.
- Use the slide notes as your script (optional).
- Check Process this slide only if you want to record per slide.
- Click on Start Recording and sync narration with the recorded animation.
- Click on Stop, then OK when you’re done.
To import a video file, click on the Video button on the Narration Editor ribbon. iSpring Suite supports the following video formats: .avi, .wmv, .mpg, .mp4, and .mkv.
Create online courses and assessments in record time.


How To Add Screen Recording in PowerPoint: The Ultimate Guide
How To Record a PowerPoint Presentation With Audio
15 PowerPoint Tips to Make Your Slides More Effective