How To Add Screen Recording in PowerPoint: The Ultimate Guide
")


Looking for a smooth way to add PowerPoint screen recording to your new presentation?
If you’ve explored recording options, you might have seen that dedicated screen recording software can complicate production. They push ads, aren’t easy to use, or have limited recording time.
Read on about two user-friendly ways on how to record PowerPoint presentation with voice. The first is ideal for basic, quick screen recording for your company’s internal sharing. The second is better suited for higher-quality videos that you can incorporate into your course or feature on your website.
By the way, if you already have some of the relevant recordings on your YouTube channel, learn how to embed PPT screen recording from YouTube into your presentation.
Key Takeaways
The article explains how to record your screen in Microsoft PowerPoint using its built-in screen recording feature or iSpring Suite. It describes the steps for capturing your screen and audio in PowerPoint, editing the recordings, saving them as MP4 files, and adding prerecorded audio. It also details how to use iSpring Suite for more advanced recording options, such as simultaneous webcam capture, built-in editing tools, and exporting to various formats. The guide notes that PowerPoint’s built-in recorder isn’t available on Mac and offers best practices for creating effective screen recordings. The conclusion suggests using iSpring Suite for higher-quality, more professional results.
What Is Screen Recording In PowerPoint?
Screen recording function in PowerPoint involves capturing your screen to demonstrate processes or software usage on your PowerPoint slide. Screen recording visually presents complex information in a digestible way, enhancing your PowerPoint presentations.
How To Screen Record In PowerPoint With Audio/Voice
PowerPoint has a built-in screen recorder many users don’t know about. Here we will provide you with detailed instructions on how to use the presentation option.
Note that in this guide we are using the recently updated Microsoft Office 16 and Windows OS. Check the FAQ section if you are using Mac.
Step 1. Open your PowerPoint presentation.
Step 2. Proceed to the Insert tab and click Media. You will see the Screen Recording option.

Step 3. Select the screen area you want to record.
Step 4. On the pop-up screen recording dock, click Record Pointer and Audio options to turn them off if you don’t need to record audio and the mouse pointer for your PowerPoint screen recording.

Step 5. Pin the recording panel so it won’t disappear when you start recording.
When recording the entire screen, you will leave the panel unpinned. Access it by pointing the mouse cursor at the top of the screen your PowerPoint record screen.
Step 6. Click the red circle to start recording. It will begin recording will start in 3 seconds.
Step 7. When you need to pause and check other apps, click the Pause button.
Once you are ready to resume recording, click the Record button.

Step 8. Hit Play to watch what you’ve recorded.
Step 9. To edit your screen recording in PowerPoint, select the video.
To change how the screen recording looks in your presentation, open the tab Format.
To trim the video, change the volume, add captions, etc., open the Playback tab.

How to stop screen recording on Microsoft PowerPoint
To stop recording in PowerPoint, click the blue square on the left of the recording panel.
Another option to stop PowerPoint screen recording is to press the Windows logo key + Shift + Q at the same time on your keyboard.
Too much to read? Get a summary from AI
How to embed audio into PowerPoint screen recording
In case you have prerecorded audio, music, or any other sound you want during your screen recording, you can incorporate them as follows.
- Head to the Insert tab, click Audio, and upload the file from your PC.

2. Ensure the audio play along with the PPT screen recording.
a) Select your audio and go to the Playback tab and uncheck the Play across slides and Loop until Stopped boxes.

Next, choose the Start Automatically recording options button from the dropdown menu.
b) Choose the screen video and configure it using the same method you applied for the system audio.
3. If you want to add audio in the background of your screen recording in PowerPoint, here is how to do it:
a) Click on the audio on the slide.
b) Go to Playback and select Play in the Background.
c) Set up the audio volume, what slides it will play on, and more.

To learn more about adding and synchronizing audio with your screen recording on PowerPoint, watch our 1-hour detailed guide.
How to save a screen recording in PowerPoint
When you are finished recording and editing your screen video and audio, this is
how you can save your recorded video as a separate file:
Select the clip and go to the Playback tab. After that, select Save Media as button.
Your recording will be saved in MP4 format.
How To Screen Record On PowerPoint With iSpring Suite
If you are looking for a program with more comprehensive recording and editing options in a user-friendly form, you can opt for the PowerPoint-based course creator software, iSpring Suite.
iSpring Suite is one of the top PowerPoint add-ins for producing online courses, video lectures, and other instructional materials. It means that the tool seamlessly integrates into PowerPoint as an extra tab.
With the video editing tool, you can record your screen in PowerPoint and webcam simultaneously, remove background noise from your audio, change the speed of your videos, and even save time on audio recording by using a text-to-speech feature.

Below you can see how to make a polished screen recording in PowerPoint with iSpring Suite.
Step 1. Download a free 14-day iSpring Suite trial (no credit card required) and install it in your PowerPoint.
Step 2. Head to the iSpring Suite 11 tab in your PowerPoint presentation and click Screen Recording. Wait for the screen recorder for PowerPoint to open.

Step 3. Select New recording when the window for screen recording is opened.
Step 4. Use cross haired cursor to select the area you want to capture in the screen recorder dock. Choose Full Screen or the Application to record only in one app.

Step 5. Select what you are planning to recordーjust your screen or screen+camera to record yourself too.
Step 6. Head to the recording settings to configure your screen recording for PowerPoint if needed: choose and adjust the camera and microphone and customize the hotkeys.
If you don’t plan to capture sound input during screen recording, click on the microphone button to mute.
Tip: you can record the video first and then record more polished audio separatelyーcomfortably reading from the script (check Step 10 of the section).
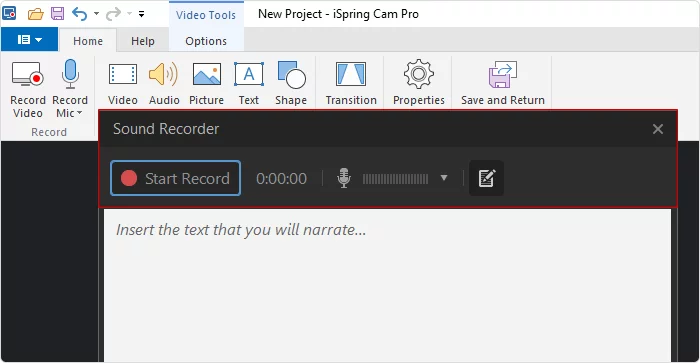
Step 7. Start recording by clicking the red circle. The tool will begin recording in 3 seconds.
Note: cursor movement is captured by default. You will be able to remove and customize it when you complete recording the video in the Home tab and Properties section.

Step 8. Click Pause when you need a break or Stop when you’ve finished the recording. You can also stop screen recording for PPT by pressing Fn+F10 on your keyboard.
Step 9. When you want to end your recording, click Stop you are directed to the iSpring screen recording feature and offered an option to customize your annotations.
If you need annotations to your screenshot of mouse clicks and captured keystrokes, click Add annotations to the screen recording in the pop-up dialog box.

In case you don’t need annotations, click the Continue button leaving the Add annotations checkbox empty.
Step 10. Edit your screen record in a presentation mode. With iSpring Suite, you can not only record your screen, but trim audio and video frame and adjust where they are in the timeline. To do the latter click and drag the recording.
Right-click recording to choose the speed of specific video or audio.

Step 11. You can record a new audio if you aren’t happy with the present one. This allows you to read from a script and record voice narration with a more refined speech.

Besides, you can overwrite the audio and add in a pre-recorded file. Click the present audio and head to the Options tab that appears on the top of the screen.

Step 12. Save the video when you finish editing. Select Save and Return to course.
You can go back to the editing tool at any time by selecting the video and clicking Screen Recording.
Use Publish option to save the video as a separate video file, upload on YouTube, iSpring LMS, or iSpring Cloud (a portal for storing courses).

FAQ About Screen Record In PowerPoint
If you’ve got questions after learning two simple Microsoft PowerPoint screen recording methods, check out these FAQs.
How to screen record in PPT for Mac?
The built-in screen recording feature isn’t available in PowerPoint for Mac. The most convenient option, in this case, is dedicated software to screen record in PowerPoint. Once you are on the page with the list of dedicated program, Press Command + F on your keyboard and search “Mac” to locate what tools are compatible with the OS on your computer.
What are some best practices for effective PPT screen recording?
- Remove your private data from the screen.
- Make your presentations easier to understand by adding mouse highlighters and annotations.
- Hide your mouse when you aren’t using it to avoid unnecessary distractions.
- Enable background music, if you aren’t commenting on your screen process.
Conclusion
While Screen recording with PowerPoint built-in functionality is a universal method, iSpring Suite allows you to create a polished educational experience. Do you care about audio and video quality and making your recording more engaging and feel professional? Then go with the latter.
We also recommend trying iSpring Suite which helps to screen record for a PowerPoint presentation regularly.
Create online courses and assessments in record time.


PowerPoint Add-ins and Plug-ins: 13 Essential Picks for 2026
The Best Interactive Presentation Software and Tools for 2026
The 9 Best Screen Recorders for PC: Free & Paid
The 21 Best Video Tutorial Software Programs: Free & Paid