How to Loop a PowerPoint Presentation


In standard PowerPoint mode, the presentation stops once it reaches the final slide. This can be a problem, especially when you’re displaying your product features at a trade show or demonstrating your company’s services to people who pop in for a quick look.
Setting up a looping presentation is ideal in these cases. It lets your slideshows play repeatedly for the duration that you need them to.
Show tab on the top of your screen
I’ll also share some easy tips to keep your slideshow running smoothly and explain how to make your presentation more suitable for training.
Key Takeaways
The article explains how to make a PowerPoint presentation loop so it plays continuously without stopping when it reaches the last slide. It defines a looping slideshow and then gives step-by-step instructions for setting up a loop in PowerPoint on Windows and macOS, including adjusting slide timings and saving the file as a .ppsx show. It notes that PowerPoint Online doesn’t fully support looping with timings. The post also offers tips for smooth playback, answers common FAQs about looping, and suggests using iSpring Suite to enhance content creation.
What Is a Looping Slideshow?
A looping slideshow is a presentation that continues to play repeatedly until you press Esc. When it gets to the last slide, it automatically starts replaying from the beginning. All you need for it to work is to set the timing for your slides and save the presentation in the right format. Unlike the standard PowerPoint mode, looping presentations don’t require any input from you and can run unattended.
A looping slideshow is great when you need to accommodate a large audience of viewers who come and go. For example, if you’re setting up a trade show, conference, or an in-store display, a looping presentation is an extremely useful feature that will ensure your content is always visible without any help on your part.
You can loop your PowerPoint presentation in any version of PowerPoint, whether you’re using Windows, Mac, or even the Online version — with some slight limitations that I will explain in this article.
How to Loop a PowerPoint Presentation in Windows and macOS
Creating a looping presentation can look a bit different depending on your operating system and whether you’re using the desktop app or the browser version. Either way, it only requires a few simple steps.
Choose from the two methods:
How to Loop a PowerPoint Presentation on Windows
To create a looping presentation on the Windows version of PowerPoint, follow these instructions:
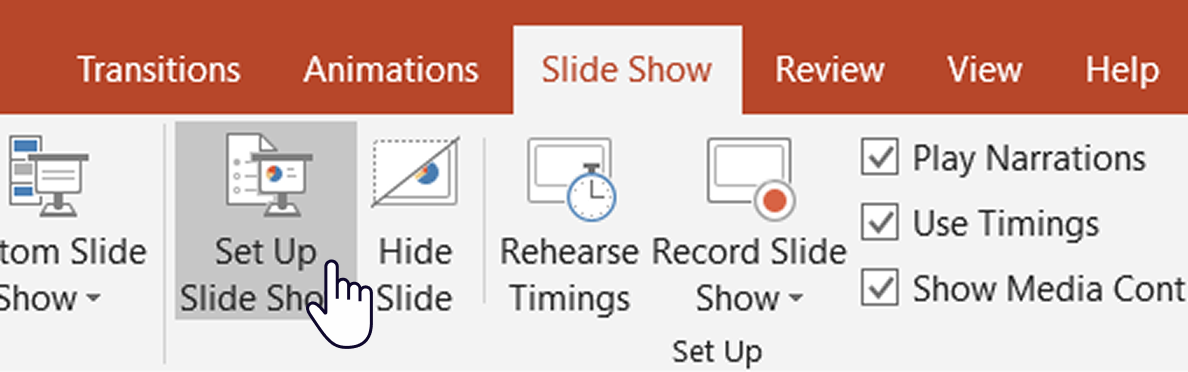
- Choose the Slide Show tab at the top of your screen and click on Set Up Slide Show.
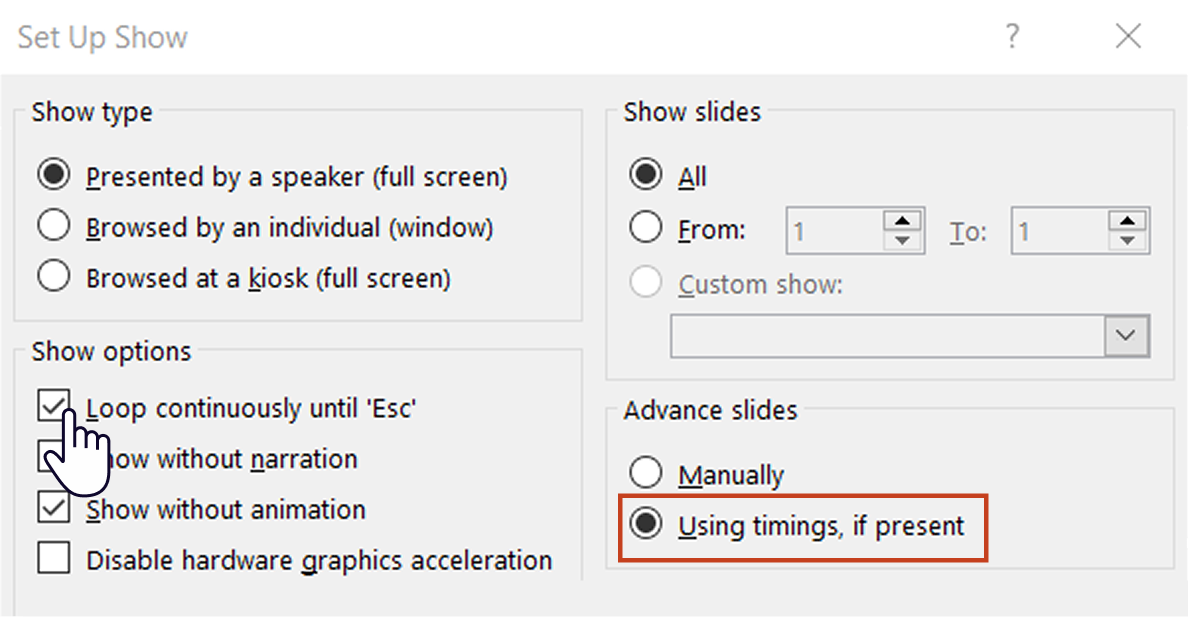
- In the pop-up window, click on Loop continuously until Esc. Make sure the box that says Using timings, if present, is checked as well.
- Next, set up the timing in the Transitions tab.
- Uncheck the On Mouse Click box, choose After, and use the up and down arrows to adjust how long each slide should stay on screen.
- Press Apply to All to use the same timing for all slides, or switch to Slide Sorter View to set custom durations for selected slides if you prefer.
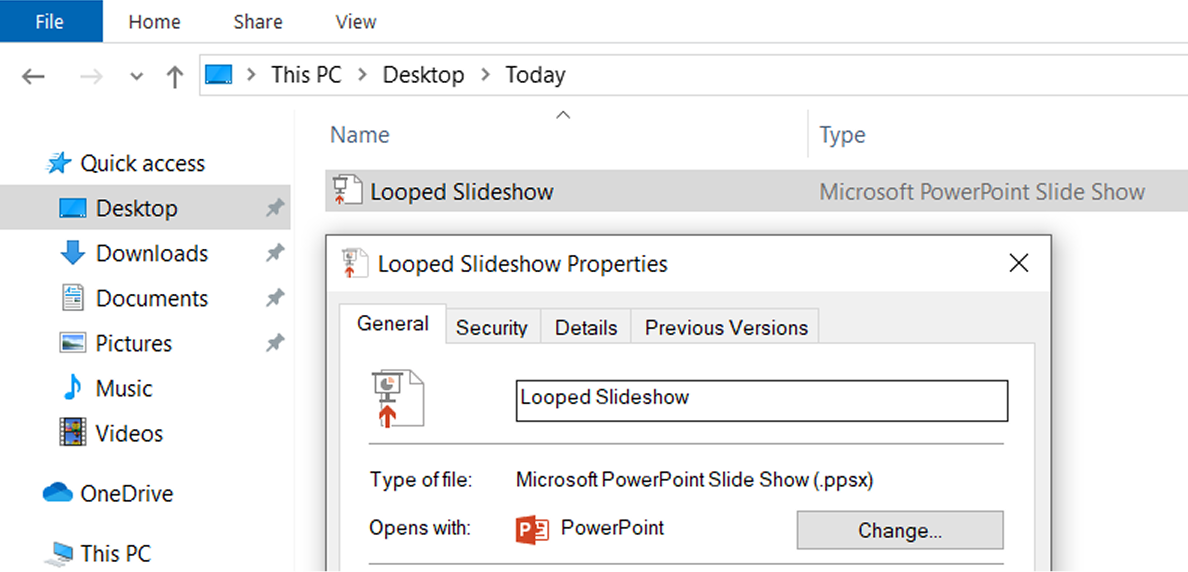
- Save your presentation. If you want it to launch full screen automatically, choose the PowerPoint Show format. Go to File, click on Save As, and select the .ppsx format.
Now, every time you open your file, you’ll get a full-screen presentation in which each slide changes with the same intervals and automatically loops after the last slide is shown.
Also read: How to Create a Video Presentation
Too much to read? Get a summary from AI
How to Loop a PowerPoint Presentation on macOS
Although there may be some minor differences in the interface, learning how to loop PowerPoint on Mac requires the same steps:
- Go to Slide Show → Set Up Show, and check the Loop continuously until Esc box.


- Open the Transitions tab to set timings for slides.

- Uncheck On Mouse Click, click After, and apply these settings to all slides.

How to Loop a PowerPoint Presentation Online
Things get a bit trickier if you’re using PowerPoint Online in your browser. Unfortunately, it doesn’t have the functionality of the desktop version and won’t allow you to create looping presentations with slide timings.
Even if you upload a .ppsx file created in PowerPoint for Windows or Mac, the online version will not play it as intended. You can still use it for basic viewing, but not to play a continuously repeating slide show.
5 Tips for Smooth Looped Playback
Try these to make sure your presentation runs smoothly:
- Use the Rehearse Timings feature to decide the display time for each slide. PowerPoint will remember your timings and automatically move to the next slide at the desired moment.
- After setting the timing and transition for one slide, click Apply to All to make all slides function in the same way.
- Save your file as a .ppsx (PowerPoint Show), so it opens in full-screen mode and starts playing right away.
- Test your presentation on the actual computer you’ll be using to make sure everything flows well.
- Keep your slides simple and clear so it’s easy for viewers to follow along during a continuous loop.
 Bonus tip: If you use PowerPoint for creating learning content, you can easily make your slides more interactive. With iSpring Suite, a PowerPoint-based authoring tool, you can quickly create quizzes, branching scenarios, voice narrations, and other dynamic content with no design or tech skills.

FAQ
How can I stop a looped PowerPoint slideshow?
To stop the looped presentation, simply click on Esc.
Can I set different timings for each slide?
Yes. You can do that on the Transitions tab or use Rehearse Timings to record how long each slide should stay on screen.
Can I loop a slideshow on a TV?
Yes. You need to save your file in the .ppsx format, copy it to a USB drive, and play it on a TV that supports file viewing.
How do I loop a video or GIF on a slide?
Select the video or GIF, go to the Playback tab, and check the box that says Loop until Stopped.
Conclusion
Looping your PowerPoint presentation is a simple way to automate your slideshow. Once you set it up, it runs on its own, without the need to click through slides or have someone supervise it. Try the instructions above and share your tips in the comments!
And if you need to create a more engaging experience, you can turn your slides into a complete online course with iSpring Suite. See how fast and enjoyable course creation can be during a free 14-day trial — no credit card required.
Create online courses and assessments in record time.


How to Email a PowerPoint Presentation: 5 Proven Ways