How to Convert Your PowerPoint Slides to an eLearning Module


PowerPoint is one of the easiest tools to use to create interactive eLearning content. With just a few clicks, you can turn your slides into a ready-to-use course. Still, many people wonder, “Isn’t PowerPoint just for presentations? Can I really use it to teach?”
 The answer is yes. In this article, we’ll walk you through how to transform your PowerPoint slides into a fully functional eLearning course that employees can access anytime, anywhere.
Key Takeaways
You can turn PowerPoint slides into interactive, trackable eLearning courses by exporting them to SCORM or HTML5, or by using an authoring tool like iSpring Suite, that enables you to add interactivity, quizzes, branching, and multimedia while keeping your original animations and transitions intact.
Other quick methods include exporting PowerPoint options to HTML5 for web access or publishing in SCORM format for LMS integration. This article also covers design tips — adding video, audio, animations, pop-ups, and custom navigation — to boost engagement and make courses more immersive. This article also covers design tips — adding video, audio, animations, pop-ups, and custom navigation — to boost engagement and make courses more immersive.
Exporting to HTML5
Exporting your PowerPoint slides to HTML5 is one of the fastest ways to create web-ready training content. This approach maintains your layout, animations, and basic interactivity while compressing slides into a lightweight file that loads quickly in any browser.
However, HTML5 exports are limited in functionality and tracking. They’re best suited for simple, visually engaging presentations that need to be shared quickly without requiring learners to install additional software.

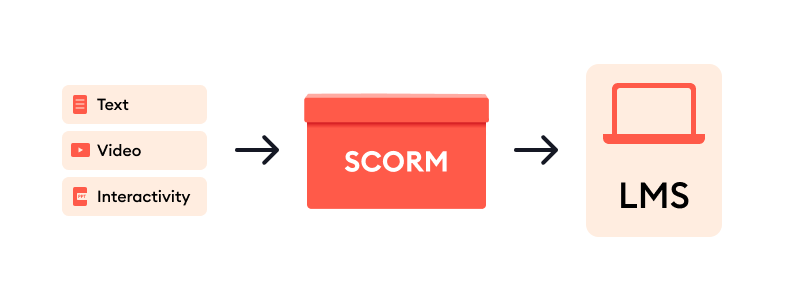
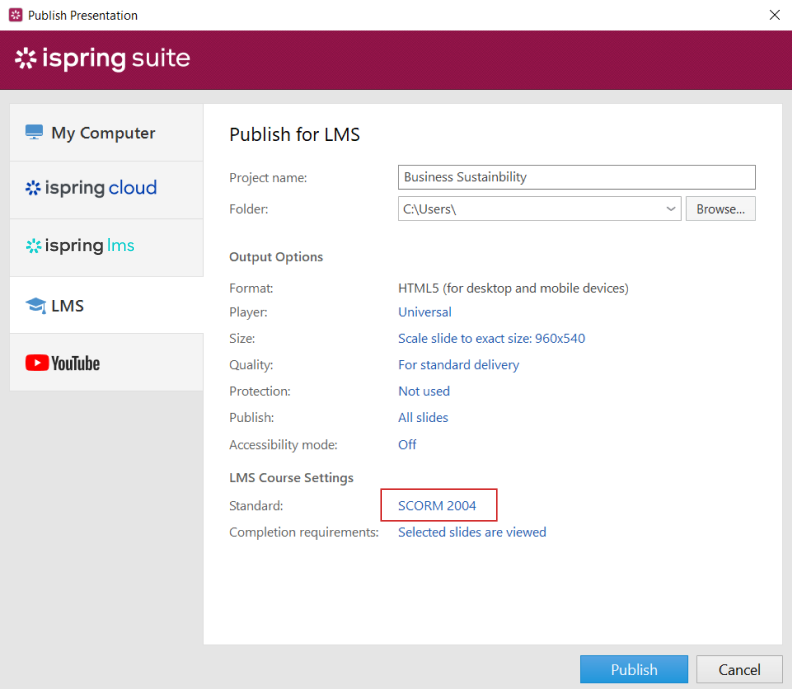
Converting PowerPoint to the eLearning SCORM format
Converting your presentation to SCORM turns it into a fully functional eLearning course that can be hosted on any LMS. SCORM ensures consistent performance, supports progress tracking, and allows you to evaluate learner performance.
Creating right in the authoring tool and distributing via LMS
Once your PowerPoint has been converted to SCORM, you can distribute it through your learning management system or embed it directly on your website.
Another option is to use an authoring tool that integrates with PowerPoint, such as iSpring Suite. This approach lets you build your course right inside PowerPoint while adding more advanced features — turning a basic presentation into a fully interactive eLearning experience.
| Method | Best for | Key Benefits | Limitations |
|---|---|---|---|
| Save as HTML5 | Quick publishing, broad accessibility | Lightweight files, works on any device, preserves animations | Limited tracking, fewer interactive options |
| Convert PowerPoint to eLearning SCORM format | Simple online training and analytics | Consistent delivery, fits most LMSs | Although it’s simple, it offers less trackability and no personalization |
| Create right in the authoring tool | Big corporate training, onboarding, access training, reference materials | Automation, assignments, reporting, personalization | LMS and authoring tool subscriptions needed, short learning curve |
Steps to Create an eLearning Module
Creating an eLearning module from PowerPoint goes beyond just uploading slides — it’s about designing an engaging learning experience. Before diving in, it’s important to shift your mindset from simply developing content to truly thinking like an instructional designer.
“The biggest mistake people make when turning PowerPoint slides into eLearning content is thinking like a content developer instead of an instructional designer. eLearning isn’t a one-to-one PowerPoint conversion. It’s asynchronous, so you need to fill facilitator gaps, design with intention, use hooks, and build a flexible microlearning ecosystem, not just repurpose slides.”
Step 1: Have all learning materials prepared
Before you jump into PowerPoint, focus on your learning objectives and the story you want to tell. Think less like a lecturer and more like a guide — design experiences that let learners explore and make decisions.
Two techniques can help:
Mind mapping: Organize ideas around a core concept and visualize the relationships between topics.

Mind mapping helped visualize a collection of eLearning assets.
Storyboarding: Sketch out slides or scenes — even rough outlines help you plan flow, visuals, and pacing before you start designing.

The storyboarding technique gives you a feel of what the final result will look like.
Although the method is mostly visual, you don’t have to be an artist to draw shots or, in our case, PowerPoint slides. They should be clear for you in the first place. You can also add some text comments to your sketches or even get by with text alone.
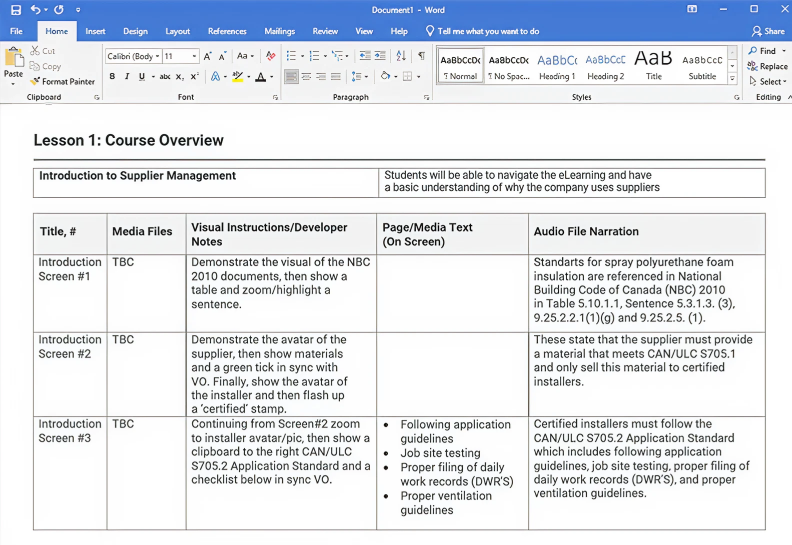
Textual storyboard example
Too much to read? Get a summary from AI
Step 2. Create a presentation
When you have your content carefully thought out and ready to go, packing it into PowerPoint usually doesn’t take long. Let’s compare two methods: using PowerPoint’s basic functionality and that enhanced by iSpring Suite, an AI-based PowerPoint add-in.
Navigation
With PowerPoint alone, you’ll employ a few main slides and then allow the learner to choose where to go next by providing them with hyperlinks to various sections of the course.
For example, in this how-to on making a jeopardy game in PowerPoint, the main slide is a game board where each cell is a hyperlink to the respective clue.
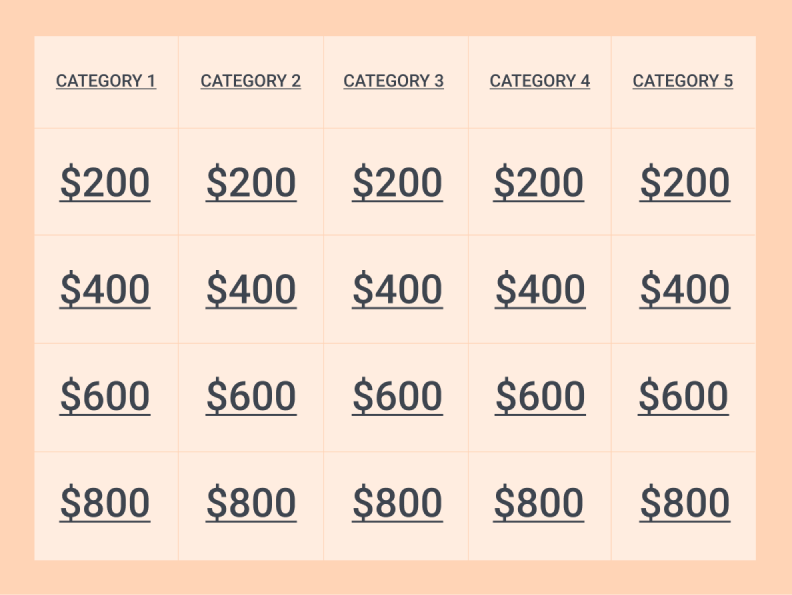
Use hyperlinks to let learners choose where to go next.
If you opt for iSpring Suite, there will be a special menu where you can set up properties for each slide and create advanced nonlinear navigation for the course. With its help, you’ll be able to develop a branched scenario course in a couple of clicks and, say, offer learners different levels of difficulty within a course or just let them choose the order in which they’d like to study topics.
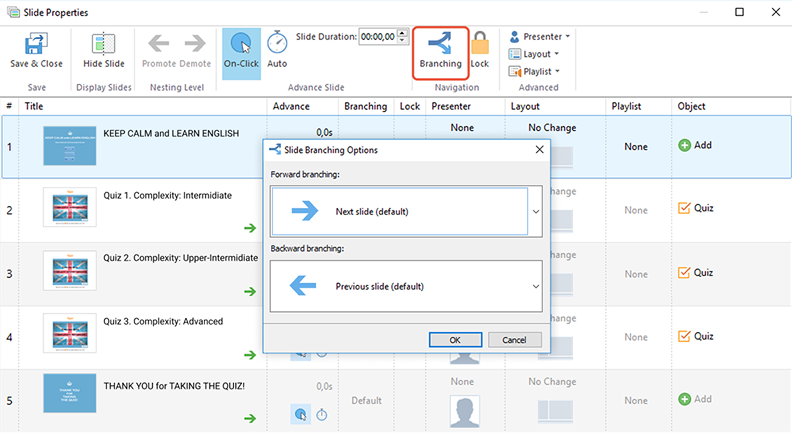
Advanced navigation capabilities in iSpring Suite
Knowledge checks
With PowerPoint alone, in order to add a knowledge check, a combo of triggered animations and hyperlinks can be a workaround (although a bit tricky and time-consuming). Check out these examples:
If you opt for iSpring Suite, you’ll find a specialized quiz-making tool that allows you to create interactive assessments with multimedia, drag-and-drops, branching, and automatic scoring. Also, there are 14 question types to choose from, so your knowledge check won’t be monotonous and you’ll be able to track learner progress with ease.
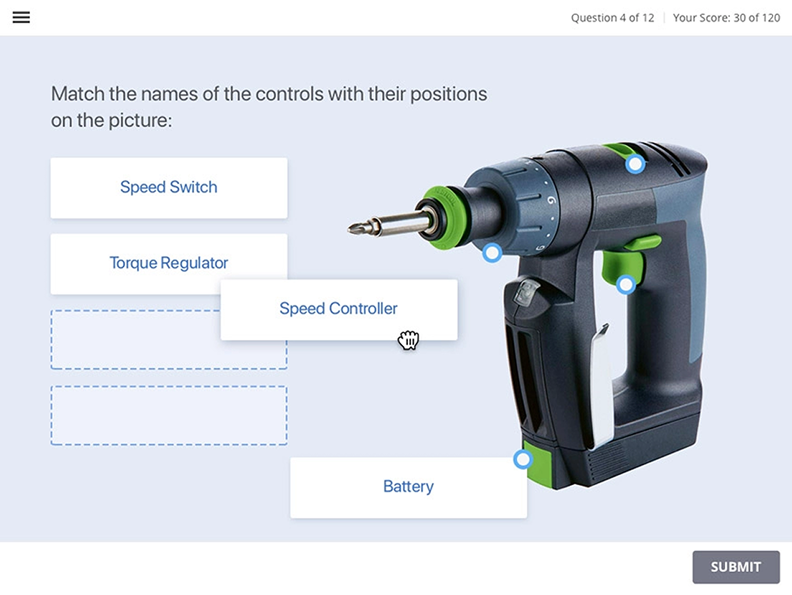
The drag-and-drop quiz question type in the iSpring Suite authoring tool

Step 3: Design and animation
To keep learners engaged, combine visuals, motion, and media. A few tips:
Use video and audio
“An easy way to use PowerPoint in eLearning is to record narration over the slides and keep the presentation as is. It’s a fast way to build a full lesson, and the more images you use and the less text, the better.”
A short embedded video or audio works much better than a wall of text when you need to teach people how to do something.
In the basic version of PowerPoint, there are two options for adding a video: you can either add a pre-recorded video from your PC or the web, or record a screencast. It’s not the best range of capabilities, but it’s better than nothing.
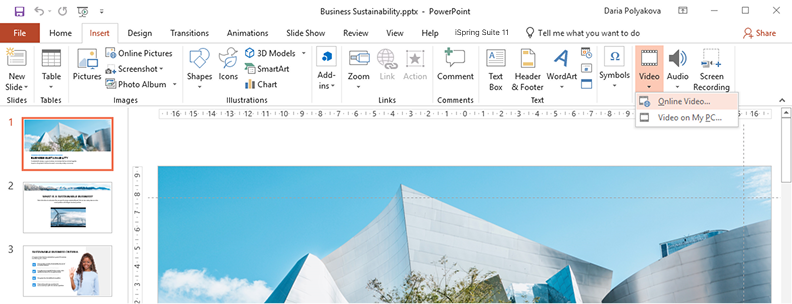
PowerPoint built-in video editor
With the iSpring Suite toolkit, you can record and edit video lectures, tutorials, and how-to screencasts right in PowerPoint. You can choose to create video narrations with annotations in a YouTube style or record videos from your screen and webcam simultaneously to provide a screencast with live video comments. There’s also an AI-powered text-to-speech feature that helps create perfect voiceovers.
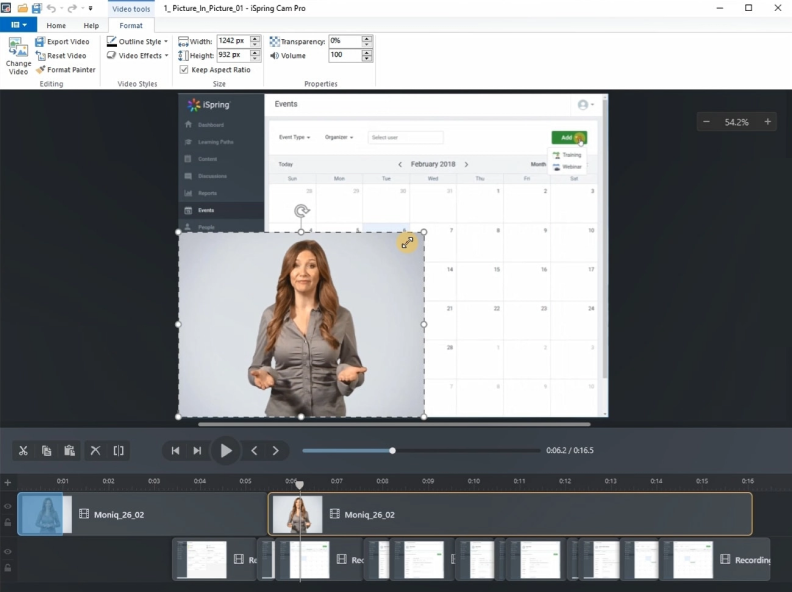
Show both videos at the same time or switch between them.
 Also read: How to Convert PowerPoint to an MP4 Video
Add animations
Animations in PowerPoint can bring your eLearning content to life by guiding learners’ attention exactly where you want it. Smooth transitions, object entrances, and emphasis effects help structure information and break it into digestible steps.
And if you’re using iSpring, all your animations are preserved exactly as designed when the course is published, so nothing breaks or behaves unexpectedly in the final eLearning modules. You can also use AI-powered image generation to enhance your course.
Also read: Animation in eLearning: PowerPoint Tips and Tricks
Add pop-ups
Using pop-ups is a simple yet powerful way to add interactivity without overwhelming your slide design. By linking buttons or icons to hidden text boxes, images, or explanatory notes, you can allow learners to click on these items to explore details on demand. This keeps your slides clean while still offering depth, making pop-ups ideal for glossaries, tooltips, short definitions, and scenario hints.
Step 3: Publishing: Converting PowerPoint to eLearning
So, you’ve created a great-looking PowerPoint presentation — what’s next? How do you turn it into a fully functional eLearning course?
To make your course compatible with a learning management system, you’ll need to publish it in an eLearning-ready format. Choose SCORM to ensure that it works smoothly across devices and allows you to track learner progress and generate reports.
Why PowerPoint Alone Isn’t Enough
We’ve all sat through endless slide decks packed with bullet points, where attention quickly fades. PowerPoint can be a solid foundation, but by itself, it doesn’t deliver the interactivity or tracking that’s needed for modern eLearning.
“PowerPoint will stick around because so many people already know how to use it. Tools like GammaApp are faster, cleaner, and more on-brand out of the box. Still, PowerPoint’s integrations like iSpring Suite or Camtasia offer interactivity that many AI tools can’t match just yet.”
Comparing PowerPoint to eLearning Modules
Before deciding which approach to take, it’s helpful to understand how traditional PowerPoint presentations differ from interactive eLearning modules. The table below highlights the key differences in engagement, design, and overall learning impact.
| Feature | PowerPoint Presentation | eLearning Module |
|---|---|---|
| Engagement | Mostly passive watching | Quizzes, interactions, scenarios |
| Navigation | Linear, predetermined | Branching and responsive navigation |
| Instructional Design | Depends on the presenter’s skill | Built-in templates, best design practices |
| Knowledge Retention | Word-heavy, less interactive | Quizzes, games, mixed media |
| Assessment | Manual or limited | Automatic grading, progress tracking |
Which Authoring Tool to Choose
As your organization grows, choosing the right authoring tool becomes more complex. You’ll eventually need a solution that goes beyond creating slides — one that helps you build structured eLearning courses, add interactivity, incorporate multimedia, and track learner progress. The key is to choose a tool that aligns with your goals and capacity, not just the one with the longest feature list.
Before deciding, consider factors like usability, integration, maintenance efforts, long-term costs, and scalability. This is where a tool like iSpring Suite stands out: it works directly within Microsoft PowerPoint, supports interactive elements, quizzes, and multimedia, and publishes to all major eLearning standards. This lets teams create and update courses easily as their training programs evolve — without adding unnecessary complexity.
Key Takeaways
Keeping learners engaged is always a challenge — but transforming your PowerPoint into an interactive eLearning course can change that. By adding media, quizzes, and branching, you can turn familiar slides into a dynamic, hands-on experience.
A well-designed course maintains all the visual appeal of PowerPoint while making learning more flexible and interactive on any device. Choose formats and tools that preserve your animations and visuals so your course looks great and runs smoothly on any device.
FAQ on Converting PowerPoint Slides to eLearning Modules
What is the best way to convert PowerPoint to eLearning?
You can convert PPT to eLearning by exporting it to HTML5 or SCORM or by using an authoring tool that adds interactive assessments and proper LMS-ready publishing.
How do I make my PowerPoint course interactive for online learning?
Interactivity can be added with branching, quizzes, pop-ups, animations, and multimedia. Authoring tools like iSpring Suite simplify this by providing templates, scoring, and built-in interactive elements.
Which format should I use to upload a PowerPoint course to an LMS?
SCORM is the most common standard for LMS delivery. It keeps your navigation, tracks learner progress, and ensures that you have a fully functional eLearning course that works consistently across platforms.
Create online courses and assessments in record time.


The 11 Best FREE eLearning Authoring Tools in 2026
PowerPoint Add-ins and Plug-ins: 13 Essential Picks for 2026
How to Make a Training Video Right in PowerPoint
How to Use Copilot in PowerPoint to Create a Course