eLearning Storyboard Template: From Idea to Engaging Course


Have you ever spent weeks building an eLearning course, only to hear your subject matter expert say, “This isn’t what I had in mind at all”? Miscommunication, numerous revisions, and unclear expectations can derail a project before it even gets going. An eLearning storyboard can make all the difference.
This guide explains how to use an instructional design storyboard to plan and visualize your course from the outset, keeping everyone aligned throughout the eLearning design process. You’ll also find a storyboard template to help you turn your ideas into clear, engaging learning experiences.
What Is an eLearning Storyboard?
An eLearning storyboard is the blueprint for your course. It’s a single document that captures not just the content but the entire learning experience.
Think of it like a movie storyboard. Before a filmmaker shoots a single scene, a storyboard artist sketches out each shot, what the characters are doing, and what lines they’re saying. This ensures that everyone on the team, from camera operators to set designers, agrees with the vision.
An eLearning storyboard does the same thing for your course development team. It moves beyond a simple outline or a list of learning objectives to provide a screen-by-screen plan.
It specifies:
- The On-Screen Text (OST): What the learner reads.
- The Voiceover (VO) Script: What the learner hears.
- The Visuals and Media: Images, animations, or videos on screen.
- Interactions and Navigation: Buttons, quizzes, and interactive elements.
- Developer Notes: Specific instructions for the eLearning developer.
A storyboard is your essential communication tool. It transforms a vague eLearning content plan into a concrete, actionable guide that prevents misinterpretation and ensures a smooth journey from idea to launch.
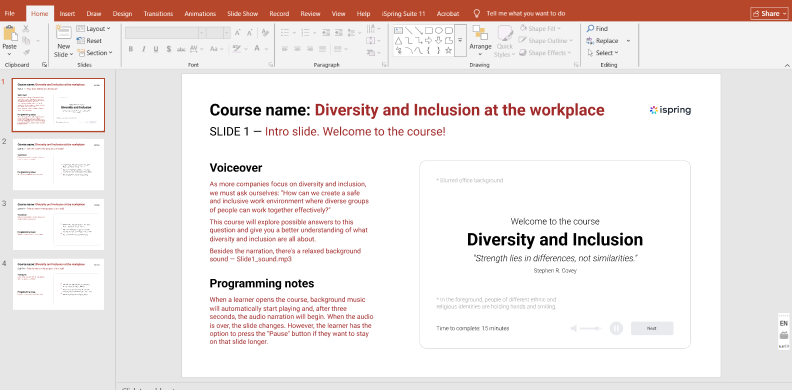
A Simple Storyboard Example: From Sketch to Screen
This visual blueprint shows what a storyboard is in eLearning. It turns a great idea into a perfectly executed learning module.
Let’s bring this to life with a scenario that every corporate trainer is familiar with: rolling out a new “Conflict Resolution” course for managers.
The Challenge:
Your SME provides a slide that says, “Teach managers how to handle team disagreements.” That’s it. That’s the direction.
Without a storyboard, you might build a text-heavy screen with bullet points. But with a storyboard, you’ll create an engaging scenario that mirrors actual management challenges.
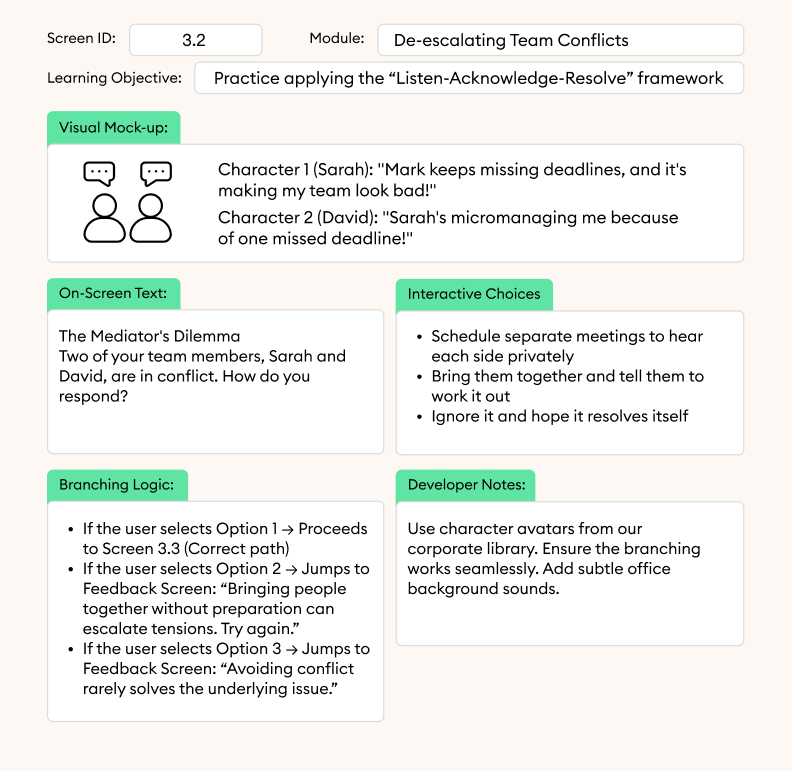
Why This Works:
Instead of just explaining conflict resolution, it lets managers practice it. The SME can immediately see the approach, the instructional designer has clear direction, and the eLearning developer knows exactly what to build.
The magic happens in the planning stage. By storyboarding this scenario, you can catch potential issues early:
- Does the SME agree with the “correct” path?
- Are the character dialogues realistic?
- Does the branching logic make sense?
This is the power of a great eLearning storyboard. It turns abstract concepts into concrete, engaging learning experiences that stick.

Why You Need a Storyboard for eLearning Development
Think of your most recent eLearning project. Did any of these scenarios sound familiar?
- You received a 200-slide PowerPoint from a Subject Matter Expert (SME) with the note, “Here’s all the content!”
- After you built the course, the eLearning developer asked, “What animation should play when the user clicks this button?”
- Your stakeholder reviewed the final product and said, “The learning flow feels jumpy and confusing.”
If you nodded along, you’ve experienced the classic pain points: misaligned teams and costly rework.
A storyboard is your strategic defense against this chaos. It’s the critical step in the eLearning development process that converts a flood of information into a structured learning experience.
Too much to read? Get a summary from AI
The Real Cost of Skipping the Storyboard
Without a storyboard, eLearning course planning happens in the dark. Assumptions replace specifications, leading to a frustrating cycle of revisions after the course has been built in an eLearning authoring tool.
Fixing a typo in a storyboard document takes seconds. Fixing the same typo after it’s been programmed, voiced over, and published takes exponentially more time and budget.
The Tangible Benefits of Storyboarding
Integrating a storyboard into your workflow delivers clear, impactful advantages:
- It Saves Production Time and Reduces Costs. By catching feedback and changes early in the eLearning process, you eliminate the most expensive and time-consuming revisions later. A storyboard ensures that everyone signs off on the plan before development begins.
- It Drastically Improves the Learner Experience. A storyboard forces you to think intentionally about the learning flow. You sequence information logically, build in meaningful interactions, and create a narrative that engages learners, rather than overwhelming them with disconnected information.
- It Ensures Consistent Branding and Pedagogy. The storyboard acts as a style guide for both design and teaching. It ensures that the visual representation, tone of voice, and instructional strategies (like scenario-based learning or quiz feedback) are applied uniformly throughout the eLearning course.
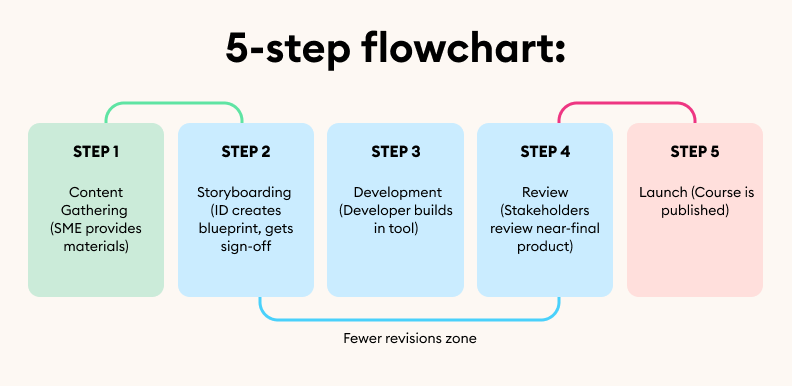
Storyboard Workflow from Idea to Launch
Core Elements of an eLearning Storyboard
Think of your storyboard as the ultimate instruction manual for your eLearning course.
Just as furniture assembly instructions show exactly which parts go where and how they connect, a storyboard breaks down every component of a learning screen. Without these core instructional design components, you’re just handing someone a box of parts and hoping they build the right thing.
Here are the essential storyboard elements that create clarity and prevent misunderstandings:
The Building Blocks of Every Screen
- Learning Objectives: This is your “why.” What should the learner be able to DO after completing this specific screen or module? It’s your compass, ensuring every element that follows serves a purpose.
- On-Screen Text (OST): This is what the learner will read. It includes all headings, body text, button labels, and instructions. Keeping this concise is key to avoiding cognitive overload.
- Voiceover (VO) Script: This is the word-for-word narration that the learner will hear. It should complement the on-screen text, not simply repeat it verbatim.
- Visuals/Media Cues: What does the learner see? This section describes images, illustrations, animations, video clips, or even simple layout notes. A sketch or reference image here is worth a thousand words.
- Interaction Notes: How does the learner engage with the content? This involves clicks, drag-and-drops, quizzes, branching scenarios, and button functionalities.
- Developer Comments: This is the technical “how-to” section for the person building the eLearning course. It includes specific instructions on animations, triggers, programming logic, and file names.
Visual vs. Written Storyboards: Choosing Your Format
The format you choose depends on your project’s complexity and your team’s workflow.
Here’s a comparison:
| Element | Visual Storyboard (e.g., in PowerPoint) | Written Storyboard (e.g., in a Microsoft Word/Google Doc document) |
|---|---|---|
| Best For | Courses heavy on visual design, animation, and complex interactions. | Content-heavy courses, rapid drafting, and getting quick SME feedback on text. |
| Learning Objectives | Listed in a notes section beside the slide. | Clearly stated at the top of the page for each screen. |
| On-Screen Text (OST) | Placed directly in text boxes on the slide mock-up. | Listed in a dedicated column or section, often in a table. |
| Visuals/Media | Shown directly as sketches, wireframes, or stock images. | Described in detail in a Visuals column. |
| Interactions and VO | Often listed in the speaker notes section. | Typically laid out in adjacent columns for easy cross-referencing. |
| Primary Advantage | Clarity of Vision. Leaves little room for misinterpretation of the visual experience. | Speed and Focus. Extremely quick to create and edit; perfect for nailing down course content first. |
Which should you use?
- Use a visual storyboard when the look and feel is critical or when you have complex animations and interactions that are difficult to describe in words.
- Use a written storyboard for a quick, text-focused first draft or when your primary goal is to get SME approval on the course content and flow before any design work begins.
Effective storyboard examples for a software simulation meticulously map each click and pop-up, while compliance course examples detail the exact wording of scenario-based questions and their feedback, providing a clear model to follow. Including these core elements ensures that your storyboard accurately translates the design into the final course.
How to Create an eLearning Storyboard Step-by-Step
The storyboard process is a foundational set of instructional design steps that will guide you from a blank page to a ready-to-build blueprint.

Follow this guide to learn how to create a storyboard for eLearning that optimizes your workflow.
Step 1: Identify Audience and Learning Objectives
Before you write a single word of content, you need to know who you are teaching and what they need to achieve. This step is the foundation upon which everything else is built.
- Audience: Define your learners’ roles, prior knowledge, and learning context.
- Learning Objectives: Write clear, measurable statements that specify what the learner will be able to do after completing the course.
Step 2: Define the Structure (Modules, Scenes, Screens)
Organize your content into a logical learning flow. This creates the skeleton of your eLearning course.
- Modules: The main chapters or sections of your eLearning course.
- Scenes: Groupings within a module that cover a specific subtopic.
- Screens: The individual slides or pages that make up each scene. Outline the sequence of screens to ensure a coherent journey.
Step 3: Choose Your Storyboard Format
Select a tool that fits your project’s needs and your team’s collaboration style. Selecting the right format can significantly speed up the instructional design process.
| Format | Pros | Cons |
|---|---|---|
| PowerPoint / Google Slides |
|
|
| Microsoft Word / Google Docs |
|
|
| Dedicated Authoring Tools |
|
|
Step 4: Fill in Content and Media Notes
This is the core of the instructional design steps for storyboarding. For each screen, populate the core elements:
- Write the exact On-Screen Text (OST).
- Draft the Voiceover (VO) Script.
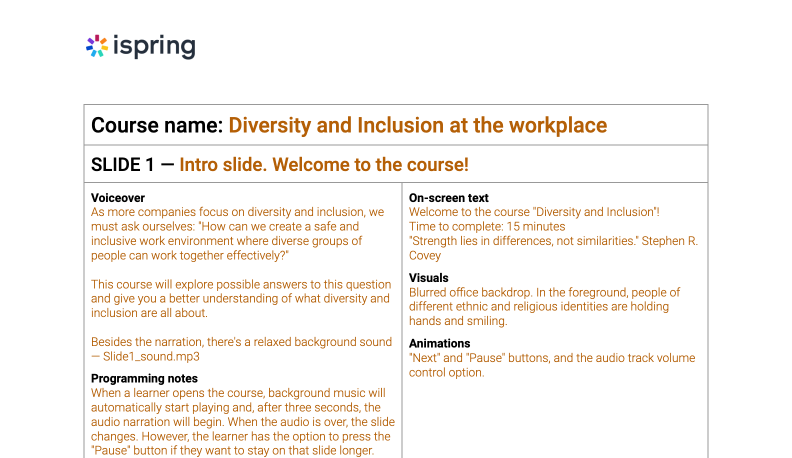
- Describe all Visuals/Media (e.g., “use an image of a team meeting that reflects diversity”).
- Specify Interactions (e.g., “a click-reveal graphic with three hot spots”).
- Add Developer Comments for technical instructions.
Step 5: Review with SMEs and Stakeholders
Share the completed storyboard draft for feedback. This collaborative review is the most critical step to prevent costly rework later on.
- Encourage stakeholders to focus on content accuracy, flow, and clarity.
- Use this stage to get final sign-off on the learning path before any development begins.
Step 6: Finalize and Iterate
Incorporate the feedback from the review cycle. This may require one or several rounds of iteration. Once all stakeholders have approved the storyboard, it becomes the official blueprint for further development and should be version-controlled.
eLearning Storyboard Templates
A well-designed storyboard template provides the structure you need to plan your eLearning course quickly, ensuring that you never miss a key element. Below are three of our most popular free storyboard template formats.
1. The Text-Based Template
Ideal for getting content approval quickly from SMEs. This format, often built in Microsoft Word or Google Docs, focuses on the script without complex visuals.
Best for: Content-heavy courses, compliance training, and quick initial drafts.
Includes: Clear columns for Screen ID, Learning Objective, On-Screen Text, Voiceover Script, and Interaction Notes.
Storyboard template in MS Word
2. The Visual Storyboard Template
This template, often created in PowerPoint or Figma, combines textual details with visual layout boxes. It’s perfect for aligning graphic designers and developers on the exact desired look and feel.
Best for: Visually complex courses, brand-heavy content, and courses with custom graphics.
Includes: Wireframe areas for sketching screens alongside fields for all instructional text and media cues.
PPT eLearning storyboard template
These eLearning storyboard examples help teams visualize course flow, maintain design consistency, and speed up the development process.
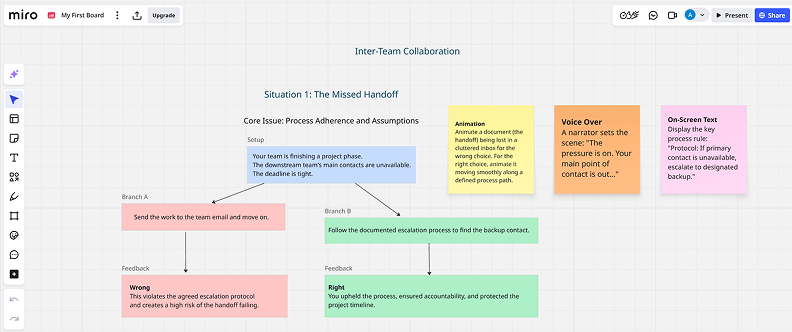
3. The Interactive Scenario Template
Designed specifically for scenario-based and branching learning, this template helps you map out decision points, character dialogues, and the consequences of each of the learner’s choices.
Best for: Soft-skills training, customer service simulations, and any eLearning course that requires critical thinking.
Includes: A flowchart-style layout to track decision paths, character profiles, and customized feedback for each choice.
Choose the storyboard template download that fits your project, fill in your course content, and start building a cohesive and effective learning experience.
Common Mistakes to Avoid
Steer clear of these common storyboard mistakes to ensure a smooth instructional design process:
- Overloading slides with too much text or too many objectives
- Ignoring learner flow and the logical progression of course content
- Skipping stakeholder review cycles with SMEs and developers
- Writing poorly defined objectives that can’t be measured
- Missing accessibility considerations, like alt-text and navigation
Use this simple storyboard checklist before development:
✓ Are the learning objectives clear?
✓ Is the course content sequenced logically?
✓ Have all interactions been specified?
✓ Have accessibility needs been met?
✓ Has stakeholder approval been received?
Tools for Creating Storyboards
Choosing the right storyboard software depends on your team’s needs.
Here’s a quick comparison of popular storyboard tools for eLearning:
| Tool | Best For | Collaboration | Integration |
|---|---|---|---|
| Google Docs | Text-heavy storyboards, quick drafts | Excellent real-time editing | Limited |
| PowerPoint | Visual storyboards, mockups | Basic co-authoring | Good |
| iSpring Suite | All-in-one storyboard for eLearning courses | Good | Excellent with LMS |
| Articulate Storyline | High-fidelity prototyping | Limited | Excellent with LMS |
Final Review and Implementation
A thorough storyboard review is your final quality checkpoint before development. This stage involves verifying course content accuracy, assessing the logical flow, and confirming that all interactive elements are properly documented.
Once approved, the signed-off storyboard becomes the official blueprint for the eLearning course development workflow. Establish clear version control (e.g., “v2.0_Final_Approved”) and a formal handoff process to developers.
Start Storyboarding Today
Effective storyboarding combines clarity in communication, collaboration between teams, and creativity in learning design. By implementing these instructional design tips, you’ll create better courses faster and with less frustration.
Download your free eLearning storyboard template and start storyboarding now.
FAQ
Do I need to use a specific authoring tool to create storyboards?
No. You can create storyboards in tools like Word or PowerPoint. The storyboard is a planning document that guides the subsequent development process in an eLearning authoring tool, ensuring that the build is efficient and accurate.
When should I involve a voiceover artist?
In the instructional design process, a voiceover artist should be engaged after the storyboard is finalized. They work from the approved script, laid out on a slide-by-slide basis. Alternatively, tools like iSpring Suite now offer an integrated AI voiceover option to generate professional narration directly within the authoring tool.
Is a storyboard only necessary for complex courses?
No. Even for simple courses, a storyboard is a core instructional design task. It forces you to structure content logically and communicate clearly with stakeholders before you begin the development process, saving time and preventing rework.
Create online courses and assessments in record time.


27 Instructional Designer Interview Questions and How to Answer Them
How to Write a Course Description [+Examples]
PowerPoint Add-ins and Plug-ins: 13 Essential Picks for 2026
eLearning Standards Comparison: AICC vs SCORM vs xAPI vs cmi5 vs IMS Common Cartridge