How to Remove the Background From a Picture in PowerPoint
We’ve all been there: while preparing a presentation, you stumble upon an image — one that captures your message brilliantly. But there’s a catch. The background of the image either distracts from the message or simply doesn’t match your presentation style. So what do you do?
Actually, there are two things you can do right in PowerPoint: you can either remove the background from an image or make it transparent. In this article, we’ll explain how to remove the background from a picture in PowerPoint with both methods, step-by-step:
- How to make a picture’s background transparent
- How to remove the background from an image in PowerPoint
TL;DR
The article explains how to remove an image’s background in PowerPoint using built-in tools. It covers how to prepare a suitable image, make a simple background transparent, and use the Remove Background feature to isolate the subject. Users can refine automatic selections by marking areas to keep or remove and undo changes as needed. It also notes that background removal is available only in the desktop version of PowerPoint. The article aims to help users improve the visual quality of their presentations.
Before You Begin: Choose and Prepare a Suitable Image
How well you can remove a background from images really depends on the initial picture you choose. Here are three steps and useful tips on how to get your image ready:
1. Opt for a high-quality picture with a simple background
Whether you use your own images or stock photos (from Unsplash, Pexels, or Pixabay, for example), choose high-resolution images with greater detail and sharpness. This will make it easier to distinguish between the foreground and the background.
Important: The method for removing the background will differ depending on the picture you choose.
If your picture’s background has a uniform, solid fill (total white background, black, or any other color that is different from the main object), you can just make the background color transparent.

Pictures with solid backgrounds like this one are ideal for using the transparent color tool.
If the image’s background is not uniform, you’ll need to select the Remove Background tool. But note: backgrounds that are too complicated, multicolored, or mixed may not provide the desired results and might require more advanced editing. To make it work, choose images with a simple, uncluttered background. Pictures and photos with blurred backgrounds in which the main subject is clearly distinguishable are usually a good fit:

The background of the image on the left is almost impossible to remove, while with the picture on the right, you can do this with a couple of clicks.
2. Save it in the right format
Note that background removal doesn’t work for Scalable Vector Graphics (SVG), Adobe Illustrator Graphics (AI), Windows Metafile Format (WMF), and Vector Drawing Files (DRW).
JPEG and PNG are the most compatible formats for PowerPoint, but if you’re aiming for a transparent post-editing background, save your image as a PNG. This format maintains transparency layers, making it the best option for this task.
3. Import the image into PowerPoint
Once you’ve prepared a photo on your computer, it’s time to import your picture into PowerPoint:
- Select the slide where you want to insert the picture.
- Go to the Insert tab and click Pictures in the Image group.
- Navigate to the location on your computer where the image file is stored. Once you’ve located the file, click to select it.
- Click the Insert button at the bottom right of the file explorer window.
How to Make the Picture Background Transparent in PowerPoint
This is the fastest way to get rid of a distracting background. If it has a single color, as in our example with the donuts, follow these simple steps:
1. Click on the image in which you want to make the background transparent. On the toolbar, select the Picture Format tab on the PowerPoint ribbon.
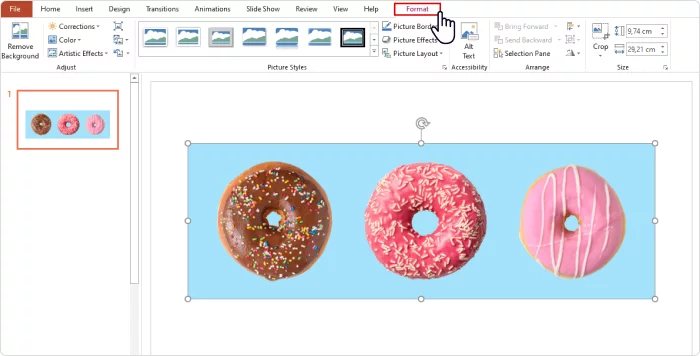
2. Click on the Color tab and select Set Transparent Color tool from the dropdown menu. The cursor will change to a small pen with an arrow.
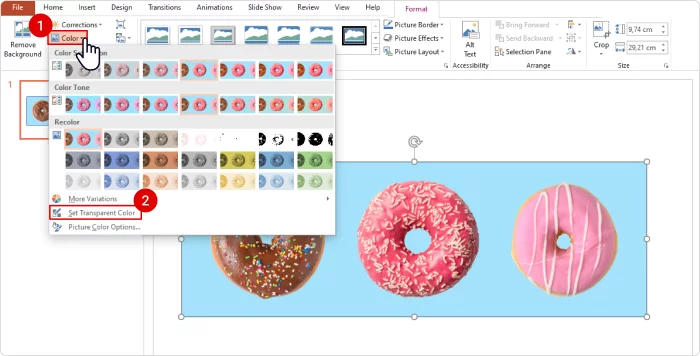
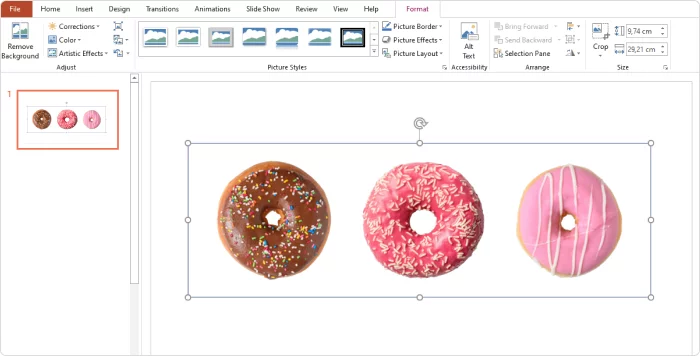
3. Move the cursor over to the image and click on the part you want to make transparent. The solid background color you click on will become transparent, revealing the PowerPoint slide’s background.
When the Set Transparent Color tool doesn’t work
Note that the Set Transparent Color tool will not help with backgrounds that have shadows or gradients. If the background tones are different shades, the tool will remove only one:

Before and after using the Set Transparent Color tool
The Set Transparent Color tool also won’t work if the content of images and the backgrounds are too similar in color. Here is an example of what can happen in this case:

The man’s portrait after using the Set Transparent Color tool
How to Remove the Background from a Picture in PowerPoint
The second way to get rid of the backgrounds is to use the Remove Background tool. It can help you extract the subject from a more challenging backdrop. Here’s how to use it:
1. Select the picture that you want to remove the background from.
2. On the PowerPoint ribbon, select the Picture Format tab. Then, select Remove Background.
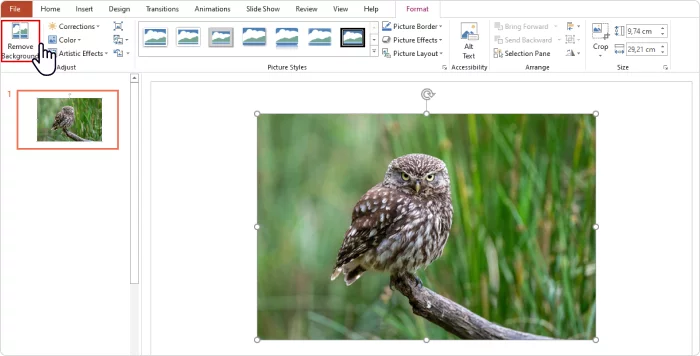
3. The default background area is overlaid with a magenta color. However, Microsoft PowerPoint doesn’t always get the selection right the first time:
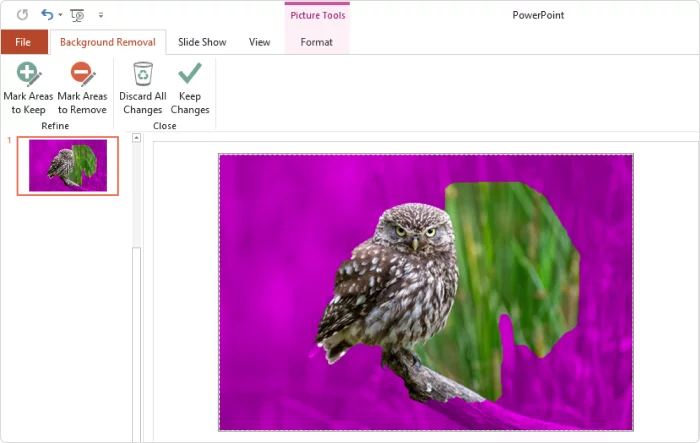
As we can see here, it missed part of the background and almost removed the branch that the owl is sitting on. So, next, we’ll adjust it manually.
You can select Mark Areas to Keep or Mark Areas to Remove buttons to make removal of the background more precise:

Use the free-form drawing pencil to mark the areas to keep. To select small fragments, just click; to select a wider area, click and drag to draw lines or a free-form shape. With just a few clicks, PowerPoint keeps or removes marked areas and selects the entire background successfully:
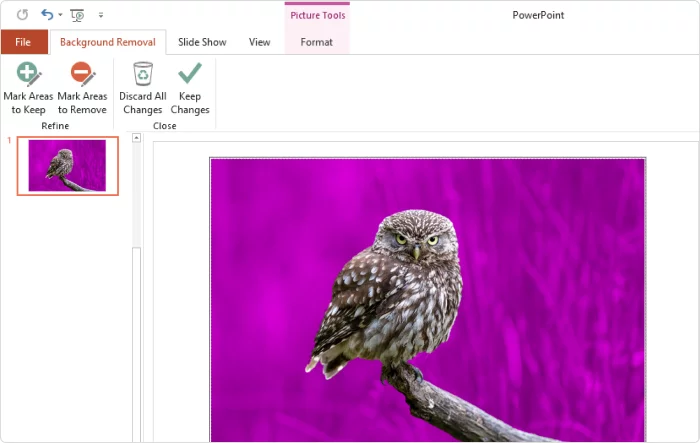
Once you’re satisfied with the selection, click Keep Changes to finalize the removal process.

The selected background elements will be removed, leaving only the desired parts of your image. Here’s what we ended up with:
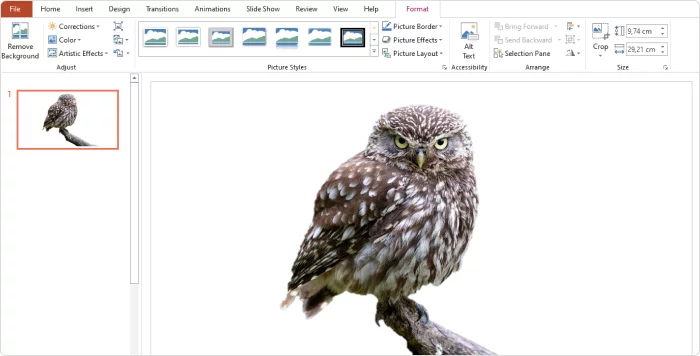
Now you can seamlessly integrate this image into any presentation style, create more space for a bold headline or compelling quote, and even add the background of your choice to create a slide that’s more visually appealing.
If you decide to keep this picture as a standalone image separate from the PowerPoint presentation, you can also save it on your computer:
- Right-click on the image and select Save as Picture.
- Choose a location, give your picture a name, and select the PNG format.
- Click Save.
When the Remove Background tool doesn’t work
Although the Remove Background tool isn’t bad, it sometimes doesn’t work as expected. In addition to the reasons we mentioned earlier, such as low image resolution and unclear subject-background contrast, the tool may not accurately handle tiny details such as hair, fur, or other elements along the edges of the main subject. See what happened to the lion’s mane when the Remove Background tool was used:

3 Free Additional Tools for Removing Backgrounds
If you’re not satisfied with the results you get with Microsoft PowerPoint, you can try one of the free cloud-based tools that we tested:
1. Removal.ai

Removal.ai is an AI-powered online tool that can automatically detect and remove backgrounds. After removal, you can edit the image: manage contrast, opacity, blur, add shadows, write a title, add your own background images, and resize the image to fit social media-friendly dimensions.
The free version doesn’t allow you to download high-resolution pictures. We were able to save an image with a resolution of 800 x 533 pixels.
2. Adobe Express
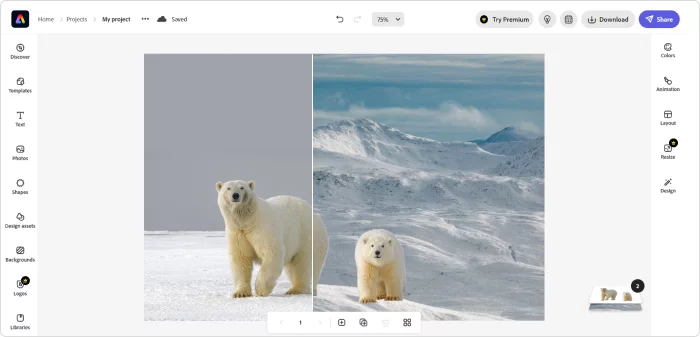
Adobe Express is a great tool that offers advanced editing features, as well as background removal. With its intuitive interface, you can easily upload your own background or select one from the built-in collection. It also allows you to insert objects, shapes, frames, and texts, and even apply animation effects.
Images can be downloaded as PNG, JPG, or PDF files. If you apply animations, you can download your file as an MP4 file. You’ll need to create an account in order to use the tool.
3. Erase.bg

Erase.bg is a minimalist tool that allows you to remove the background from an image with a single click. It doesn’t offer extensive editing options – you can only add your image to a new background that’s either a monochrome or a texture fill.
It also has a mobile app for Android and iOS.
FAQ on How to Remove the Background From an Image in Microsoft PowerPoint
Here are some questions you might have when you want to remove the background from an image in PowerPoint:
1. Can I undo background removal in PowerPoint?
Absolutely. PowerPoint allows you to discard changes if you’re not satisfied with the outcome. Just click Discard All Changes in the Adjust group:

2. Is it possible to replace the background instead of removing it completely?
PowerPoint doesn’t have an automatic background replacement option, but you can place the image that the background has been removed from on top of another image to achieve a similar effect.
3. Can I remove an image background working with OneDrive?
No. You can remove the background from a picture only in the desktop version of PowerPoint. The cloud-based version doesn’t have a built-in background removal tool. To remove the background online, use one of the tools listed above.
The Final Word
That’s it! We hope you found these step-by-step instructions on how to remove a picture’s background in PowerPoint helpful. To learn other PowerPoint presentation hacks and make your slides more engaging, check out these articles:


