How to Create a Timed Quiz


To prevent your learners from cheating, you may want to add a timer to your tests. A quiz timer limits the time allotted, so it’s only enough for quiz takers to answer test questions on the spot and not Google them. This way, timing in quizzes will allow you to get more reliable quiz results.
In this article, we’ll show you how to create timed quizzes and tests using iSpring Suite, a powerful, yet easy-to-use timed quiz maker and much more.
Key Takeaways
The article explains how to build a timed quiz using iSpring Suite, starting with installing the software and creating a graded quiz. It covers selecting question types, adding content, and configuring timers with three options: a uniform time per question, custom times per question, or a total quiz time. After creation, the quiz can be published to web pages, LMS formats like SCORM, or Word. The guide also outlines the benefits of timed quizzes and suggests appropriate time limits for different question types.
What Is a Timed Quiz?
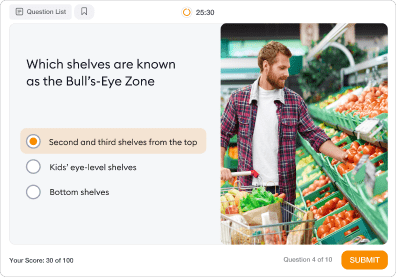
A timed quiz is a quiz with a built-in countdown timer for each question. This type of assessment can be applied to any learning assignment, from short knowledge tests to classic quizzes and final exams.
Here’s an example of a timed math quiz made with iSpring Suite.
iSpring Suite allows you to create professional online quizzes without the help of instructional designers or programmers. The toolkit comprises the online quiz creator functionality with everything needed for building varied eLearning content, and you can test drive it during a free 14-day trial.
Just download iSpring Suite and install it to make a quiz with a timer right away. After that, you can create an unlimited number of quizzes with a timer function and use all the tool’s capabilities to the fullest.
Step 2. Create a Quiz
Open the app, click on Quizzes in the Quick Start menu, select Create Graded Quiz and click on Graded Quiz. You can apply timing to any quiz which is graded.

You can create graded quizzes and surveys in iSpring Suite. Let’s select Graded Quiz for example
Also read: How to Create a Moodle Quiz: Step-by-Step Guide
Step 3. Choose a Question Type
There are 14 types of quiz questions in iSpring Suite. To select the needed type click the Question tab.

Step 4. Add a Question Text
As an example, we chose the Multiple Choice configuration and made a multiple choice timed test. You can do the following for any other timed quiz in iSpring Suite.
Enter a text in the quiz question field and add answer options in Choices. Mark the correct answer and leave incorrect answers unmarked. After you’re done with the first question, add more questions the same way.

Too much to read? Get a summary from AI
Step 5. Set a Quiz Timer
In iSpring Suite, there are three ways to set timing for a quiz. Check out these major timer options below.
Set the same time for all questions
If questions in your timed quiz are of a more or less equal difficulty, you can set the same time limit for each of them. Click on Properties on the toolbar:

And select the Question Properties tab.

Tick Limit time to answer the question and set a time limit. To apply the setting, click on Save. Now, your quiz takers will see a timer warning that will show them the end time for each unanswered quiz question in real-time.

Note: The time limit will only be applied to new questions.
Set custom time limit for quiz questions
In some quizzes, there can be different levels of difficulty for each question. For example, we tend to count answering an essay question as more difficult than deciding whether a statement is true or false. They will require a different amount of time. In iSpring Suite, you can determine a custom time limit for each question.
Select the question in your timed quiz and, in the Slide Options tab, tick Limit time to answer the question. Set the number of minutes the quiz taker will have to answer.

Set a general time limit
If you don’t need to limit questions separately, you can set an overall time limit for your interactive quiz to make it automatically stop. This way, your quiz takers need to submit their answers before the time runs out. iSpring Suite offers this feature as well.
Click on Properties. In the Main Properties tab, tick Time to complete the quiz and specify a time limit. To apply the settings, click on Save.

Step 6. Publish Your Quiz
You can choose between several ways to publish the quiz with a time limit, depending on your requirements. If you want to publish your quiz with a timer to a web page or a blog, or you conduct distance learning, the HTML5 output is the best option.
First, click the Publish button on the toolbar.

In the My Computer tab, add the name of the project and its location and click on Publish.

There are other publishing destination options for your timed quizzes:
- LMS: choose this tab if you want to upload your timed quiz to a learning management system. iSpring supports SCORM, xAPI (Tin Can), AICC, and cmi5 eLearning formats.
- iSpring LMS: here you can publish your online timed quiz directly to your iSpring LMS LMS account, set a due date for completing the quiz that will automatically display in your learners’ Microsoft Outlook calendar.
- Microsoft Word: choose this tab if you need a quiz in a printable format.
FAQ on a Quiz with a Timer
What are the benefits of timed quizzes?
Timed quizzes offer multiple benefits, including improved time management, preparation for pressure, enhanced focus, better decision-making, increased recall, quicker processing speed, boosted motivation, effective self-assessment, readiness for standardized tests, realistic evaluation, heightened efficiency, and skill development. However, their suitability should be considered based on individual preferences and subject requirements.
What’s the appropriate timer duration for timed quizzes?
For example, as per the handout, “Is This a Trick Question? A Short Guide to Writing Effective Test Questions” by Kansas Curriculum Center, there is an optimal time duration for particular types of quiz questions. So, in case of doubt, you can base your quiz timing on the following:
True or false: 30 seconds
Multiple-choice: 60 seconds
Short answer: 120 seconds
Essay question: 10–15 minutes
This can help you decide on the maximum time to allow for different types of questions correctly.
What are some extra options to enhance a quiz?
- Make your quiz “more cheat proof”
- Make your timed quiz more informative
- Make assessments more individualized
- Make the assessment process more engaging and fun
Create interactive quizzes for learning, knowledge checks, and skill practice


How to Create a Fill-in-the-Blank Quiz: A Step-by-Step Guide
How to Create a Hotspot Question for an Online Quiz