The 15-Minute Guide for Teachers on Getting Started with Moodle

“Moodle” is a fun word and so is teaching with it! At least, when you know how to work with the platform or, if nothing else, have an idea of what happens after you click a certain button. If you are a teacher who is new to Moodle and you’re looking to explore the platform’s capabilities, this guide is for you.
Moodle is a platform for online learning that enables you to create online courses, add assignments, and keep an eye on your students’ progress. It also allows you to communicate with the students and encourage communication between them in forums and discussions. In short, the platform is multi-faceted and flexible, so it’s easy to get confused when learning your way around for the first time.
This guide covers the basics of getting started with Moodle and some of the main everyday tasks you’ll need to do as a teacher. You’ll learn how to create courses and tests for Moodle and how to invite learners, provide them with assignments, and track their results. We’ve also included some useful links so you can dive even deeper into certain topics, if necessary.
You can also grab this guide as a PDF to print out or just read when it’s convenient for you.
Two quick notes before we get started.
Note 1: This guide was written for teachers and doesn’t cover the system administration part. We presume that you already have a learning portal up and running. If you don’t have it yet, you can try using Moodle Cloud. It doesn’t require any technical skills to launch the learning portal and allows you to set up in minutes. It also has a free plan, which is enough to familiarize yourself with Moodle and make an informed decision on further actions.
Note 2: Moodle is a highly-customized platform, so your portal may differ in appearance and functionality. To illustrate, we used a demo version of a school portal created by Moodle. You’re most welcome to go there and click a couple of buttons on your own.
Learn How to Use Moodle for Teaching
- Customizing Your Teacher Profile
- Creating an eLearning course
- Adding Activities and Resources
- Managing Learners
Customizing Your Teacher Profile
Your teacher profile is available to your learners and colleagues, so it’s a good opportunity to introduce yourself, prove that you’re a human being and not a chatbot, and earn some trust from the students.
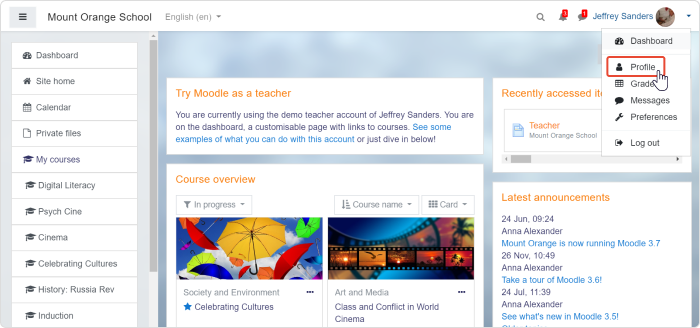
After clicking Profile in the upper right corner, you’ll get to your personal page where you can edit personal information, add a photo, and create an introduction. Click Edit profile to do this.
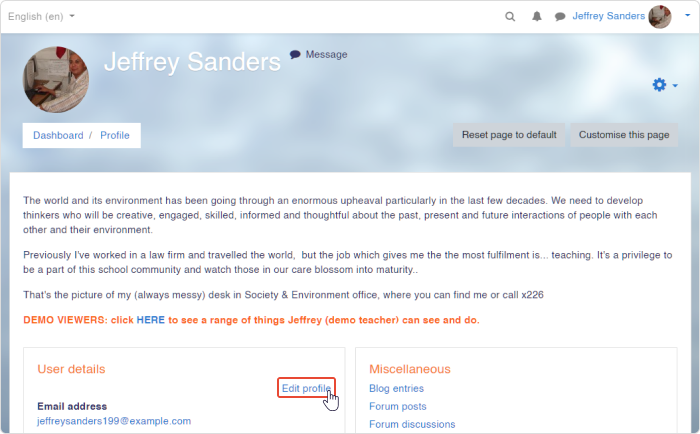
There, you can enter some text about yourself (or record a video introduction, if you like), place a photo, and leave additional contact information.
Creating an eLearning Course
By default, Moodle doesn’t allow Teachers (meaning the role in the system) to add new courses. Here, we must make a quick remark about user roles in Moodle.
There are five major standard user types in Moodle:
- Administrator is a host of a party who can do everything with the system.
- Manager has similar capabilities as an Administrator, but unlike the Administrator, this role can be assigned and the capabilities can be customized.
- Course Creator can create new courses.
- Teacher can add and edit content and activities within a course.
- Student can access available courses.
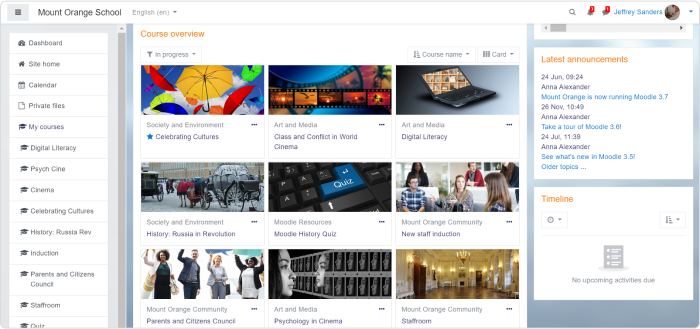
So, if you’re a teacher, you’ll need to contact your admin or manager and ask them to either give you course creator permissions or create an empty course shell for you. For example, in the Mount Orange School demo in the teacher view, we have nine courses assigned by an admin.
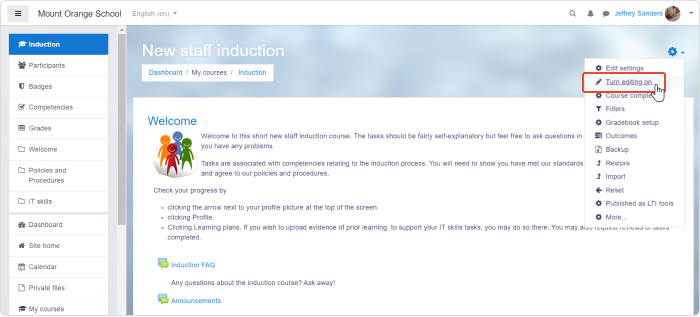
Within these course shells, we can do almost anything: create new units or delete them, add quizzes and resources, or set up a gradebook. To start developing course content, click on the gear icon in the upper right corner, and choose Turn editing on. In case you don’t have such an option, contact your admin to enable it.
Too much to read? Get a summary from AI
How to set up a course structure
In Moodle, there are four types of course formats that define the outline of a course:
- Single activity format is suitable when you have just one activity or resource to study. For example, a survey, a book, or a video lecture. Also, choose this format if you have a SCORM package.
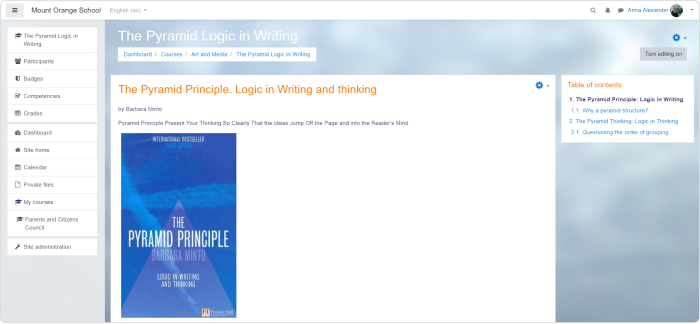
You can use a single activity format to assign learners some readings.
- Topics format organizes content into different sections (lessons, units, or whatever you prefer to call it.)
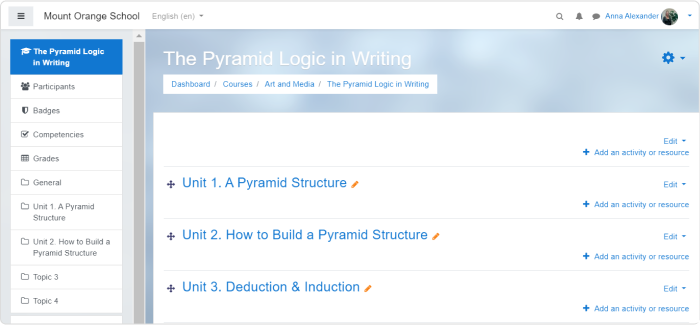
Topics are the most popular format for organizing an eLearning course.
- Weekly format is similar to the topics format, but instead of units, you’ll have weeks. This is a good option for you if you’d like to set a regular learning pace for your students.
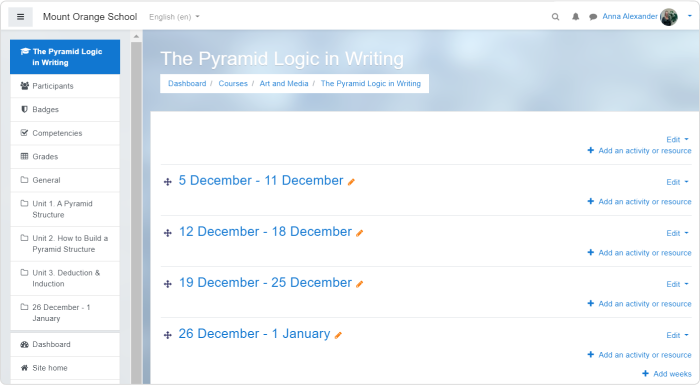
You can rename dates into Week 1, Week 2, and so forth, to make a course more reusable.
- Social format. If you choose this format, then you’ll have a forum instead of traditional units. This is a good choice when you need informal learning and would like to encourage discussions between learners.
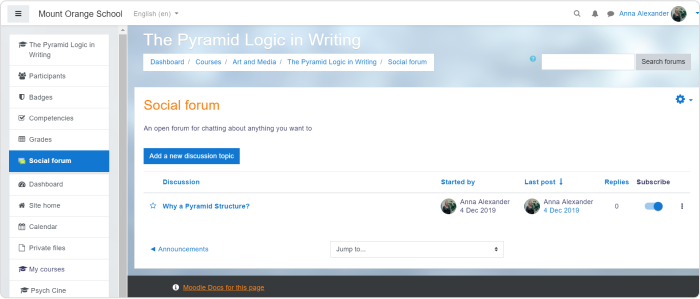
Who said that learning platforms are only for e-courses? Forums are super useful for helping learners to get to know each other and allow productive informal communication.
So, open the course shell you’re going to fill with the learning content and activities. Click the gear icon in the upper right and turn on the editing mode.
After doing so, again, click the gear and choose Edit settings from the drop-down menu.

Scroll down the course settings to the Course format section and choose the format you’d like to proceed with. Then click Save and display at the bottom of the page.

Adding Activities and Resources
In Moodle language, activities are the ways students interact with a course. Quizzes, glossaries, forums, and assignments are all generally called ‘activities.’
Resources are items that you can use to augment training. They can be documents or presentations, or even an external web page such as a certain video from YouTube.
To add an activity or a resource, turn on the editing mode by clicking the gear icon in the upper right. When editing is enabled, there’s a + Add an activity or resource icon after each section of a course. Click it, and you’ll see a pop-up window with the list of all available options and their descriptions. There are 14 types of activities and 7 types of resources.
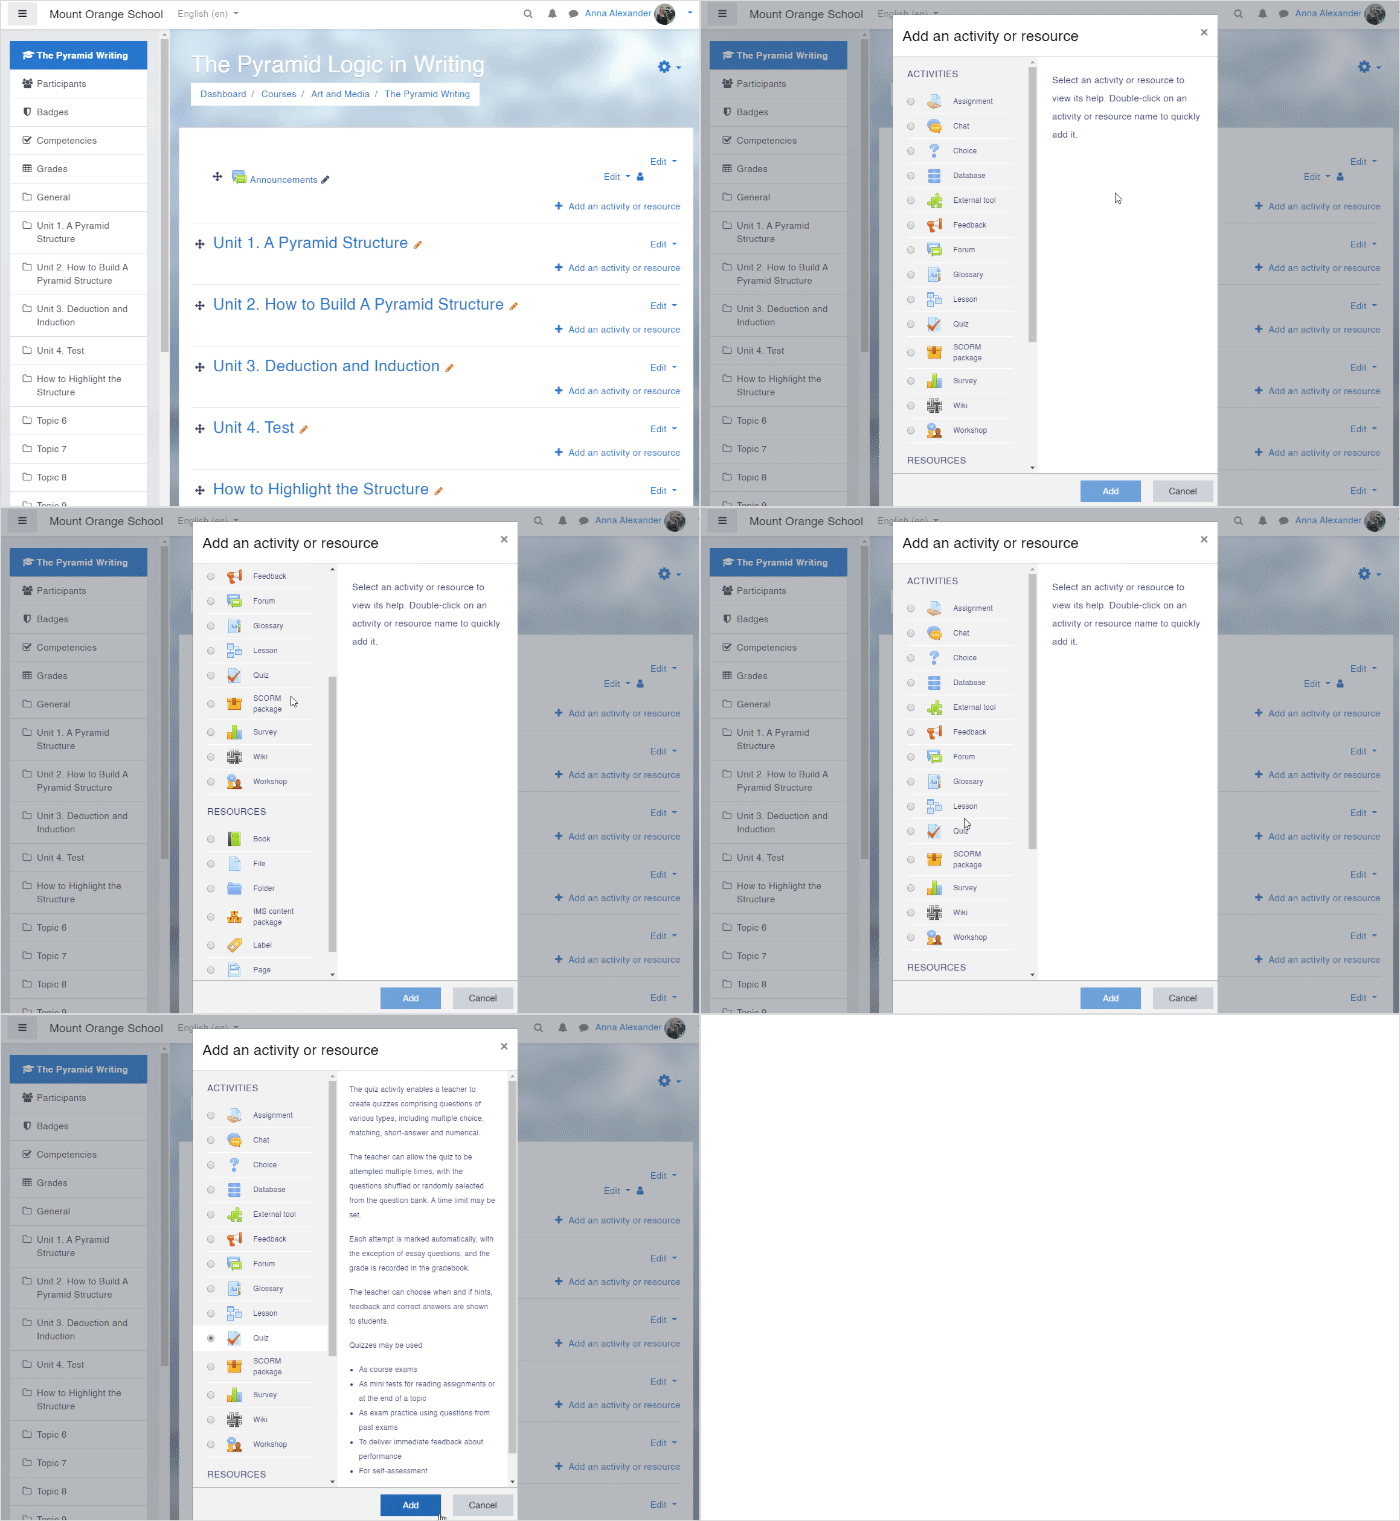
When you have chosen which type of activity or resource you’d like to use, click Add.
How to add a quiz
Choose a section where you’d like to add a quiz, click + Add an activity or resource, and choose Quiz in the pop-up window. After doing this, you get a quiz settings menu.
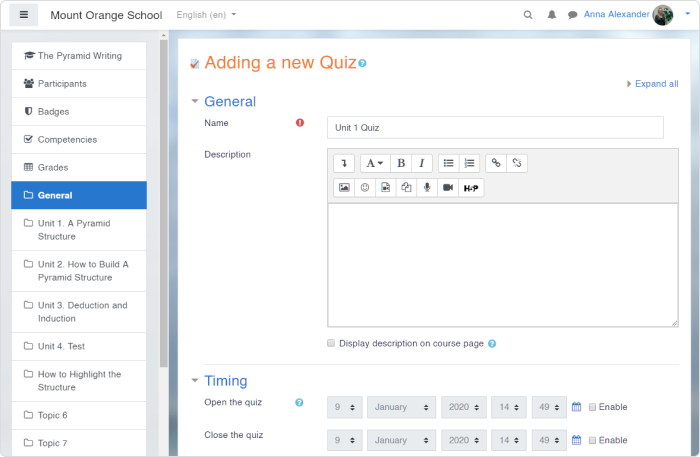
In our example, we’ve simply put “Unit 1 Quiz”, but you can be more specific.
Fill in the name of the quiz. Then you can click Save and return to course since Name is the only field required for creating a shell for a quiz. However, feel free to explore other settings in this menu. For example, you can set time frames for assessment or limit the number of attempts allowed.
The next step is to fill this empty quiz shell with some questions. Click Edit quiz and, in a new window, click Add → + a new question.
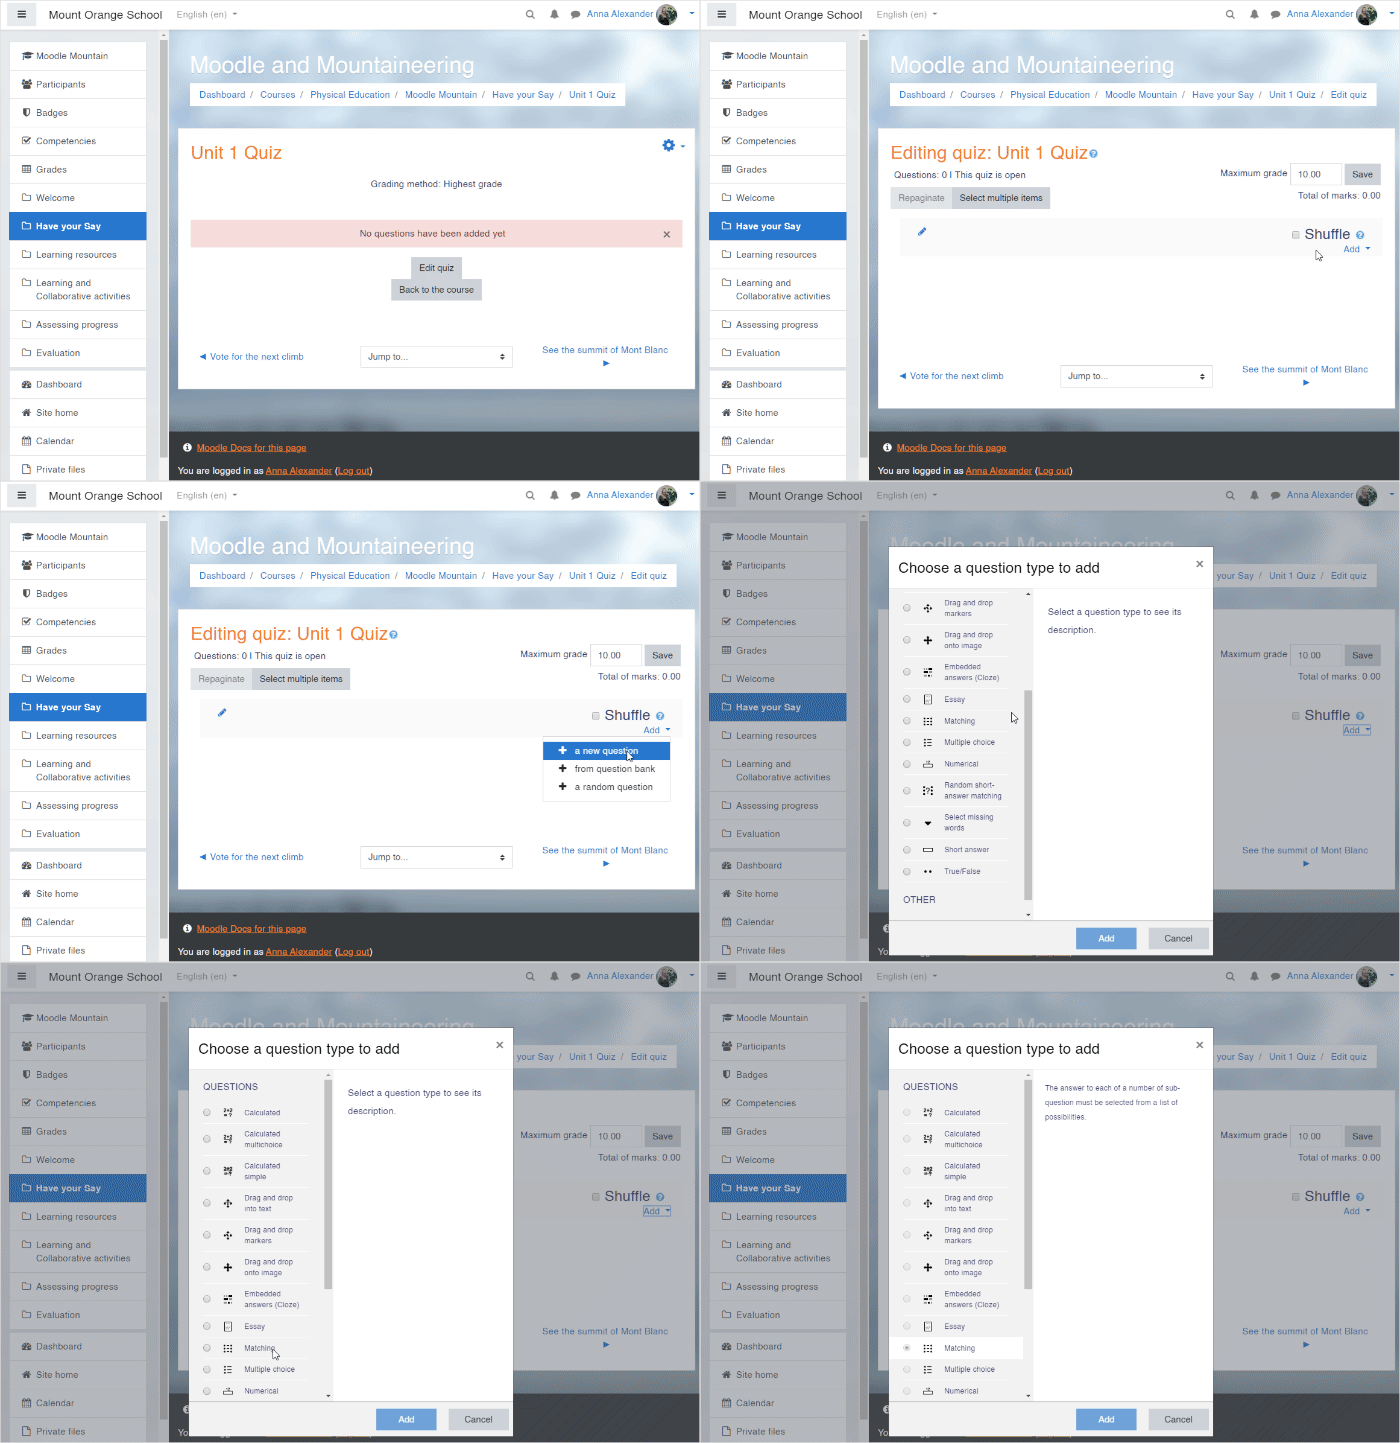
In Moodle, there are 15 types of questions you can use, such as multiple choice, matching, and drag and drop. Choose the type you’d like to use and click Add.
In a new window, you’ll need to fill out the details of the question: its name, question text, answers, and feedback. The interface is quite self-explanatory, but in case you have trouble, there are detailed step-by-step instructions on how to create quizzes in Moodle.
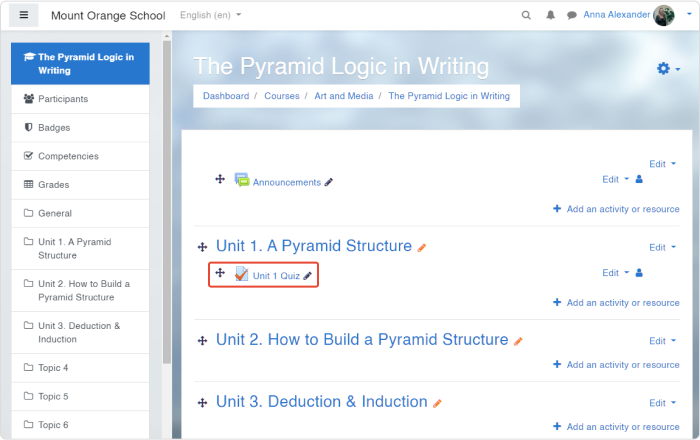
When you’re ready, click Save changes. Again, you’ll find yourself in a quiz editing menu where you can repeat the same sequence of action and add as many questions as you need.
How to add an assignment
Creating assignments is a feature that you’ll likely use very often as a teacher. With its help, you can ask your students to submit their homework and check how well the unit is being digested and provide feedback.
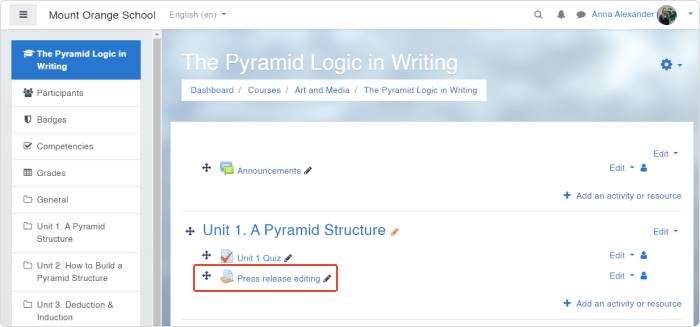
Just like with quizzes, choose the section where you’d like to add the activity, click + Add an activity or resource, and choose Assignment in the pop-up window.
In a new window, give the assignment a name and specify what you expect your students to do in a description field. For instance, you can ask them to watch a video and share their opinion on the topic, or ask them to edit a text and submit an improved version, as we did in our example.
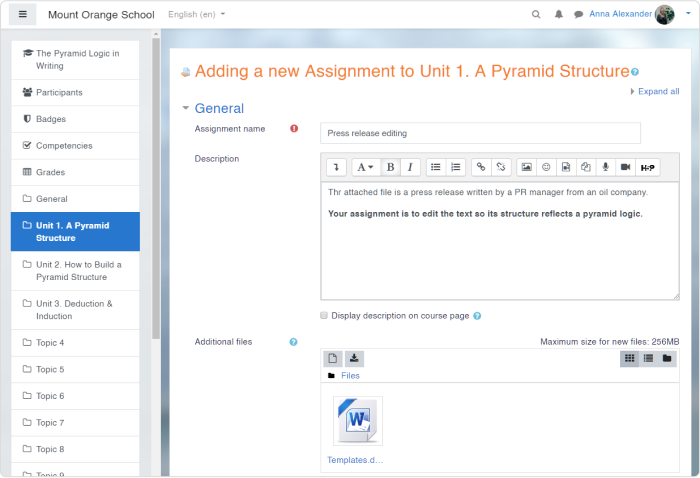
There are also a number of useful settings that are worth playing with. We’ll mention just a few basic ones.
Availability
In this section, you can set time frames for submitting assignments or set a reminder to check students’ work before a certain date for yourself.

Submission types
In this section, you’ll need to specify in what format you expect the students to submit their work. Choose Online text if you want them to type their responses right in Moodle, File submissions if you want them to attach a file, or both options at the same time.
You can also specify certain formats of files and the number of words in essays for the Online text option.

Click Save and return to course when you’re done.
An alternative way to create content for Moodle
While Moodle is a versatile platform with rich authoring features, its interface can be, well, not really difficult but somewhat overwhelming, especially if you’re new to the system. Forget the need to check whether the editing mode is turned on every time you want to change something. Its design capabilities are also limited. So if you need to develop professional eLearning content quicker and easier, there’s iSpring Suite, a fully Moodle-compatible authoring tool.
iSpring Suite works as an add-in to PowerPoint. It enriches a familiar PowerPoint interface with special features for developing eLearning content. With its help, you can create interactive e-courses, quizzes, software simulations, YouTube-style video lectures, and dialogue simulations — each of the items can be published as a SCORM package and easily uploaded to Moodle.
In this blog post, you’ll find a detailed step-by-step tutorial on making a course with Moodle and the same course made with iSpring Suite.
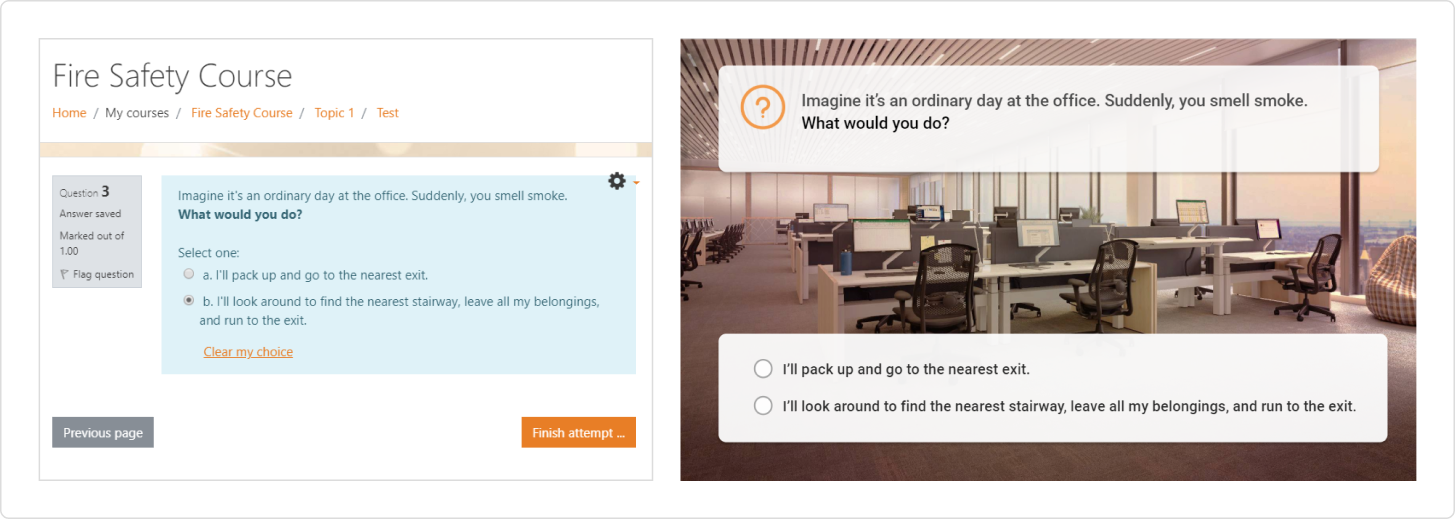
Preview of a quiz made in Moodle and the same quiz created with iSpring Suite.
Managing Learners
Now, when your course is ready, it’s time to invite some learners to explore the content.
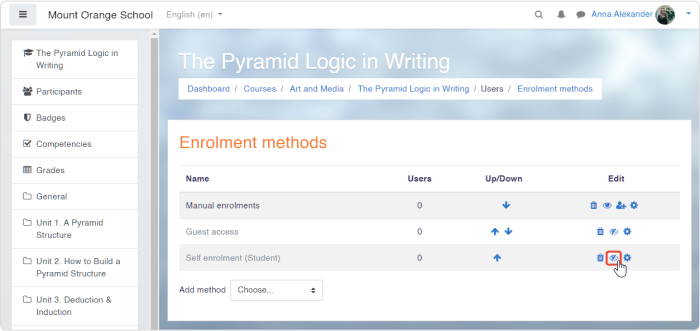
First, let’s set up the enrolment methods. Within a course, choose the Participants tab in the left menu, then click a gear icon in the upper right and select Enrolment methods from a drop-down menu.
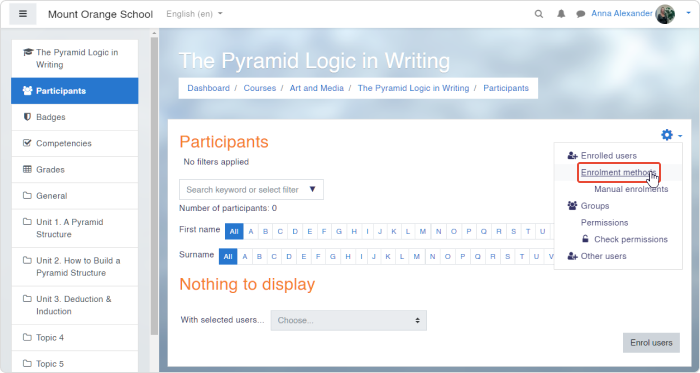
There are three enrolment methods available:
- Manual enrolment
- Guest access
- Self enrolment
By default, the only option enabled is manual enrolment. If you’d like to activate self enrolment or guest access, click the eye icon. If you also click the gear icon next to the eye, you’ll be able to set up some additional settings such as enrolment duration, enrolment password, or a maximum number of users.
How to enroll students on a course
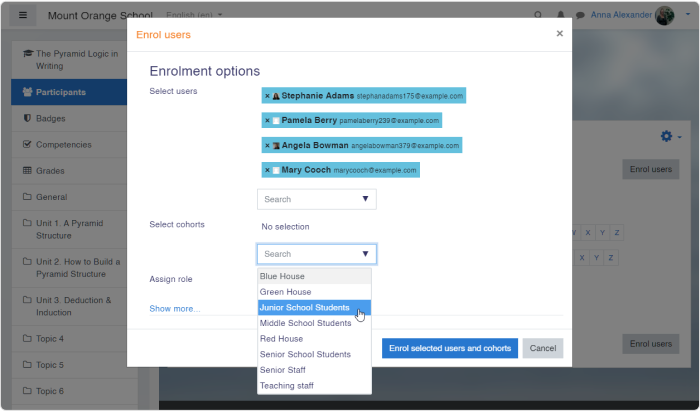
Usually, teachers don’t have to add users to the system, because the list of users is pre-loaded by an admin or a manager. So, to enroll students on your course, choose the Participants tab in the left menu. From there, click Enrol users in the upper right area and then, in a pop-up window, select users or groups of users from the drop-down lists.
When you have finished, click Enrol selected users and cohorts.
How to create groups
For more convenience, you can also divide the enrolled users into groups. It’s especially useful when you have different classes that study the same course, or there’s another teacher assigned to this course, so you would like to split the learners.
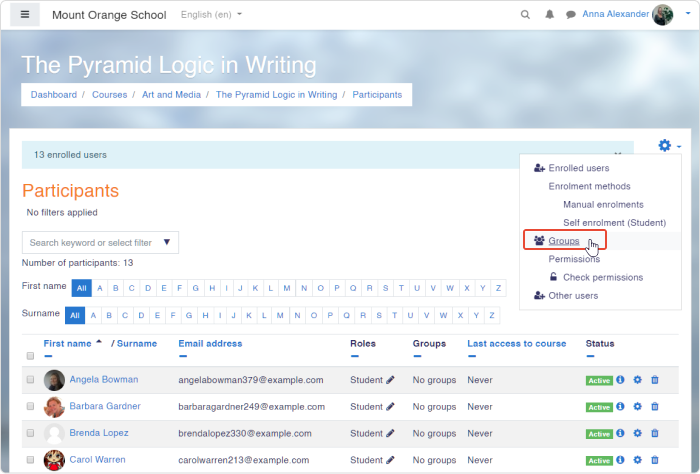
To create a group, click on the gear icon in the upper right and select Groups from the drop-down menu. By the way, you may have noticed that in Moodle, you have to click this gear icon like, well, all the time! Think of it as a benefit: you’ll definitely remember where it is.
In a new window, scroll down the page and click Create group. After that, name the group, set a picture, and enable group messaging if you like, and click Save changes.
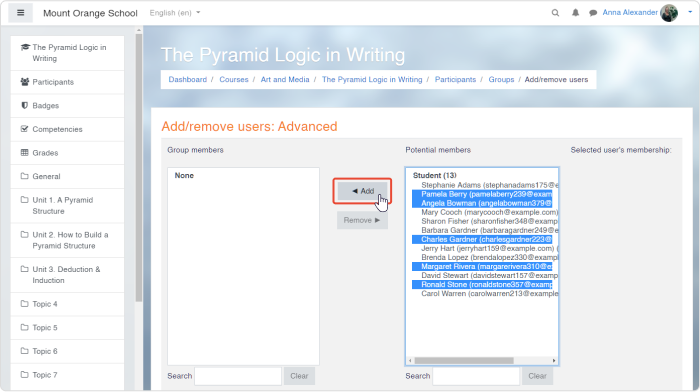
Again, in a new window, select the group from the list and click Add/remove users from the right. You’ll see the list of users enrolled in the course; select those who you’d like to add to the group and click Add in the middle.
How to message students
In Moodle, you can communicate with your learners and colleagues, just like in WhatsApp. In the upper ribbon, there’s a bubble icon that opens the list of your contacts.
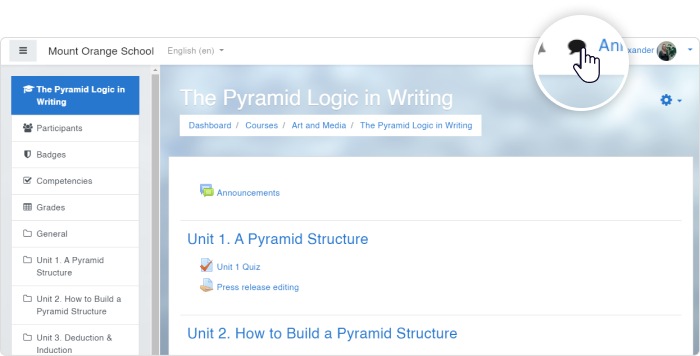
You can send private messages to users as well as group messages, which is a very convenient feature when you need to quickly discuss something, inform, or share an insight.
How to set up a gradebook
A gradebook is a Moodle feature that helps you collect scores for graded activities from your course. With its help, you can collect and view marks and manually enter grades for offline activities.
To set up a gradebook for a course, click on the gear icon in the upper right and select Gradebook setup. On a new page, you’ll see the full list of graded items for the course.
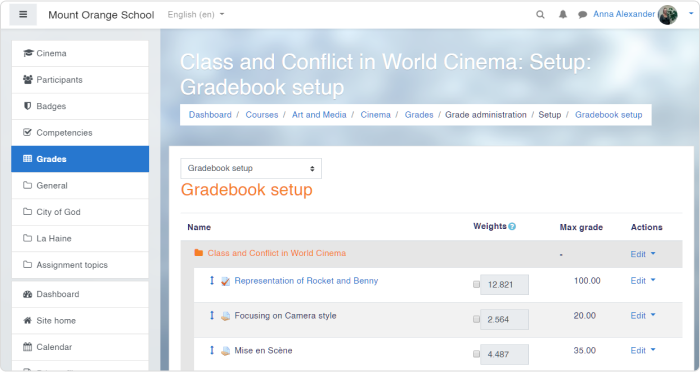
For each item, there’s a Weights column. The bigger the number, the more important the grade for performing this task (more on that in a minute).
For now, let’s make gradebook items look more organized and divide activities into categories. Scroll down the page and click Add category. In the demo course we use, there are three types of graded items, so we can create three categories for them:
- Assignment
- Quiz
- Simulation
In your course, you can create any number of graded item types and as many categories as you need. After clicking Add category, give each created category a name and click Save changes.
Now, move the items to their category by clicking the arrow icon on the left of the item’s name.
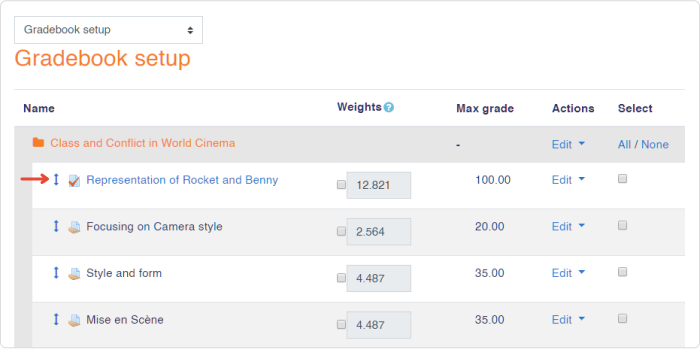
Now, when your items are organized, it’s easier to assign the weights to each category. Let’s say, we believe Assignment to be the most important category, so we’d like to give it the largest weights. For example, it’s 50. We tick a checkbox for Assignment and enter 50.
All the other weights are automatically adjusted, so the sum is 100, but you can define weights for the rest of the categories too — in our example, we put 30 and 20 for Quiz and Simulation correspondingly.
If you like, you can also manually define weights for each item within a category.
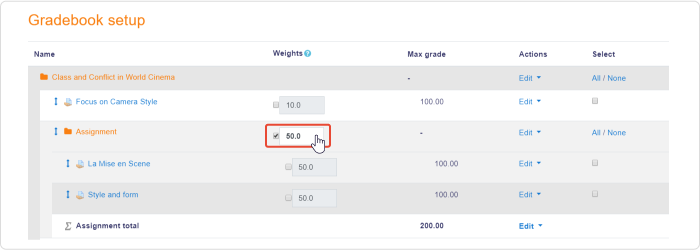
When everything is ready, click Save changes in the left bottom.
How to grade learners’ assignments
To grade assignments, you need to choose the one you’d like to begin with. You can do this in several ways, but let’s go the most direct way and choose Grades in the left menu and then find an activity you’d like to grade in the row and click on it.
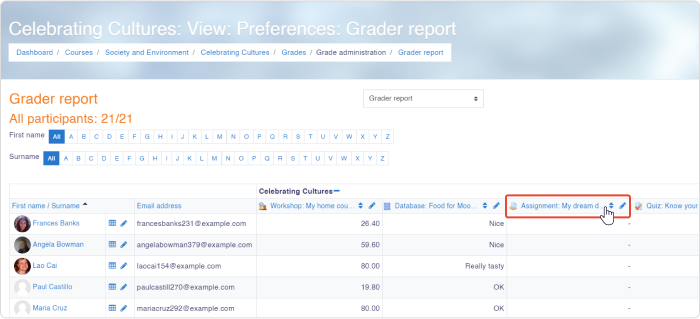
You’ll get in the Grading summary page with two options: View all submissions or Grade.
Click View all submissions, to begin with. After doing so, you’ll see the list of all enrolled users and their submissions (or lack thereof). For more convenience, you can assign statuses, so it’s always clear for you which work still needs marking or review.
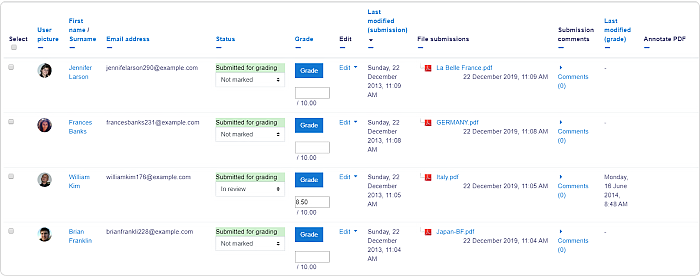
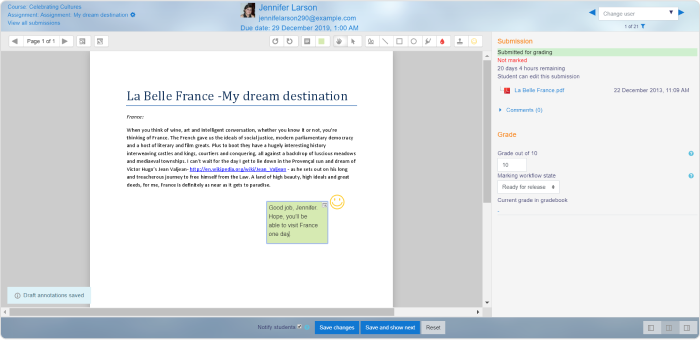
Click Grade if you’re ready to begin reviewing some students’ assignments.
The gradebook’s interface allows you to leave annotations, text comments, mark with colors, and put various stamps as feedback. Enter the grade for the student’s submission in the right panel, change the status, and then click Save changes to quit or Save and show next to proceed.
Get Started Teaching with Moodle
Congratulations! You’ve come a long way to get here through the basics of teaching with Moodle. It’s a great (and free!) platform that allows you to teach as many students as you wish from all over the world.
Being teachers’ advocates, we’d also love to recommend you try iSpring Suite for developing professional eLearning content. It’s not as free as Moodle itself— though, there are a free trial and discount for the academic sector — but it helps to keep your life easier and create content two times faster, at the very least.
Let us know if the article was useful in the comments section below!


