How to Create a Moodle Quiz: Step-by-Step Guide

In this article, we’ll show you how to build a quiz in Moodle and how to set it up so users don’t cheat and the results are credible. We’ll also create a small linear sample quiz together to put theory into practice right away.
To continue, you’ll need to sign up to Moodle Cloud and get the text of the sample questions.
Usually, creating your first Moodle quiz takes an hour or two because you need time to get acquainted with the interface. But, there’s a way to make quizzes twice as fast using the iSpring Suite authoring tool. We’ll show you how it works as well, so you can decide which tool suits you best.
Key Takeaways
The article explains how to build and configure a Moodle quiz, starting with creating a course and configuring quiz settings to ensure credible results, such as setting time limits, the number of attempts, passing grades, layout, answer shuffling, and feedback. It walks through how to add True/False and Multiple Choice questions and how to use a question bank for reuse. The guide also shows how to assign the quiz to learners and track their results. Finally, it presents iSpring Suite as an easier alternative for quiz creation that is fully compatible with Moodle and significantly simplifies the process compared to Moodle’s native interface.
Now, let’s get started.
Step 1: Create a New Course
One doesn’t simply open Moodle and create a quiz. First, you need to create an online course in Moodle and enter the course details; only after that will you be able to add quizzes for your exams or ongoing assessments.
To create a new course, go to Site Administration → Courses → Add a New Course.
Enter a full and a short name for the course, then go to the Course Format tab below and choose “1” in the Number of sections line.

Choose the necessary number of sections. For a sample course, one is enough.
The Moodle course structure is similar to that of a book. It consists of chapters, or sections, that you fill with theory and drills. The number of sections is usually set at the beginning.
There are also a number of other settings below, such as course start and end date and course appearance — we’ll get back to them later. For now, scroll down the page and click Save and Display.
The course is ready; now you need to provide yourself with admin access rights so that the course will appear in your profile. Click Enrol users, enter your name in the pop-up window, and choose Manager from the dropdown menu. Then click Enrol users.

If you don’t assign yourself a manager role, you’ll have to spend some time to find this course in the admin panel.
Step 2: Add and Set Up a Quiz
Now you can add a quiz to Moodle. Click Proceed to course content → Add an activity or resource. The Moodle toolbar will appear on the screen. Choose Quiz in the Activities section → Add.
Enter the quiz name and its description. It’s also important to set a number of options so that your learners don’t cheat.
Quiz Settings in Moodle
You can find details on each option in this Moodle help doc. In this article, we’ll cover the basic settings.
Setting #1: Timing. Protect from cheating
By default, learners have unlimited time to pass the exam; they can get started today and finish in three days with the highest score by copying the answers from the textbook.
To obtain credible results, we’ll set an assessment period and time limit.
Assessment period
Let’s make the test automatically open on September 17 at 11:00. Until that time, learners will see only the exam description in their account.
The end date is September 18 at 12:00; at this time the quiz will be closed. If a user forgets to take the test in time, he or she will automatically fail.

Set the start and the end dates.
Time limit
Usually, 30 minutes to an hour is enough, but it depends on the complexity of the exam. In some cases, learners may need 3 or 4 hours.
When the learners start answering questions, they see a countdown timer that shows how much time is left. When the time expires, the quiz is automatically closed.

Set a time limit for taking a quiz.
The rest of the options in this section can be left as they are by default.
Setting #2: Grade. Set a passing grade
With the default settings, your employees have an unlimited number of attempts to answer the same question. As a result, a quiz can be passed by a random choice method: they make a mistake and immediately change the answer, and so on until they pass. If you prefer learners not to play guessing games, limit the number of attempts and set a passing score.
Too much to read? Get a summary from AI
Number of attempts
If this is a final exam, you can give just one attempt, and perhaps three for a pop quiz.

Limit the number of attempts to avoid guessing games.
Passing grade
This is the minimum score required to pass a quiz. The pass grades are highlighted in green, and fail grades in red.

Set a minimal passing grade.
As there are only two questions in our sample quiz, let’s set one point as the passing grade.
Setting #3: Layout. Build a structure
You can group questions into blocks and place each question on a single page, or all the questions on one page.

If all the questions are on one page, learners can see the whole quiz at a glance.
Setting #4: Question behavior. Shuffle answers
For additional anti-cheat protection, choose Yes in the Shuffle within questions line so that the parts making up each question will be randomly shuffled each time users take the quiz.

Enable shuffle within questions.
Setting #5: Overall feedback. Provide a final comment
The overall feedback is a text which users see after completing the quiz. You can show different text depending on the final score: praise high performers and tell flunkers the rules of retaking the quiz.

Overall feedback is a message your learners see after completing the quiz.
For now, we’re done with the main settings. Click Save and Display. The system will forward you to a new page:

You’ll see this page when you create a sample course.
Previously, we set the minimum passing grade for the quiz. Now, we need to indicate the highest score. Click Edit quiz and enter the mark in a field that appears after clicking. Since there are only two questions in our sample test, the highest score will be two points.

Specify the maximum score. In this case it’s 2 points.
Step 3: Create Tasks for Assessment
In MoodleCloud, there are 15 types of questions.

The Moodle built-in quiz editor
We’ll create two of the most popular question types, True/False and Multiple Choice, so you can master the principles of making quizzes in Moodle and easily create other types of tasks on your own.
True/False question
To add a True/False question, click Add → a new question → True/False → Add.

In the new window, fill in a question name and question text (here’s the source file for the sample quiz). You can also add images, video, audio, or a link to additional material on the topic of the question.

You can add images, video, audio, or a link to additional material.
Then set the correct answer. In our sample, the statement is true, so choose True in the dropdown list.

Choose the correct answer.
By default, learners get one point for each correct answer, but you can increase the reward. You can also add feedback for the response so that a learner can better understand the topic and improve next time.
Click Save changes to publish the task; it will look like this:

This is what a published True/False question looks like.
Multiple choice question
Here’s how to create a multiple choice quiz in Moodle, click Add → a new question → Multiple choice → Add. Fill in the question name and question text by copying it from the template.
In multiple choice questions, there can be more than one correct answer, but there’s only one correct response in our sample question. Let’s choose this option in the question settings.

Choose how many answers are allowed.
Now, you need to select the correct answer and give it a 100% grade. The rest of the responses are false, so we don’t give points for choosing them.

Define a grade for the correct answer.
The rest of the options can be left at default. Save changes. The published task looks like this:

This is what a published Multiple choice question looks like.
You can also apply some additional display options such as:
- Whether correct: show or don’t show learners if the response was correct
- Marks: show or don’t show learners how much they score
- General feedback: show learners a certain message upon completing the quiz
To find these options, click Preview question (a magnifying glass with a plus sign next to each question) and set them up in a pop-up window.

The list of additional settings
The quiz is ready. All you need to do now is to assign it to learners and keep track of their results from the Grades tab.
Step 4: Open a Question Bank
So far, we’ve been discussing creating a quiz from scratch. If you’re going to conduct regular online assessments in distance learning, it’s convenient to use a question bank.
A question bank in Moodle is an overall stock of all the questions and tasks you’ve ever created on the platform. This feature saves time since there’s no need to create everything from scratch: if you need to prepare a test for a new course, you can simply copy ready-made tasks from the bank.
The two questions we created as a sample are already in the bank; to find them, go to the course page in your account.

To open a question bank, click the gear icon and select More.
Choose More from the dropdown menu and click Question bank in the new window. On this page, you can create new tasks and find the ones you’ve already used.

A question bank keeps all the questions you’ve ever created with Moodle.
Next time you can try creating questions right on this page and build a new quiz with them.
Creating a Quiz with iSpring Suite: An Easier Alternative
Moodle has a wide range of options for creating assessments. At the same time, its interface is quite complicated due to the large number of various settings and menus; for a new user, it can be a challenge to find the right option without looking in the help docs.
The logic of Moodle is also something you need to get used to: before you can create a quiz, you have to adjust the course and set the parameters for the quiz and each question. As a result, the process takes more time than you might expect.
iSpring Suite can help to solve this task quicker and easier. With this tool, you create an interactive quiz in a single window without jumping from one page to another. The published quiz is fully compatible with Moodle and adapts to any screen size. Here’s an example of a quiz made with iSpring Suite:

Thanks to the plugin, you can create exercises and quizzes in iSpring Suite and use them in Moodle. With the iSpring Module, you combine the simplicity of course creation with iSpring Suite with the comprehensive statistics of Moodle.
Step 1: Choose a Question Type
Launch iSpring Suite and click Question in the upper left corner of the ribbon. In the dropdown menu, you’ll see 14 question types.
Choose True / False and fill in the text field of the question. iSpring Suite has an interface that is similar to Microsoft Word, so it’s easy to work with text. Let’s make part of the text in bold to make it quicker for learners to catch the essence of the question.
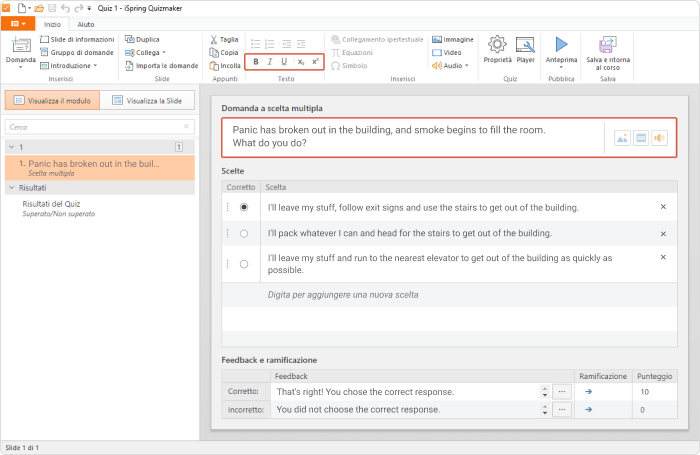
Write the text of the question
Step 2: Add Feedback
Create feedback messages in the Feedback and Branching pane and specify the score you’d like to award for each answer.
When learners complete the quiz, they’ll automatically see a final slide that indicates if the quiz was passed or failed.

The final slide of a quiz made in iSpring QuizMaker
You can change the text and design of the final slide in the Results section on the left.
Step 3: Protect From Cheating
Let’s limit the number of attempts and time for a response to avoid cheating. You can do this in the Slide Options bar on the right. You can also tick the Shuffle answers checkbox so that the answer choices for each question are randomly shuffled for each user.
Step 4: Configure Quiz Design
iSpring Suite offers 36 ready-made themes and 19 color schemes. You’ll find them by clicking Themes in the Design tab.
You can also customize fonts and add captions, images, and objects — it’s as easy as in PowerPoint.
Also read: How to Convert PowerPoint to MP4 Video on Windows & macOS
The first question of the quiz is now ready, and you can create the second one using the same simple process. The final result looks like this:

Step 5: Publish the Quiz to Moodle
Now, it’s time to publish the quiz. To do that, click the Publish button on the toolbar, and select Moodle in the LMS profile option. In this tab, you can prepare quizzes for Moodle.

Choose the LMS tab when publishing a quiz.
Select a folder on your desktop where iSpring QuizMaker will save the quiz. Choose SCORM 1.2, the format Moodle recognizes, under LMS Profile. Then click Publish, and the archive with the quiz will appear in the specified folder.
Then open your course in Moodle, select a topic you’d like to add the quiz to, and turn the editing on in the settings. Then click Add an activity or resource, choose SCORM package from the list, and click Add.

Upload the published quiz as a SCORM package.
In the new window, fill in the quiz title and description, attach the package file, and click Save and display. Now the quiz can be assigned to learners and you can track their results.
Tips for Creating Effective Quizzes
Here are a few techniques that will help you create engaging quizzes that really work:
- Make questions short and simple. Of course, you can use eloquent metaphors and long clever sentences, but plain wording is best. Keep your message clear and try to formulate questions as concisely as possible. Also, mind your tenses and phrasing, and omit redundant information.
- Align questions with your training goal. When creating your quiz, always keep the learning objective in mind. Do you just want to get a factual answer, or initiate a train of logic for better knowledge retention?
- Vary question types. Students are tired of encountering the ubiquitous multiple-choice and true or false questions. So, to make the learning process more engaging, consider fill-in-the-blank, sequence, hotspot, drag-and-drop, and a selection of others.
- Give various weights to various questions. If you have different question types in your quiz, they may “earn” differently. The chances are some of them will be more valuable than others. For example, open response questions may weigh more than multiple-choice questions. This should be taken into account if you want to make quiz results more objective.
- Provide feedback. For better retention, give detailed feedback on the answers that explains why this or that choice is incorrect or correct. You can also provide some additional useful facts on a topic in a feedback message to expand learners’ knowledge.
FAQ on Quiz in Moodle
Is there a way to loop questions in Moodle?
Yes, in Moodle, you can set up a question bank and create a quiz that pulls questions from that question bank. You can then configure the quiz settings to allow for question looping when a question is answered incorrectly.
Does Moodle check switching tabs?
No, Moodle does not have built-in functionality to check if a user switches tabs while taking a quiz or completing an activity. Moodle focuses on providing a secure and reliable learning management system, but it does not have the ability to monitor user behavior outside of the platform itself.
You can add plugins to achieve this, but these plugins will display a prompt informing you that switching between tabs or apps is not permitted.
Which type of quiz can be created in Moodle?
In Moodle, you can create various types of quizzes, including multiple-choice, true/false, short answer, matching, essay, and more. Moodle also supports advanced question types such as calculated, numerical, and drag and drop. Additionally, you can create randomized quizzes to present different questions to different students.
Can I create quizzes for Moodle in iSpring QuizMaker?
Yes, you can. A plugin lets you create your quizzes in iSpring QuizMaker and gather statistics and data in Moodle, including completion status, start/end date and time, total time spent, and score. With all of this data at hand, you can apply filters and build reports to identify areas for learner improvement.
To Sum Up
In this article, we’ve covered two ways to create quizzes for Moodle: using the built-in editor and the iSpring Suite tool.
In Moodle, you can build a test with different types of questions for free. The main disadvantage is the complex interface with a bunch of settings.
You can also create quizzes with iSpring Suite. Thanks to the integration with Moodle, you can make course progress tracking more engaging and, at the same time, gather valuable insights on learner performance
iSpring QuizMaker is just one tool from the iSpring Suite toolkit. Also, you’ll be able to convert PowerPoint presentations into e-courses, create interactive simulations, edit video, and much more. All the video files in this article were created in iSpring Suite.
There’s a 14-day trial version of the toolkit; theoretically, that’s enough time to create dozens quizzes for Moodle.
Create online courses and assessments in record time.


11 Best Quiz Maker Software for Training and Fun
The 15-Minute Guide for Teachers on Getting Started with Moodle