How to Change PPT Slide Size: A Step-by-Step Guide


Key Takeaways
The default slide size in PowerPoint is widescreen 16:9 (13.333 in × 7.5 in). You can switch to standard 4:3, match a paper size like A4, or enter any custom dimensions you need.
On both Windows and Mac, the path is the same: Design tab → Slide Size. The entire process takes under a minute.
When you change slide dimensions, every slide in the file changes – there’s no way to resize a single slide independently inside the same deck.
Picking the right aspect ratio at the outset – 16:9 for screens, 4:3 for older projectors, A4 for print – saves you from re-aligning text boxes, images, and charts across an entire presentation later.
If you’re building training content, getting slide dimensions right before you publish matters. Tools like iSpring Suite work directly from your PowerPoint file, so whatever canvas size you set there carries through to your SCORM course, video output, or LMS upload.
Why PowerPoint Slide Size and Aspect Ratio Matter
Not every screen is the same size – and neither is every room, projector, or learning platform. A slide deck you build on your laptop might look sharp in your preview window but appear stretched, border-heavy, or inconsistent across different devices. This mismatch usually happens because the slide dimensions don’t match the display.
The most common aspect ratio difference is between 4:3 and 16:9. If your file is set to the older standard ratio and the projector or display is widescreen, you’ll see black bars on both sides – or worse, the presenter software stretches the image to fill the screen, and every face and diagram looks slightly wrong. Flip it the other way, and a widescreen deck on a 4:3 projector gets cropped or letterboxed. Neither version makes your content look professional.
This matters even more in a training context. L&D teams often repurpose the same PowerPoint file across formats like webinars, SCORM courses, printed aids, and videos. Setting the correct slide size right from the beginning ensures that all slides scale predictably, avoiding manual repositioning of objects on dozens of slides – a time-consuming task that can delay production.
If your team uses iSpring Suite to convert PowerPoint presentations into courses, the slide canvas you set becomes the base layout for the published course. Setting the canvas correctly from the start ensures that your course fills the browser frame cleanly on laptops, tablets, and large displays without extra tweaks.
Default PowerPoint Slide Dimensions and Aspect Ratios
Before you change anything, it helps to know what you’re starting with – and what the default size is.
Aspect ratio is just the proportional relationship between a slide’s width and its height. A 16:9 ratio means the slide is 16 units wide for every 9 units tall. Slide dimensions are the actual physical measurements – inches or centimeters – that PowerPoint uses to define the canvas. The two concepts are linked but not the same: you can have two slides with identical 16:9 ratios but different physical sizes.
What PowerPoint uses by default
Every version from PowerPoint 2013 through Microsoft 365 (as of 2026) uses the default size of widescreen slide size 16:9 for new presentations. The exact measurements are:
Format | Width | Height | Aspect Ratio |
Widescreen (default) | 13.333 in / 33.87 cm | 7.5 in / 19.05 cm | 16:9 |
Standard | 10 in / 25.4 cm | 7.5 in / 19.05 cm | 4:3 |
A4 paper (portrait) | 8.27 in / 21 cm | 11.69 in / 29.7 cm | A4 |
Letter paper (portrait) | 8.5 in / 21.59 cm | 11 in / 27.94 cm | Letter |
Why you might still encounter 4:3
If you’ve opened an older PowerPoint template or a corporate library file that looks boxy, it’s probably a 4:3 format. Many older projectors in classrooms and training centers use this standard ratio, so 4:3 content remains common even if it’s no longer the default. Knowing your slide ratio before adding content helps avoid reformatting later.
How to Change Slide Size in PowerPoint on Windows
These steps apply to PowerPoint 2016, 2019, 2021, and Microsoft 365 on Windows 10 and Windows 11. The ribbon layout and dialog boxes are the same across all these versions.
The basic steps
1. Open your presentation in PowerPoint.
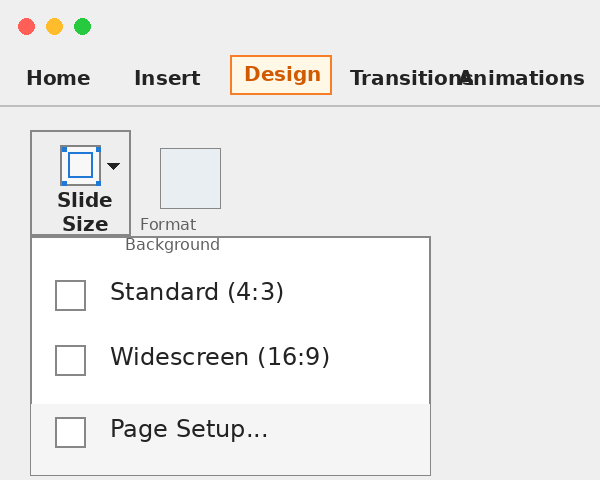
2. Click on the Design tab in the ribbon at the top of the screen.
3. On the far right of the ribbon, find the Customize group and click on Slide Size.
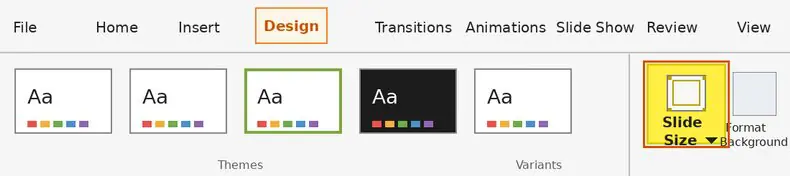
4. A short dropdown menu appears with three options:
- Select Standard (4:3) – 10 in × 7.5 in
- Widescreen (16:9) – 13.333 in × 7.5 in
- Custom Slide Size… – opens a dialog where you can enter any desired dimensions
The prompt PowerPoint shows you – and what it means
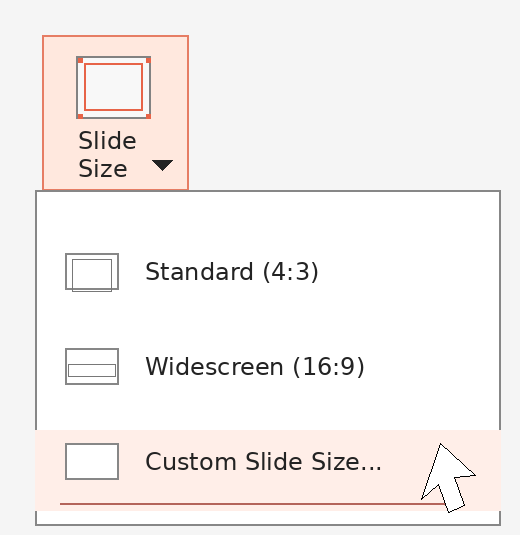
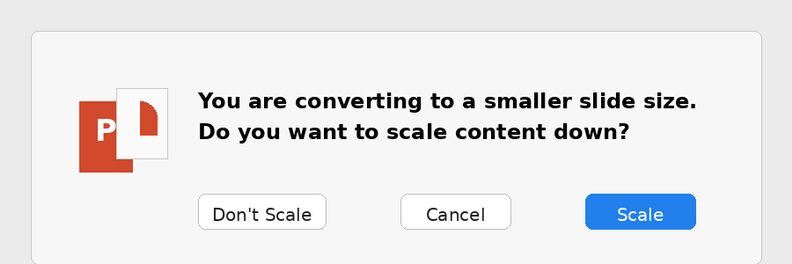
As soon as you select a new size, PowerPoint will ask how it should handle your existing slide content. You’ll see two buttons:
Maximize – keeps all objects at their current size. Content near the edges of your slides may get cropped if you’re switching to a smaller canvas. Select Maximize if you’re scaling up and want objects to stay large.
Ensure Fit – shrinks everything proportionally so that content fits within the new slide boundaries. Nothing gets cut off, but text and images will be smaller than before.
Neither option is automatically the right call. If you’re switching from 4:3 to 16:9, Maximize usually works well because you’re gaining canvas space. Going the other direction – widescreen down to standard – Ensure Fit is safer as a starting point, since it prevents content from disappearing off the edges.
Whichever you pick, treat it as a point of departure rather than a finished result.
What changes, and what doesn’t
Changing the slide dimensions affects every slide in the presentation file – all at once, with no way to exclude individual slides. Animations, transitions, and slide notes carry over, but the positions of text boxes, images, shapes, and diagrams will shift depending on how dramatic the size change was.
After resizing, it’s worth spending a few minutes scanning through your deck before you do anything else. Pay particular attention to:
Title slides – logos and headline text often drift toward the edges
Content-heavy slides – tables and multi-column layouts are especially prone to overlap or overflow
Slides with diagrams or custom graphics – grouped objects sometimes separate or rescale unevenly
Set a Custom Slide Size with Exact Dimensions (Windows)
The two presets – 16:9 and 4:3 – cover most presentation scenarios, but there are plenty of situations where neither fits: a digital signage display with unusual proportions, a printed training booklet that needs to match A4 paper, a square graphic for a LinkedIn post, or a course layout sized to fill a specific LMS player frame. In these cases, Custom Slide Size lets you define the exact dimensions you need.
How to open the custom size dialog
- Go to Design on the ribbon.
- Click on Slide Size at the far right.
- Select Custom Slide Size… from the dropdown.
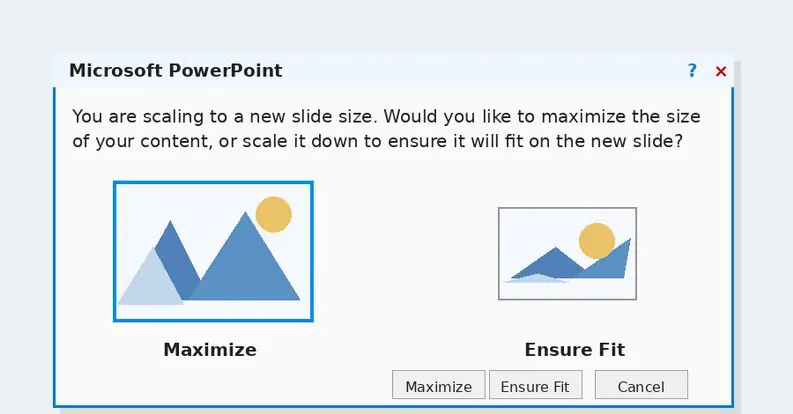
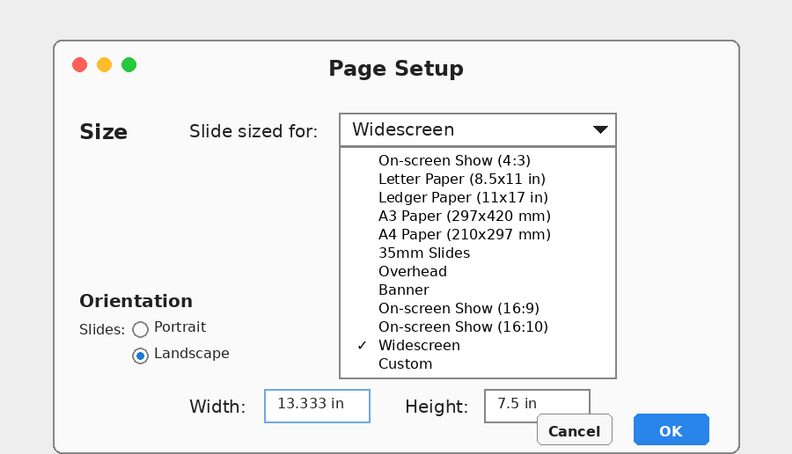
Using the “Slides sized for” dropdown
At the top of the dialog is a dropdown labeled Slides sized for. It contains a list of presets that goes well beyond the two options in the main ribbon: On-screen Show (4:3 and 16:9), A3, A4, B4, B5, Letter, Ledger, 35mm Slides, Overhead, Banner, and Widescreen. If your target is a standard paper or screen format, picking from this list is faster than entering measurements manually and reduces the chance of a rounding error.
Entering your own width and height
If none of the presets match what you need, type directly into the Width and Height fields. PowerPoint accepts inches, centimeters, or pixels – just type the number and the unit, and PowerPoint converts automatically. Here are a few practical examples, including custom dimensions for designing social media posts:
- Training room with an older 4:3 projector: set Width to 10 in and Height to 7.5 in
- Digital signage banner (horizontal): set Width to 25 in and Height to 5 in
- Square social media graphic (approx. 1080×1080 px): set both Width and Height to 11.25 in (1080 ÷ 96 dpi ≈ 11.25 in)
- A4 portrait for a printed job aid: select A4 from the dropdown, then set orientation to Portrait
Orientation controls
Just below the size fields, the dialog lets you set orientation separately for Slides and for Notes, Handouts, and Outline. Portrait and Landscape are both available. This is the right place to set up a vertical slide deck – for example, a tall infographic or a mobile-friendly job aid – without affecting the layout of your handout.
Size limits to be aware of
PowerPoint enforces a minimum of roughly 1 inch per side and a maximum of 56 inches per side. If you type a value outside those limits, PowerPoint will flag it before allowing you to proceed.
A note on pixels and print resolution
When you’re designing for web or social media, and you’re thinking in pixels, the conversion is straightforward at PowerPoint’s default 96 dpi screen resolution: divide your pixel target by 96 to get inches. So, a 1920×1080 export target translates to 20 in × 11.25 in as your slide canvas. For print, the math changes – print output at 150 or 300 dpi requires a higher-resolution source, so if print quality matters, it’s worth setting the canvas larger and compressing images after the layout is finalized.
How to Change Slide Size in PowerPoint on Mac
The process on Mac is nearly identical to Windows, but a few labels differ depending on which version of PowerPoint for Mac you’re running. The following steps cover PowerPoint 2019, 2021, and Microsoft 365 for Mac – all of which use the same ribbon-based interface.
The basic steps
- Open your presentation in PowerPoint for Mac.
- Click on the Design tab in the ribbon.
- On the right side of the ribbon, click on Slide Size.
- Choose from the dropdown: Standard (4:3), Widescreen (16:9), or Page Setup… or Custom Slide Size, depending on the PowerPoint for Mac version.
If you’re using an older version of PowerPoint for Mac (2016 or earlier), you might see Page Setup listed directly in the File menu instead of the Design ribbon. However, the dialog that opens is the same either way.
Setting custom dimensions on Mac
When you select Page Setup… (or Custom Slide Size… in newer versions), a dialog box opens where you can choose a preset from the Slides sized for dropdown, type your own Width and Height values in inches, centimeters, or pixels, and set Orientation separately for slides and for notes and handouts.
There’s one small difference from Windows: on some Mac versions, the unit selector (inches vs. centimeters) is controlled by your Mac’s regional settings rather than inside the PowerPoint dialog itself. If you’re seeing centimeters but want inches – or vice versa – you can change this in System Settings → Language & Region → Measurement System.
The same scaling prompt (labels vary by version)
Just like on Windows, PowerPoint for Mac will ask how to handle existing content after you confirm a new slide size. In current Microsoft 365 builds, this may appear as Maximize / Ensure Fit; in older Mac builds, the equivalent choices are Scale / Don’t Scale. Choose the option that preserves all content when scaling down, then review your key slides before moving on.
A practical tip for Mac users in training environments
If you’re preparing a presentation for a lecture hall, training room, or client site, try to test the file on the actual display or projector before the session – not just on your MacBook screen. Mac displays tend to have higher pixel density than the projectors and external monitors typically found in corporate training rooms, which means a deck that looks perfectly sharp on your laptop can look noticeably less sharp on a large projected screen.
Choosing the Right Aspect Ratio for Your Use Case
There is no single correct slide size that works in every situation. The right choice depends on where the presentation will be displayed, how it will be delivered, and whether it needs to double as a printable or shareable asset.
When 16:9 widescreen is the right call
Laptops and desktop monitors – virtually all consumer and business displays sold after 2012 use a 16:9 or similar widescreen ratio, making it the best way to fit screens in modern presentation environments
Flat-panel displays in meeting rooms and training centers – widescreen is standard equipment at this point
Webinars and virtual instructor-led training – platforms like Zoom, Teams, and Webex all display shared screens in widescreen format
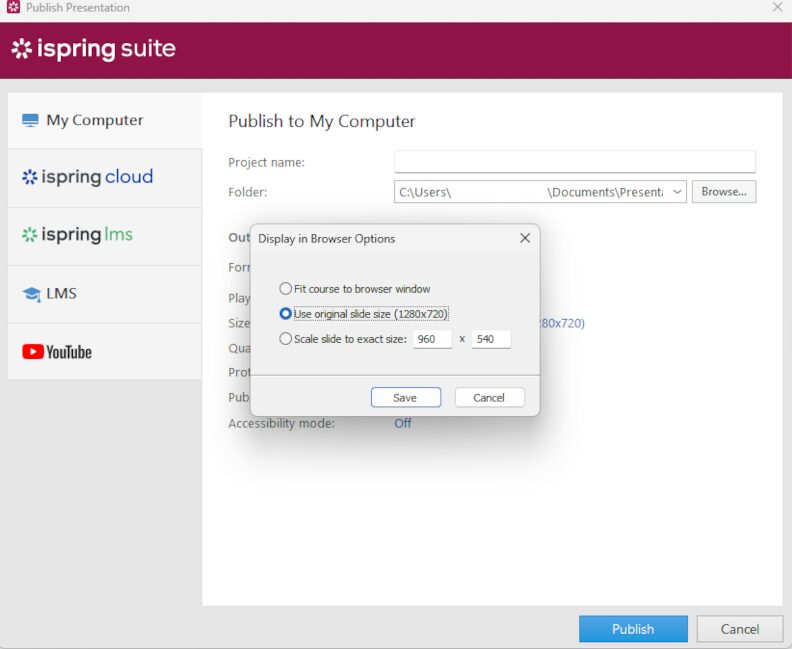
Video-based training modules – if you’re exporting your course as an MP4 or publishing through iSpring Suite as a video, 16:9 maps directly to HD and Full HD video standards (1280×720 and 1920×1080)
LMS-hosted SCORM content – most modern LMS players are optimized for widescreen content
When 4:3 still makes sense
Older projectors in classrooms and training centers – a lot of institutional and corporate AV equipment is still 4:3
Legacy corporate templates – if your organization has a branded PowerPoint template that was built years ago and hasn’t been updated, it’s almost certainly 4:3
Content that needs to look consistent alongside older materials – if new slides will be combined with existing 4:3 decks, matching the ratio avoids visible layout inconsistencies
When custom dimensions are the right answer
Printed handouts and training booklets – A4 (21 cm × 29.7 cm) or US Letter (8.5 in × 11 in) in portrait orientation match standard paper size
Job aids and reference cards – a tall portrait layout works well for single-page checklists or process summaries
Infographics inside an LMS – if your LMS displays content in a fixed-height frame, a custom canvas sized to that frame prevents unnecessary scrolling
Social media assets promoting training content – square (1080×1080 px, roughly 11.25 in × 11.25 in) for Instagram or LinkedIn posts; vertical (1080×1920 px) for Stories or Reels
One step worth taking before you start building
If you know the target display ahead of time, check its native resolution or aspect ratio before you open PowerPoint. Most modern displays list this in their specs or in the display settings menu. A two-minute check at the start of a project is a lot less work than a round of layout fixes after 50 slides have already been designed.
Converting Aspect Ratio to Practical Slide Dimensions
An aspect ratio like 16:9 is a proportion, not a size. It tells you the shape of the canvas but not how big it is. To actually set up your slides in PowerPoint – or to plan an export for a specific screen or platform – you need to translate that ratio into real measurements.
How the math works
- 16:9 at PowerPoint’s default widescreen size: 13.333 in wide × 7.5 in tall
- The same 16:9 ratio at Full HD resolution: 1920 px wide × 1080 px tall
- The same 16:9 ratio at HD resolution: 1280 px wide × 720 px tall
Converting pixels to inches for PowerPoint
PowerPoint uses 96 dpi as its screen resolution baseline, which makes the conversion simple: Inches = Pixels ÷ 96
Target output | Pixel dimensions | PowerPoint canvas (at 96 dpi) |
Full HD video | 1920 × 1080 px | 20 in × 11.25 in |
HD video | 1280 × 720 px | 13.333 in × 7.5 in (default widescreen) |
Square social post | 1080 × 1080 px | 11.25 in × 11.25 in |
Instagram Story | 1080 × 1920 px | 11.25 in × 20 in |
LinkedIn banner | 1584 × 396 px | 16.5 in × 4.125 in |
Working out less common ratios
For ratios that don’t appear in PowerPoint’s preset list, pick a width that works for your context, then calculate the height: Height = Width × (ratio height ÷ ratio width).
- For a 4:3 canvas at 10 in wide: 10 × (3 ÷ 4) = 7.5 in tall
- For a 1:1 square at 11.25 in wide: 11.25 × (1 ÷ 1) = 11.25 in tall
- For a 9:16 vertical canvas at 11.25 in wide: 11.25 × (16 ÷ 9) = 20 in tall
Why this matters for learners
When the slide canvas matches the player frame in an LMS or video player, learners see content the way it was designed – text at the intended size, images filling the space without cropping, and diagrams with enough room to be readable. When the ratio is off, the player either adds black bars to preserve proportions or stretches the content to fill the frame. Either way, the course looks unpolished, and on smaller screens like tablets, cropped content can make key information genuinely hard to read.
Orientation, Single-Slide Limitations, and Common Constraints
This is the section that explains where PowerPoint’s architecture runs up against what a lot of users actually want to do – and it helps to know the limits before you design around them.
Slide size is a presentation-level setting
PowerPoint applies dimensions and orientation to the entire file, not to individual slides. When you change the slide size or switch between landscape and portrait, every slide in the deck changes at once. There is no built-in option to assign different dimensions or orientations to different slides within the same .pptx file – not in PowerPoint 2016, 2019, 2021, or Microsoft 365 as of 2026.
You cannot resize only one slide
If you need one slide at a different size than the rest, your options are limited to workarounds rather than a native feature:
- Create a second presentation at a different size, design the slide there, and link to it from your main deck or distribute it as a separate file
- Export the differently-sized slide as an image (PNG or JPEG), then insert that image into a slide in your main deck – the image will display at the dimensions of the main deck’s canvas, so you may need to scale it manually
- Use a PDF combine step if you’re distributing printed materials: export each deck as a PDF and merge them using a PDF tool, which preserves each section’s original page size
Managing mixed orientations in practice
If your training program includes both a landscape course deck and a portrait job aid, the cleanest approach is to treat them as separate PowerPoint files from the start:
- Build the main course in 16:9 (landscape)
- Build the companion job aid in A4 or Letter (portrait)
- Publish or distribute them separately, or combine them as chapters in your LMS
In iSpring Suite, you can upload multiple SCORM packages to the same course path in your LMS, which lets learners access a landscape course module and a portrait reference document from the same place without you having to force them into a single file.
A note on the vertical slide use case
One question that comes up often is how to make a vertical PowerPoint slide – for a mobile-friendly job aid, a tall infographic, or a portrait-oriented handout. Here’s how: go to Design → Slide Size → Custom Slide Size, set your width smaller than your height, and select Portrait under slide orientation. The entire deck will switch to portrait. If you only need one or two vertical slides, the workaround approach – separate file or exported image – is the more practical path.
Sending feedback to Microsoft
Per-slide orientation and sizing is one of the most consistently requested features in PowerPoint’s user feedback channels. If this is a recurring pain point for your team, it’s worth submitting a feature request through the Help → Feedback option in PowerPoint or through the Microsoft 365 feedback portal.
Optimizing Images and Content After You Change Slide Size
Changing slide dimensions is a two-step process. The first step is updating the canvas size itself. The second – which is easy to skip but always worth doing – is checking that your existing content still looks right on the new canvas. PowerPoint does its best to reposition objects automatically, but the results are rarely perfect, especially when the aspect ratio changes significantly.
A practical review checklist
Title and section divider slides – Logos, full-bleed background images, and large headline text are the most likely elements to shift. Check to make sure that logos haven’t moved to an awkward position and that background images still cover the full canvas.
Content-heavy slides – Text boxes that were carefully sized to avoid overflow can suddenly run long after a resize. Tables are particularly prone to this – check each one and resize or reflow as needed.
Diagram and graphic-heavy slides – Grouped objects sometimes separate during a resize. Zoom into these slides and check to make sure that connecting lines, arrows, and callout boxes still point at the intended things.
Slides with motion paths or layered animations – Motion paths are anchored to absolute coordinates on the slide. Test these in Slide Show mode rather than just in the editor.
Image resolution after resizing
If you’re moving to a larger canvas, images that looked fine at the smaller dimensions may show compression artifacts or softness when stretched to fill a bigger area.
- Any image used as a full-slide background should be at least 1920×1080 pixels for a widescreen canvas.
- Diagrams exported as images from other tools should be re-exported at a higher resolution if they’re being scaled up.
- Photos and stock images that were inserted at a small size and then stretched are the most common source of quality problems after a resize.
Using PowerPoint’s Compress Pictures feature
Once your layout is finalized, compress the images in the file. In PowerPoint, go to File → Info → Compress Media for embedded video, or select any image and go to Picture Format → Compress Pictures for static images. Choose the output quality that matches your delivery format:
- HD (330 ppi) for print or high-resolution display
- Web (150 ppi) for LMS delivery and screen-based viewing
- Email (96 ppi) for files that need to stay small for distribution
The connection to eLearning output quality
For teams using iSpring Suite, this optimization step has a direct downstream effect. Slides with uncompressed, oversized images produce larger SCORM packages, which take longer to load for learners on slower connections. A well-optimized 16:9 deck with properly sized images will publish faster, load faster in the LMS player, and display more consistently across different device types.
Using iSpring Suite with PowerPoint Slide Sizes
iSpring Suite is a PowerPoint-based authoring tool, which means it works from inside PowerPoint rather than asking you to rebuild your content in a separate application. The slide canvas you’ve set up in PowerPoint – dimensions, aspect ratio, orientation – becomes the foundation for everything iSpring Suite publishes from that file.
Your PowerPoint canvas is your course canvas
When you publish a course from iSpring Suite, the slide dimensions you set in PowerPoint define the layout of the published output. A 16:9 deck publishes as a widescreen course. An A4 portrait deck publishes in portrait orientation.
Publishing to multiple formats from one file
One of the practical advantages of working in iSpring Suite is that a single, correctly sized PowerPoint file can be published to several output formats without rebuilding the layout each time:
- SCORM 1.2 or SCORM 2004 for LMS upload
- xAPI (Tin Can) for platforms that support experience tracking
- HTML5 for browser-based delivery without an LMS
- MP4 video for distribution through video platforms or internal portals
- PDF for printed companion materials
How correct slide dimensions affect the learner experience
When the slide canvas matches the LMS player frame, the course fills the available space the way it was designed to. Learners on laptops see a full-width layout. Learners on tablets see the same proportions scaled appropriately. There are no black bars, no scroll bars inside the course frame, and no cropped content.
When the dimensions don’t match, the LMS player typically either adds black borders to preserve the original proportions, or it scales the content to fill the frame and distorts the layout in the process. Neither outcome looks intentional.
A practical template strategy for L&D teams
If your team produces training content regularly, it’s worth maintaining at least two standard PowerPoint templates, since PowerPoint is a powerful tool for building both presentation and print assets:
A 16:9 widescreen template for all screen-based and LMS-delivered courses – this covers webinars, SCORM modules, video-based training, and anything viewed on a laptop or display
An A4 or Letter portrait template for printed materials – job aids, reference cards, course summaries, and handouts that accompany instructor-led sessions
Both templates can carry your organization’s branding, fonts, and color palette.
Frequently Asked Questions About PowerPoint Slide Size
These are the questions that come up most often when people are working through slide dimensions for the first time – or running into a specific problem mid-project.
What slide size should I use if I don’t know the projector or screen type?
Use 16:9 widescreen since most modern devices support it; if unsure, prepare backup PDFs in both 16:9 and 4:3 to ensure your presentation displays correctly on any screen.
How do I choose the slide size for content that will go into an LMS?
Select 16:9 widescreen for LMS courses, as most players and browsers optimize for this format, and tools like iSpring Suite maintain the slide size through publishing for consistent display.
Does changing slide size affect my existing animations and transitions?
Transitions usually remain unaffected, but animations – especially motion paths – may shift and need review after resizing, so check these carefully in Slide Show mode.
Is there a “best” PowerPoint slide size for printing?
Match your slide size to your print paper – Letter or A4 – and choose portrait or landscape orientation based on your content to ensure that margins accommodate printer margins, to avoid cropping.
Create online courses and assessments in record time.


eLearning Content Development: The Ultimate Guide for 2026
Designing Accessible eLearning: ADA, Section 508, and WCAG
15 PowerPoint Tips to Make Your Slides More Effective