The All-New Adobe Captivate vs PowerPoint with iSpring Suite AI


Can you create polished, interactive eLearning courses in PowerPoint, or does your case call for a switch to Adobe Captivate?
To answer the question, I compared the PowerPoint-based authoring tool, iSpring Suite AI, and the all-new Adobe Captivate (the modernized version launched in June 2023).
I read dozens of reviews from trainers and instructional designers and then tested the main features of each tool. Read the summary below, jump to any feature you’re interested in, or scroll to the end to see the conclusion on the best use cases for each tool.
Key Takeaways
The article compares Adobe Captivate and PowerPoint with iSpring Suite AI for creating eLearning courses, evaluating ease of use, content import, assets, interactions, simulations, video and narration, quizzes, accessibility, collaboration, and publishing. It finds Captivate powerful for advanced interactivity and detailed software simulations, but it is more complex to learn and offers fewer ready-made assets. PowerPoint with iSpring Suite AI is easier for users familiar with PowerPoint, offers a much larger asset library, provides simpler templates, enables seamless import of PowerPoint content, and delivers robust support. Both tools have strengths depending on course complexity and authoring needs.
Key Differences
Here’s a summary of the key differences between these course creation tools — which is worth knowing before you dive in and start testing them out.
| Adobe Captivate | iSpring Suite AI | |
| Ease of use and learning curve | The new version is definitely easier to use. Still, I struggled with some basic things like figuring out how to close a feature window (it turns out you have to click the feature itself) or trying to delete an object. | If you’re used to PowerPoint, it’ll feel super easy. Even if you’re not, it’s still easier to figure out where to find the features you need. |
| Simulation tool | Click-by-click interactive software simulations with demo, training, and assessment modes. | Drag-and-drop editor for creating branched dialogues in training and assessment modes. |
| Video tool | Record simulations as a video. | Webcam + screen capture in one studio, plus must-have video editing options. |
| Customization | Offers more customization freedom within most features. Want a hover state that fires a variable, plays audio, and jumps to another slide only if the learner scored ≥ 80 %? No problem — just string the triggers together. You can even script extra logic in JavaScript. | Leans on PowerPoint’s comfort zone. There are plenty of templates, but customizing most of them usually just means changing the accent color to match your brand and adding your text. |
| OS support | Windows 11 22H2, Windows 10 22H2, or later versions only. macOS Sequoia (version 15), macOS Sonoma (version 14), macOS Ventura (13.4) | Microsoft Windows 7/8/10/11 (32- and 64-bit) with PowerPoint installed. |
| Interface languages available | English, Français, Deutsch, Español, 한국어, 日本語, Português (Brasil) | English, French, German, Spanish, Italian, Chinese (Simplified), Portuguese, Japanese, Chinese (Traditional), Korean, Indonesian |
| Price | Adobe Captivate individual plan costs $489.48 per year, billed monthly at $33.99 (no monthly plan).A 30-day free trial is available. | iSpring Suite AI costs $1,290 per user/year. A 14-day free trial is available. |
Course Creation Experience with Adobe Captivate vs PowerPoint + iSpring Suite AI
I’ll compare each tool’s features side by side, following the order that you’ll likely use them during course creation.
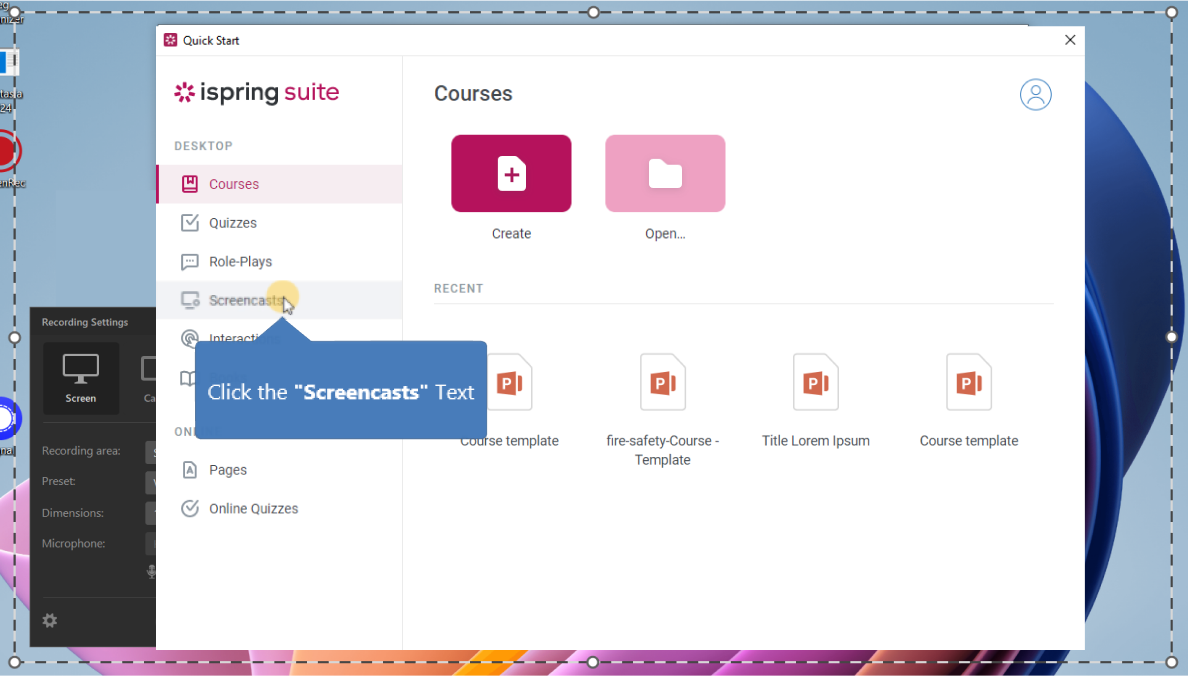
Step 1. Learn the product and get help
Both tools offer detailed guides for each feature. iSpring Suite provides more variety in its getting-started resources, and the knowledge base feels more user-friendly. Unlike Captivate, it doesn’t have a user forum, but its real-time customer service is more available and helpful.
Adobe Captivate
Captivate now bundles a short onboarding course and a few in-app walkthroughs. The rest sits in the online knowledge base and user forum. What I didn’t like is that when you’re in the Captivate help docs and start searching for something, it pulls results from the entire Adobe knowledge base — not just Captivate…
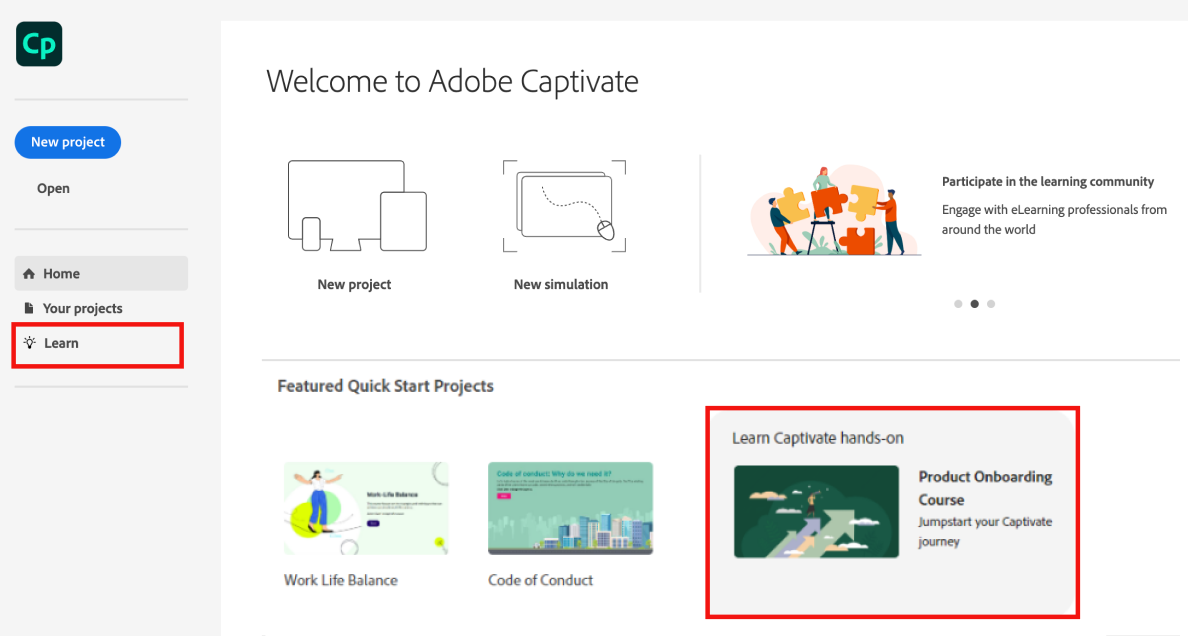
Adobe Captivate Home screen with product tutorials
There are also regular webinars and a blog focused on using Captivate more effectively.
I was trying some features for the first time, and I found many buttons and options unclear. My brain felt like it was melting as I tried to figure out what things were and how to use them — even with tutorials. Realistically, getting comfortable with Captivate can take months (feedback from users).
Adobe Captivate offers chat, email (though I could only find it through the Adobe Community), and real-time phone support.
From my experience, though their agents respond fast, they don’t seem to dig into your issue and try to close your ticket as fast as possible. To make the conclusion more objective, G2 users rate the quality of Captivate’s customer service at 7, compared to 9.5 for iSpring Suite and 9 for Articulate 360.
iSpring Suite AI
iSpring Suite is known for being the easiest-to-use authoring tool (especially if you are used to PowerPoint). On top of this, there are a lot of resources for a faster start: an AI assistant right in PowerPoint, a getting-started course, tutorials, and help docs. I loved the AI assistant because I got quick answers about functionality right in PowerPoint. However, note that sometimes it may give you outdated answers.
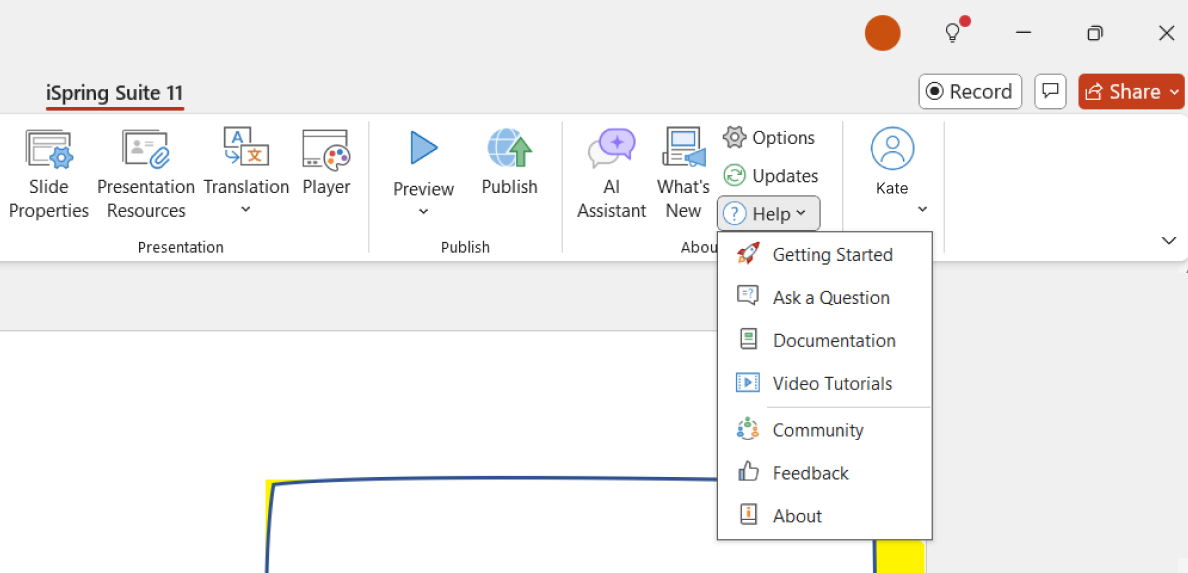
iSpring Suite product learning and support options in PowerPoint
Also, keep in mind that each of iSpring Suite’s full-fledged tools has its own knowledge base. So, if you don’t find the answers in the iSpring Suite knowledge base, you might need to switch databases.
The iSpring Suite knowledge database is grouped based on features inside of iSpring Suite
iSpring customer support is available 24/7 via phone, chat, and email on weekdays and via email on weekends. 83% of all cases get resolved within 2 hours.
I got a prompt response on Friday evening, and the agent stayed with me until the problem was resolved. And it isn’t just my opinion — most users mention support as one of iSpring’s strengths.
There are also weekly webinars and a blog covering all things eLearning. You get support that helps you build skills beyond just iSpring Suite.

Step 2. Import training content
Many teams still use PowerPoint to create storyboards or build the first version of a course. If you want to enhance an existing PowerPoint course, the new version of Captivate won’t help much — it doesn’t support importing PowerPoint files for further development.
With iSpring Suite, it’s seamless. Just click on the iSpring Suite tab right inside PowerPoint and start building.

Step 3. Add ready-made assets
Compared to iSpring Suite, Adobe Captivate offers audio and video clips to enhance interactivity, but in terms of other content assets, its library is quite limited: less than 2,000 assets compared to 127,000+ in iSpring Suite.
Adobe Captivate
In terms of ready-made content assets, Captivate has 800 slide templates, 29 characters with multiple poses, 850 royalty-free images, and 250 icons. There are also 1,800+ audio clips for background music and audio responses to interactions. And 100 video clips for storytelling, realistic scenarios, or to support the textual content.
Adobe Captivate asset library
Not all asset types are easily searchable. There are no filters (aside from topics like compliance, finance, or marketing), so you’re stuck scrolling through endless lists trying to find something for your case.
There are also Quick Start Projects — ready-to-go eLearning courses on common topics that you can quickly pick up and tailor with your own content. The slides from the projects are also available in the Slide templates, but there you can only add them one by one. Quick Start Project lets you insert all slides at once.
You can find more reusable courses in their free projects database, where users share courses they’ve created in Captivate.
iSpring Suite AI
G2 users mention that the iSpring library is more extensive and user-friendly compared to Adobe Captivate. There are 127,000+ editable slide templates, characters, icons, objects, and backgrounds.
More visual assets add more realism to your role-play simulations and make the course more relatable — you can find highly relevant characters for your topic and industry. Plus, you’ll save a ton of time on searching or creating necessary elements.

iSpring character library with detailed filters
Compared to Captivate, you have helpful search and detailed filters for each type of asset. You’ll quickly find what you need.
iSpring icon library search
Moreover, you can easily create your own characters with pre-made elements.
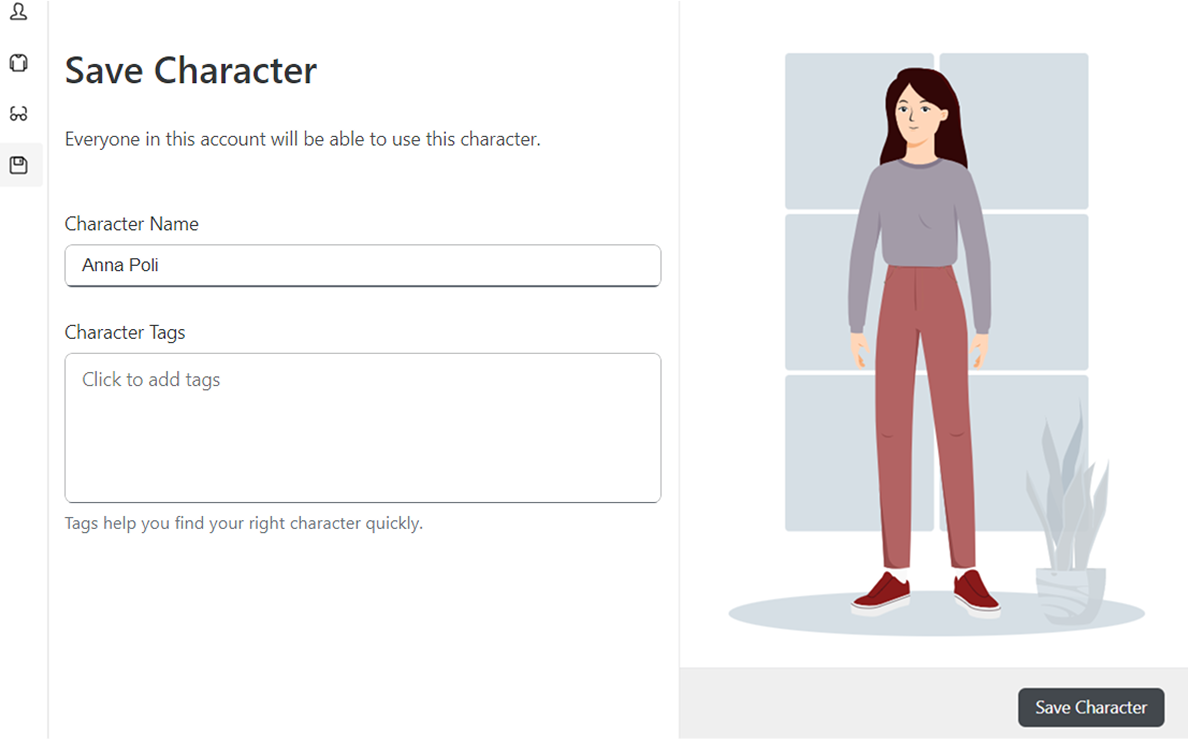
A character of Anna Poli — our Senior Instructional Designer
Too much to read? Get a summary from AI
Step 4. Create interactions
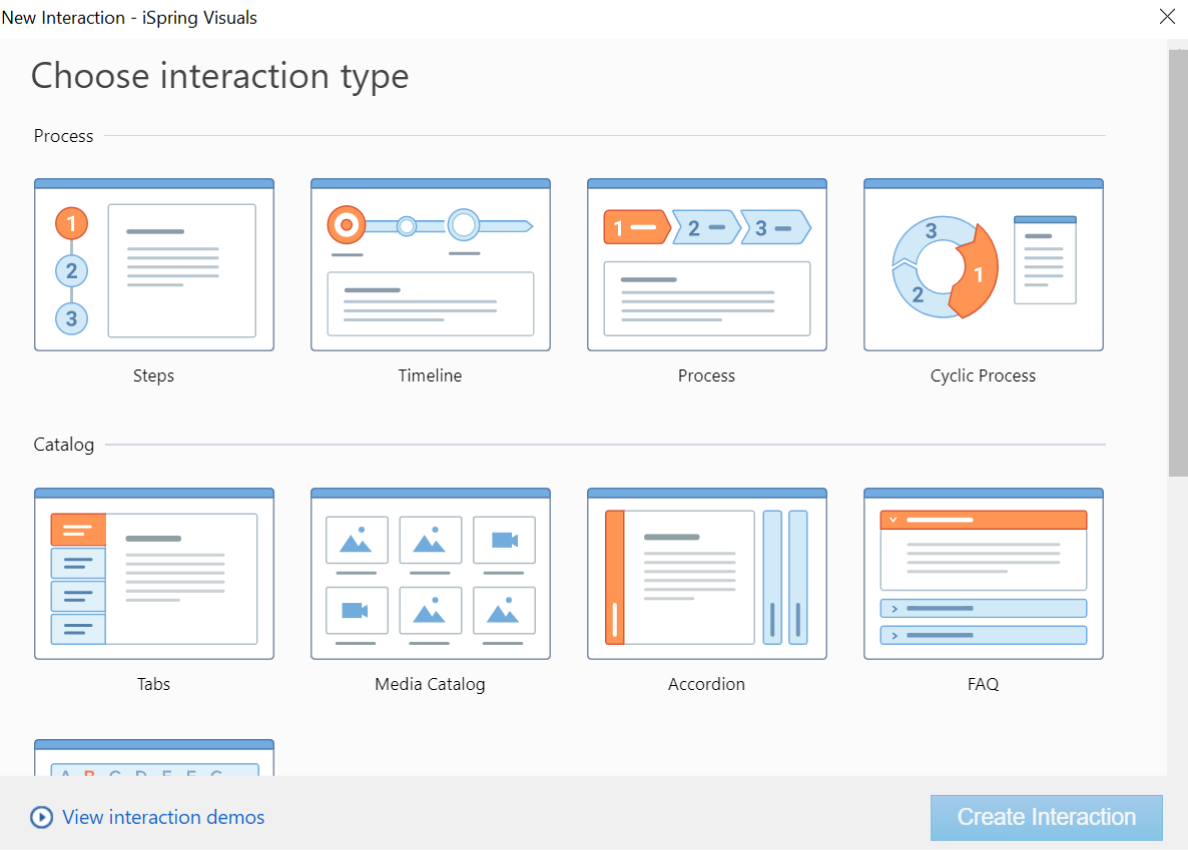
Adobe Captivate offers deep control: every component or widget exposes a wide range of properties, and its trigger-action system lets you design custom interactions from scratch. iSpring Suite AI, by comparison, supplies 14 ready-made interaction templates that work well right out of the box but provide only surface-level tweaks and no tools for creating entirely new interactions or advanced logic.
Adobe Captivate
In terms of pre-made interactions, Captivate gives you a drawer full of “Lego” bricks: basic components (buttons, fields, radio groups, checkboxes, dropdowns) plus nine widgets.

Adobe Captivate widgets
Each interactive element or widget is fully customizable — by clicking on an element, you’ll see properties that you can change on the right panel.
Adobe Captivate interactive element customization panel
You can also create custom interactions on the slide and object levels with various triggers, conditions, and actions.

Adobe Captivate option to create custom interactions
iSpring Suite AI
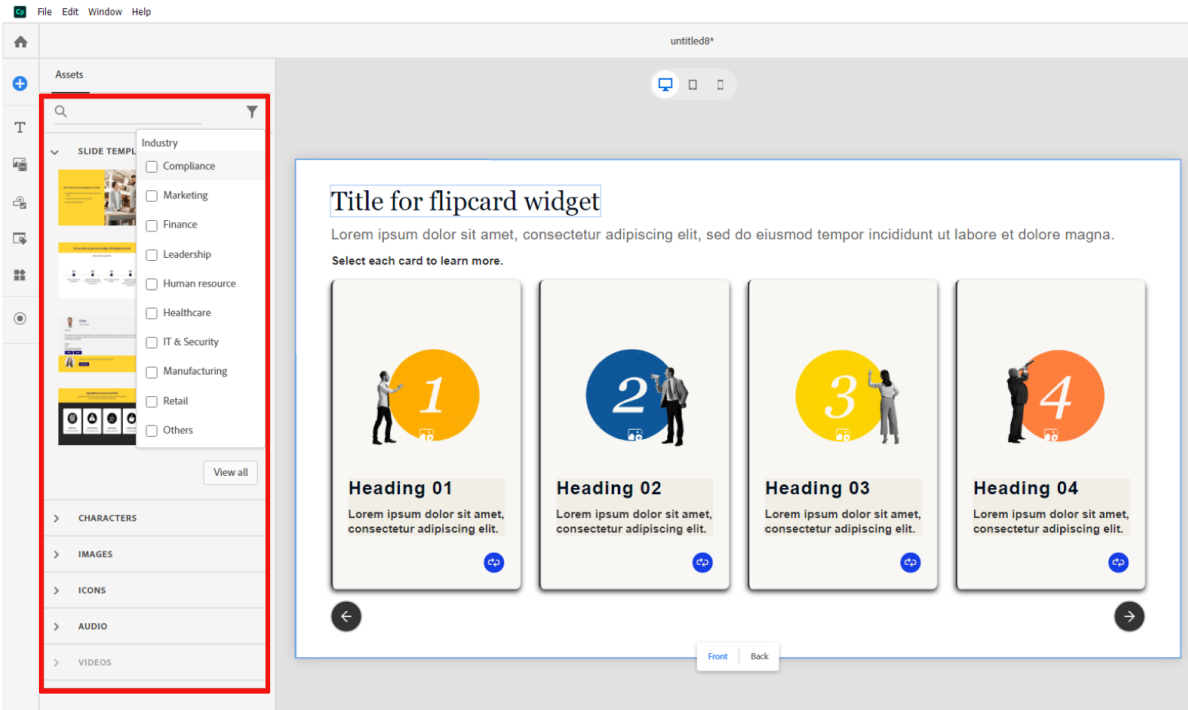
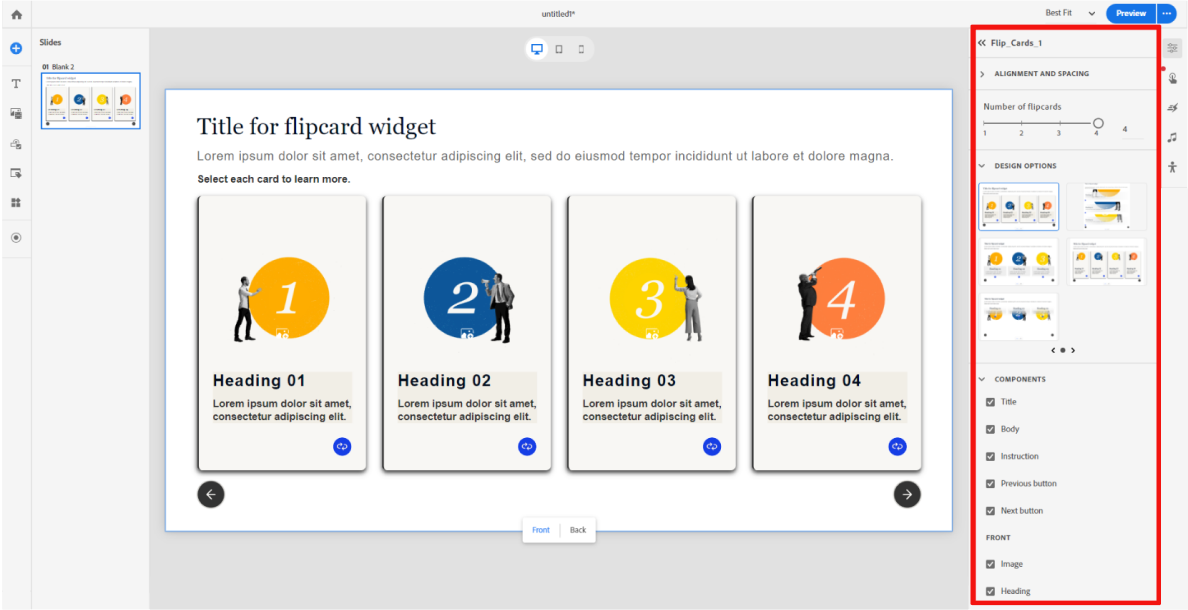
iSpring has 14 pre-made interactions — accordion, timeline, tabs, hotspot, flip cards, etc. It feels like adding animations in PowerPoint: pick a template, swap colors or images, rewrite the labels, and publish.
iSpring Suite interaction template options
Compared to Adobe Captivate, interaction template settings can be limited. However, it is enough for many courses. For example, you can easily change basic appearance elements (colors, images, labels) and content within the interactions, but deeper interaction behaviors (like custom branching or advanced conditional triggers) aren’t available.
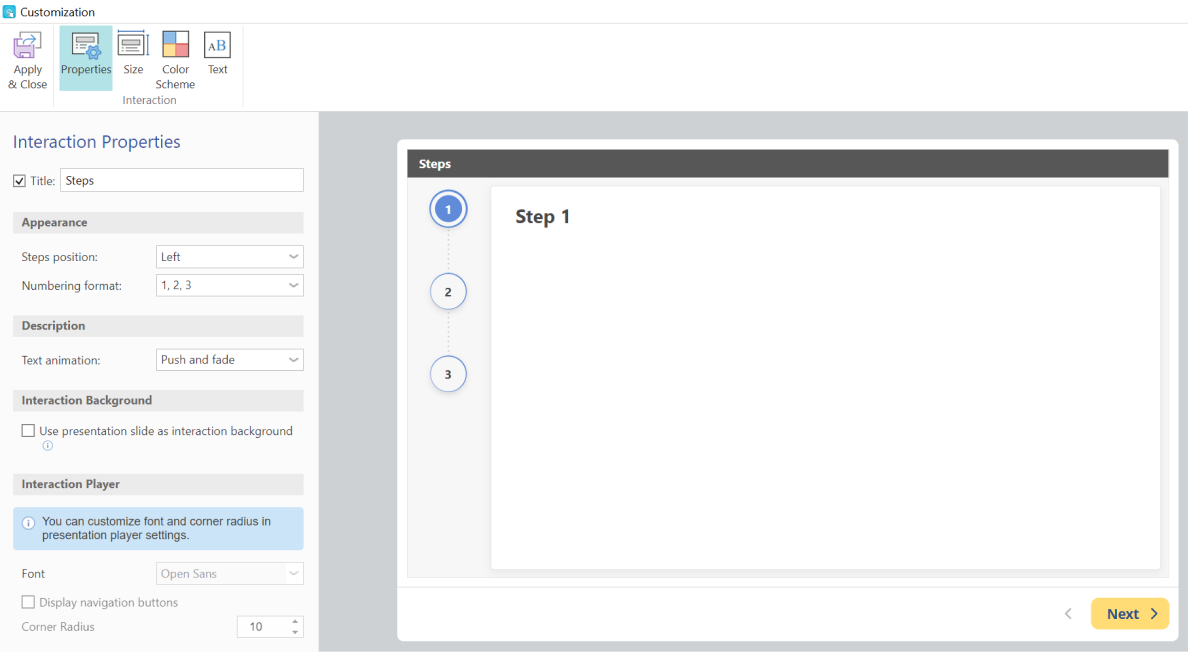
iSpring Suite Steps interaction template
Some interaction types appear in iSpring quizzes, e.g., drag-and-drop.
Step 5. Design simulations
Simulations work differently in iSpring Suite and Captivate. iSpring Suite is great for quick, dialogue-style role-plays for training soft skills. Captivate is better for detailed software sims where you need interactivity.
Adobe Captivate
Software simulations (interactive videos) are one of Captivate’s key strengths. It allows learners to complete each step on their system before accessing the live environment. You can record your screen once, and it splits the footage into three tracks:
- Demo (watch the process)
- Training (guided practice with hints)
- Assessment (unassisted test)
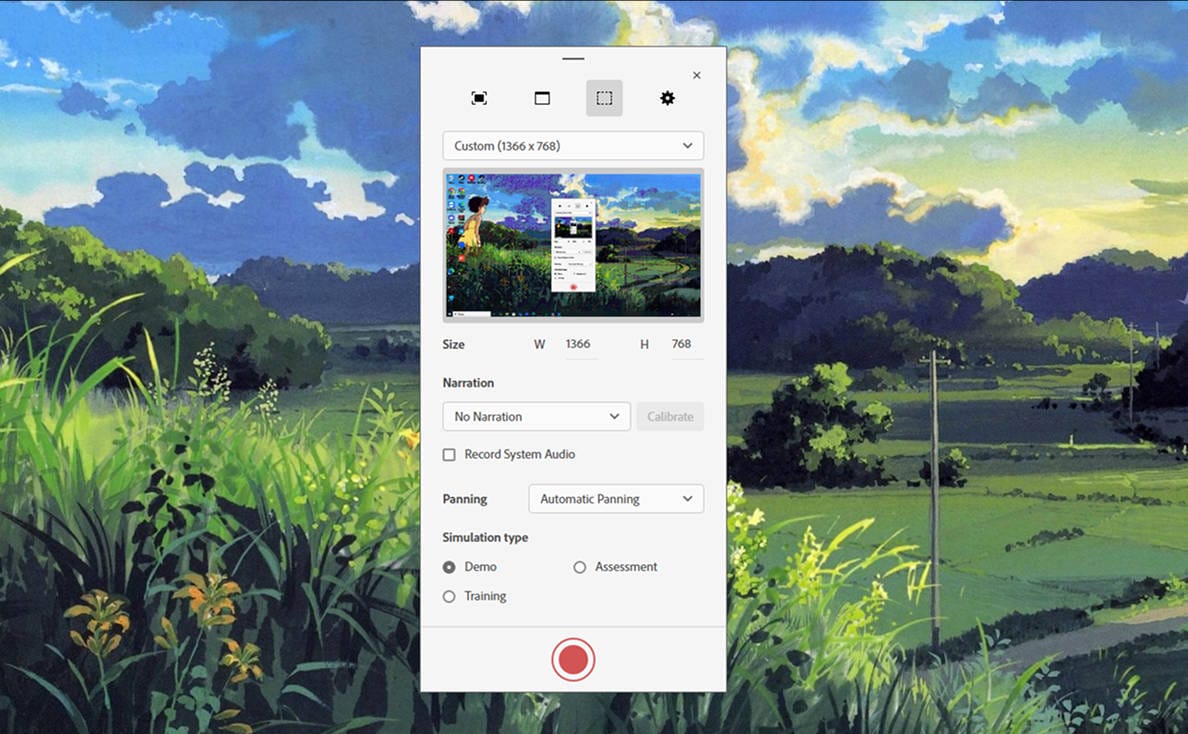
Captivate simulation recorder
Every mouse click, keystroke, and scroll becomes an editable slide with hotspots, highlight boxes, blur areas, and input fields that you can fine-tune.
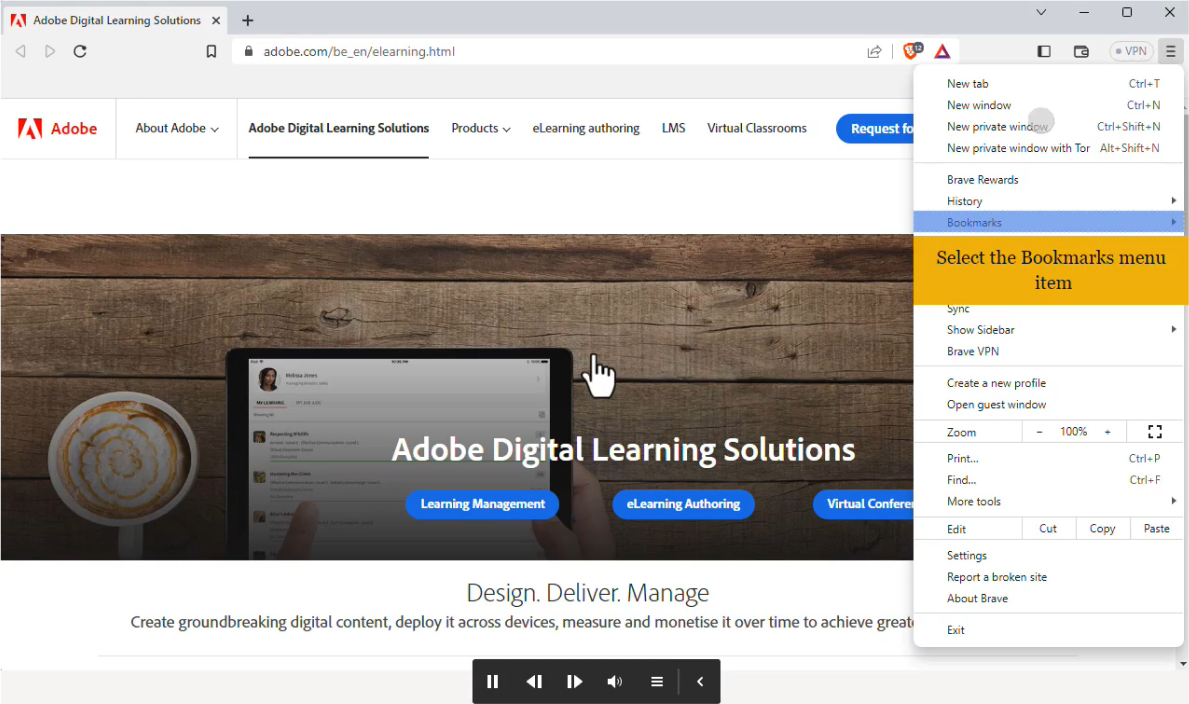
Sample simulation showing how to create a bookmark in a browser. Source: Adobe.
You can also create role-play simulations using interactive slides, branching scenarios, and multimedia elements. Captivate doesn’t have pre-made interactions and templates for role-play simulations. It will take far more time than with iSpring Suite, but Captivate allows for more advanced customization: variables, conditional logic, multi-state objects, etc.
iSpring Suite AI
The iSpring TalkMaster feature is built specifically for creating role-play simulations.
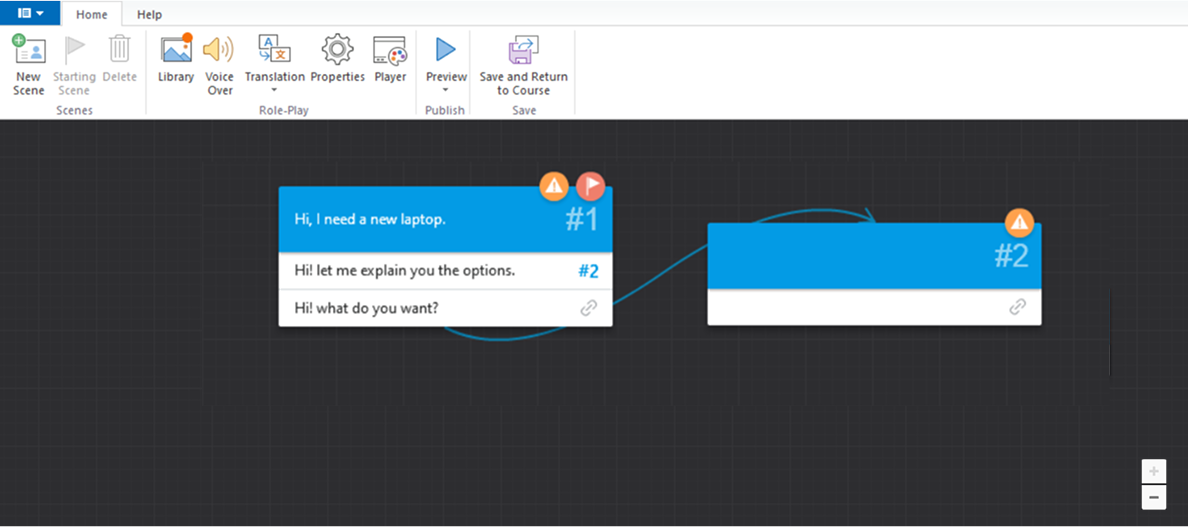
iSpring TalkMaster drag-and-drop interface for branching
Connecting scenes is easy thanks to the visual drag-and-drop interface, which lets you build conversation trees and view the full branching structure at a glance.
For each scene, you can choose from characters and backgrounds from iSpring Suite’s Content Library or upload your own images. I especially liked that there’s a broad range of character poses and emotions to choose from.
Customization options are minimal — you can change the scene’s color layout, but not the fonts or font sizes. On the plus side, you can add voice overs to each scene, which makes the simulation feel more realistic.
Still, the setup covers what most role-play simulations need and keeps the process fast. I was able to create a polished role-play in about an hour.
Step 6. Create video and narration
Captivate screencasts are best for software simulations. But if you record instructor-led courses more often, iSpring’s video editor works better since Captivate doesn’t support webcam recording. For text-to-speech, Captivate gives you more voice options and better search. Still, iSpring supports 5x more languages. One more thing — iSpring can generate captions from your video or audio. With Captivate, you’ll need to import them yourself.
Adobe Captivate
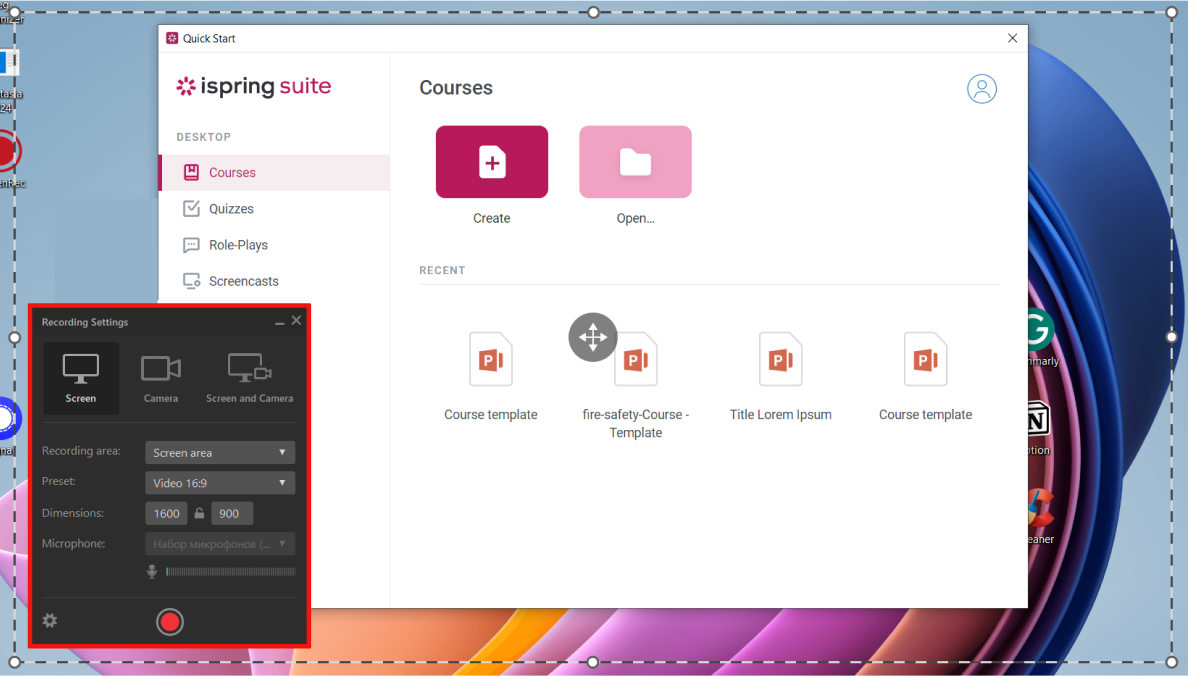
I already mentioned recording simulations, but the default simulation recording is not a video — each step is essentially a slide in Captivate, and the simulation progresses as the learner interacts with these steps.
To create a video, you need to record a full-motion recording (FMR). It is better for demonstrating tasks that involve fluid, continuous actions, such as dragging objects or scrolling through content.
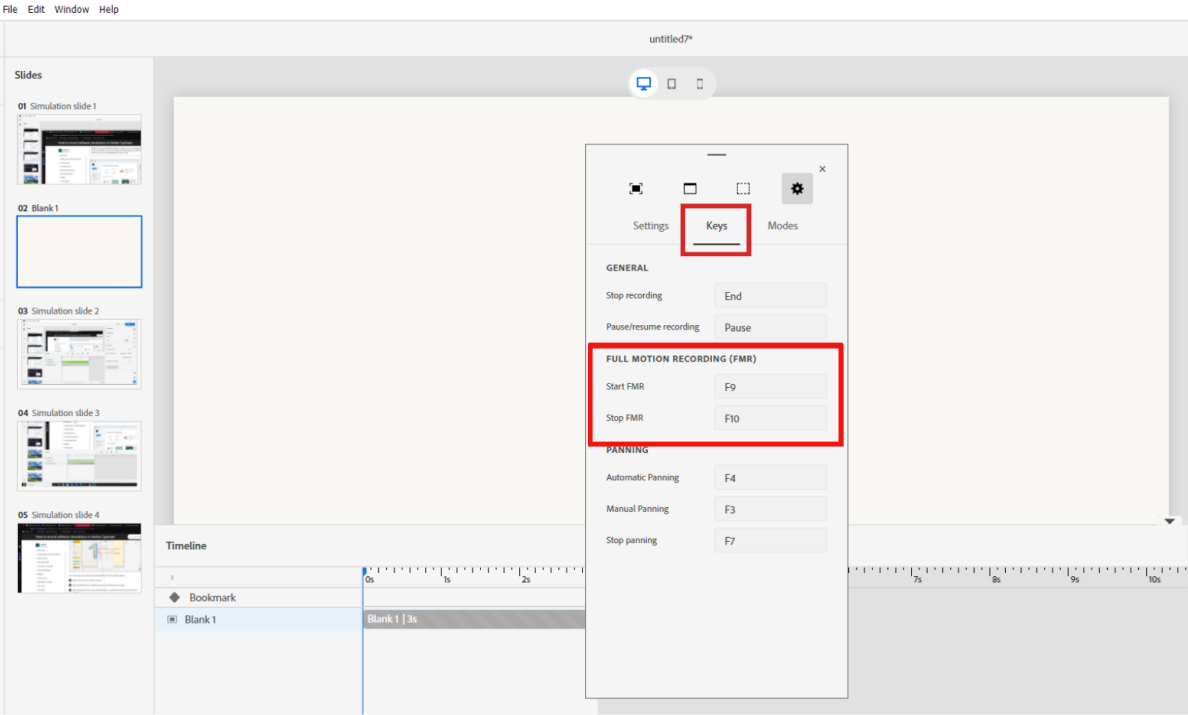
Full-motion recording (FMR) in Adobe Captivate
Keep in mind that video-based simulations have fewer customization options.
Full-motion recording (FMR) customization in Adobe Captivate. Source: Adobe.
Audio work happens inside Captivate, too. A built-in editor lets you trim, fade, loop, insert silence, or adjust volume.

Adding audio options in Captivate
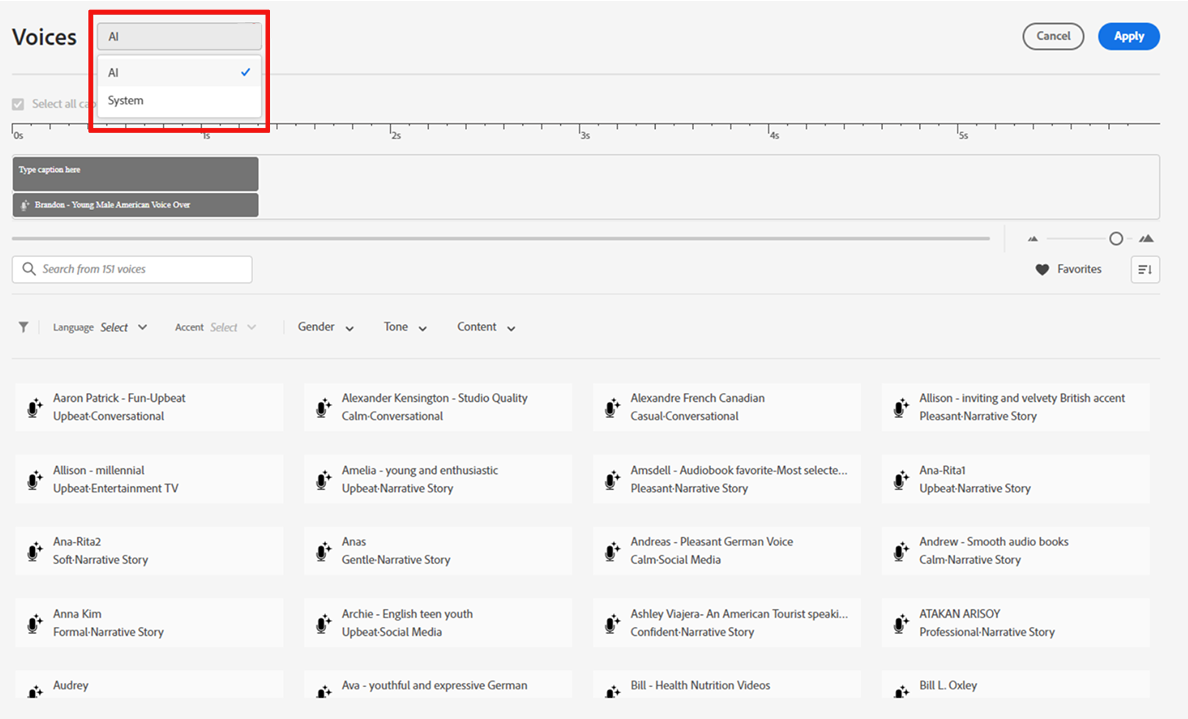
The text-to-speech feature generates a narration from your captions. Unlike with other content assets, you can comfortably filter 152 AI voices and 10 languages, listen to previews, and even mark the most suitable voices as favorites. Like!
Captivate text-to-speech interface with voice options
Captivate automatically syncs the waveform to the closed captions.
iSpring Suite AI
The iSpring video editor (iSpring Cam Pro) sits beside PowerPoint rather than inside it, so the same tool can produce stand-alone tutorials or clips.
You can create and edit screencasts with or without a webcam and record talking head videos. It’s a complete toolkit for instructor-led video modules!
Recording screencast in iSpring Suite
After you finish recording, you can automatically add annotations to your mouse clicks and keystrokes — similar to Captivate’s simulation.
Video annotations in iSpring Suite
There is also font/color customization for annotations. The mouse cursor is customized in video Properties on the ribbon.
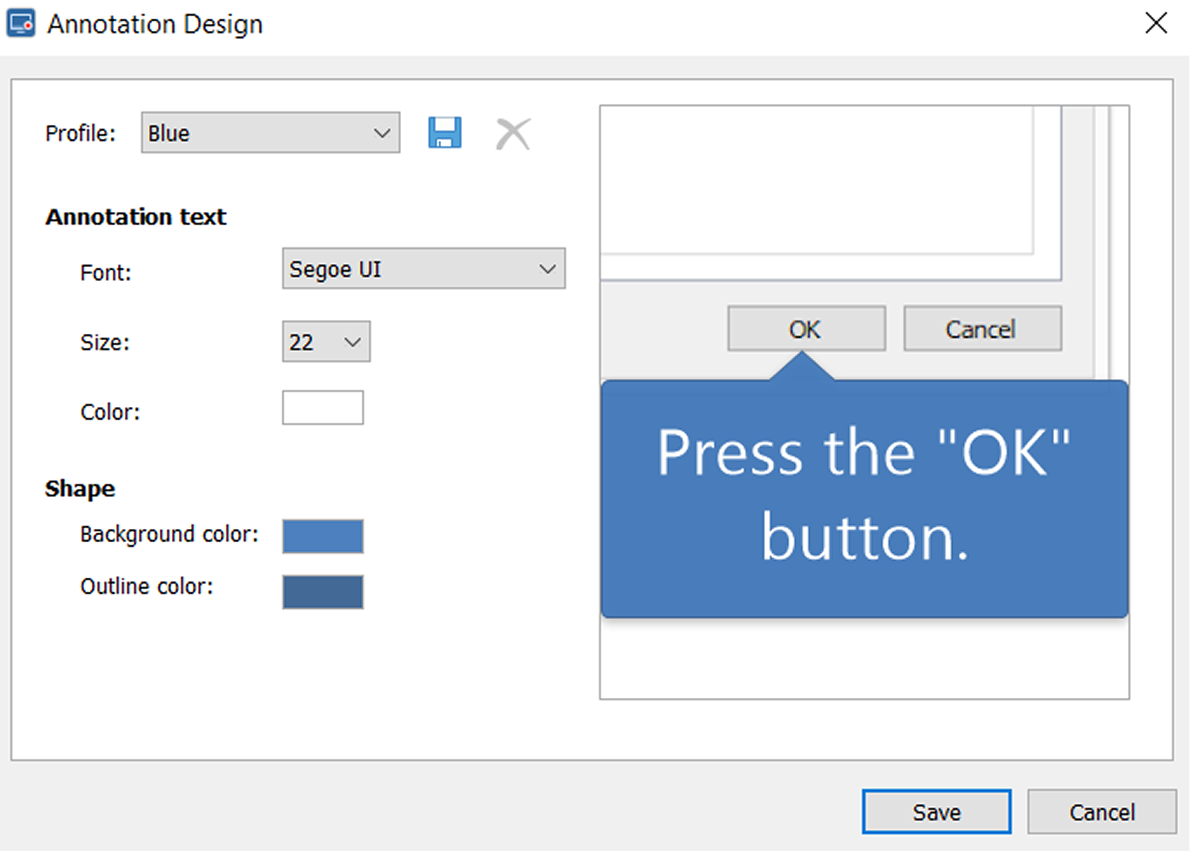
Video annotations customization in iSpring Suite
Caption support is native: generate captions after recording or bring in an external file, then fine-tune timing on the timeline.
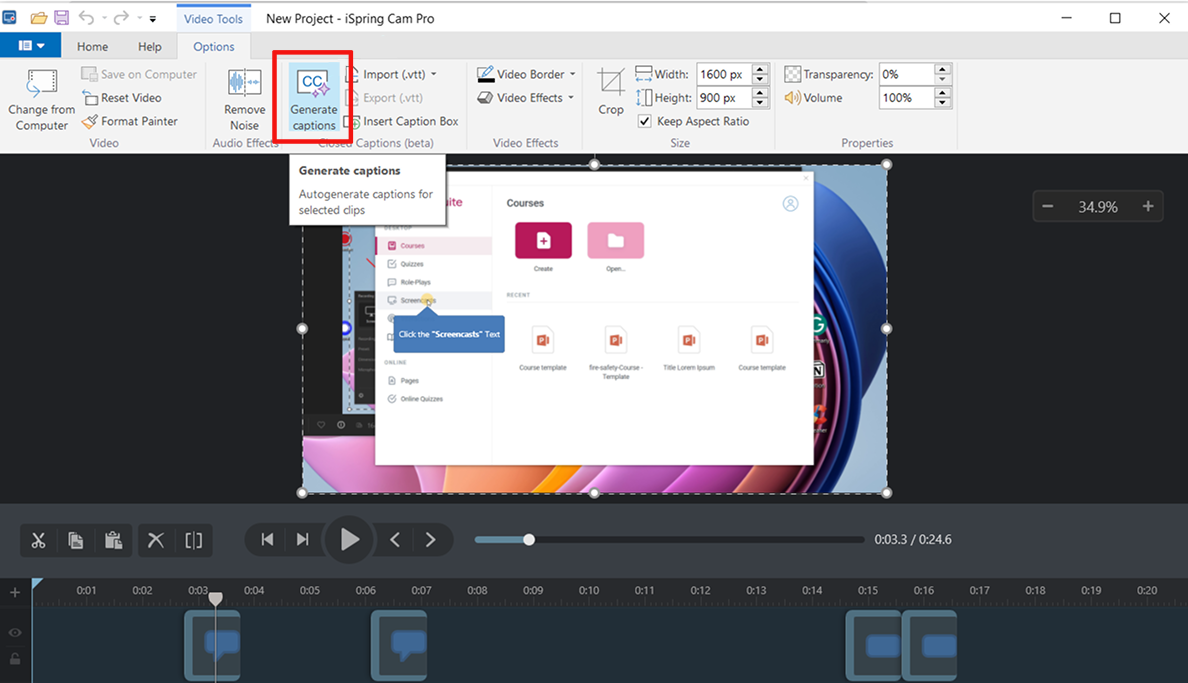
Caption generation in iSpring Suite
Along with basic editing capabilities, you can freeze or extend any frame to highlight a screen element or give learners more time to read the content.
Narration capabilities are more extensive as compared to Captivate: record audio, record video, generate captions, sync animations with narration, and more.
Audio work mirrors Captivate — I was able to fade, loop, adjust volume, insert silence, and remove noise.
Text-to-speech is available in 53 languages (wow!) with natural-sounding voices. You’ll probably find any language you need to localize your course for a global workforce.
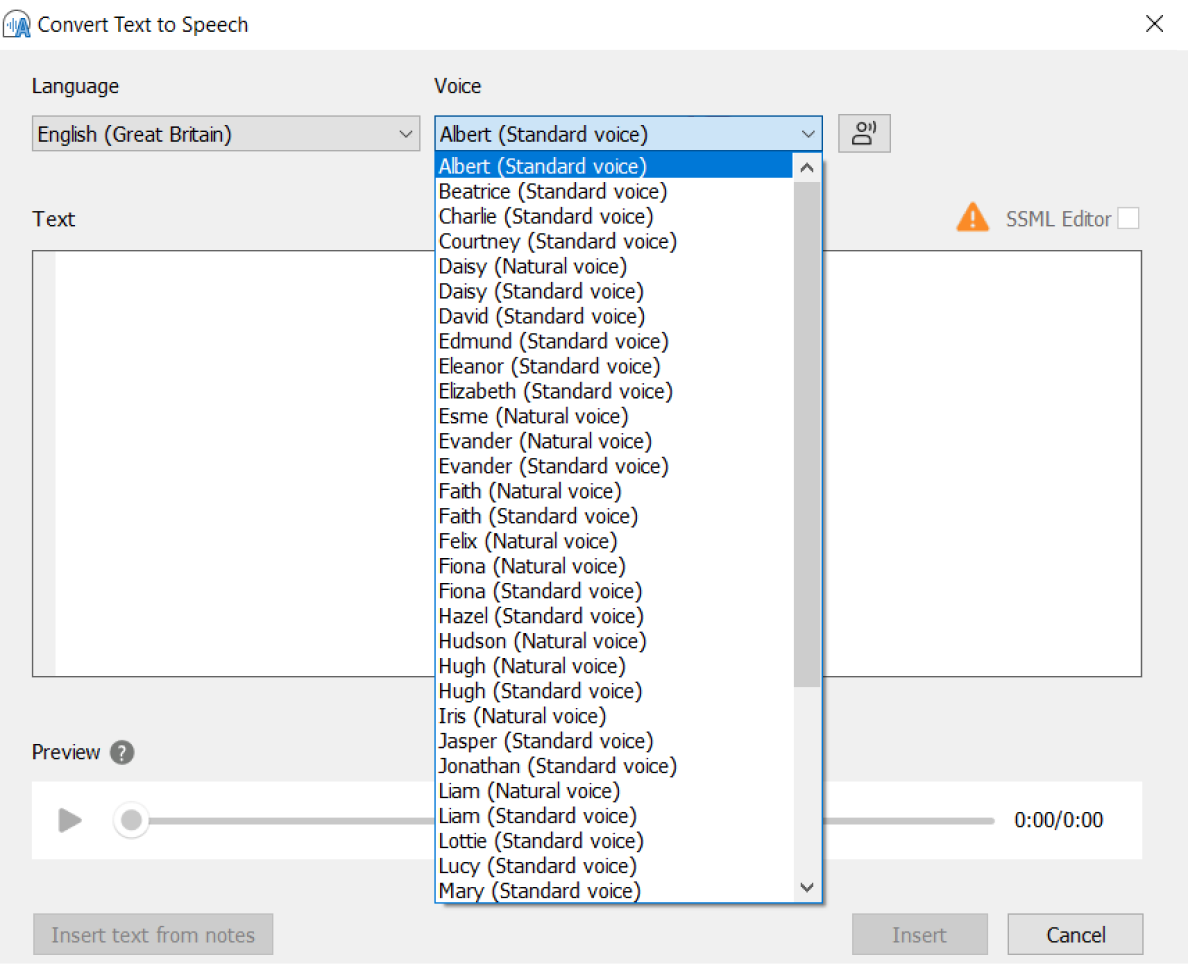
Text-to-speech voices available in iSpring Suite
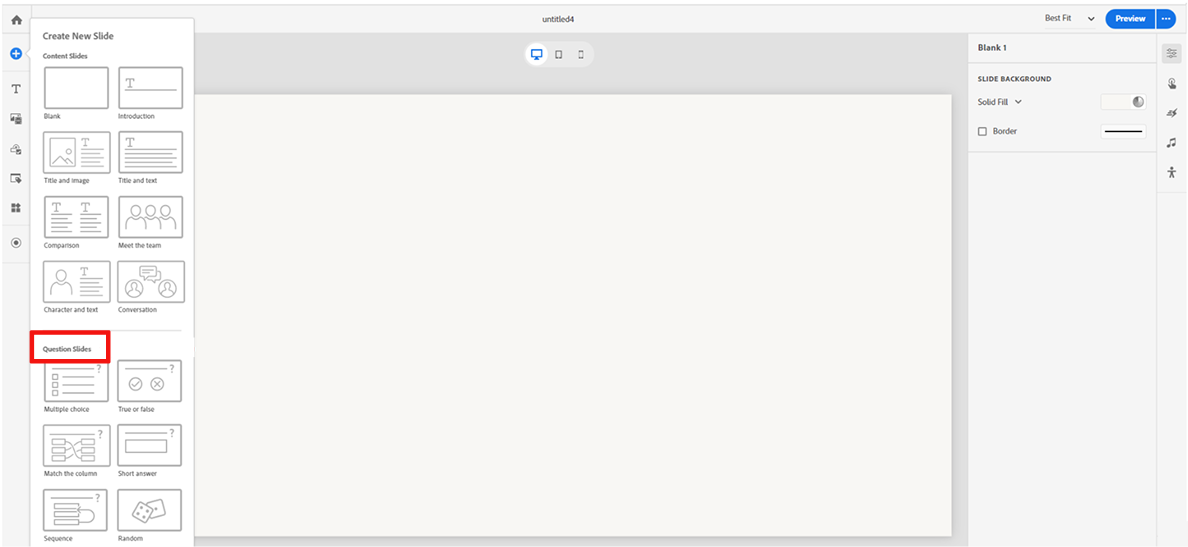
Step 7. Develop assessments
Quiz capabilities are similar in both tools, although iSpring has more ready-made templates — 14 vs 5. Each platform can also turn its simulations into scored assessments: software walk-throughs in Captivate and dialogue role-plays in iSpring.
Adobe Captivate
You’ll have 5 question types in the Question slides: multiple-choice, true/false, matching, sequence, and short answer. There are basic settings on the right panel: graded/non-graded, time limit, number of attempts, shuffle questions, simple branching, etc.
Captivate’s question slide templates
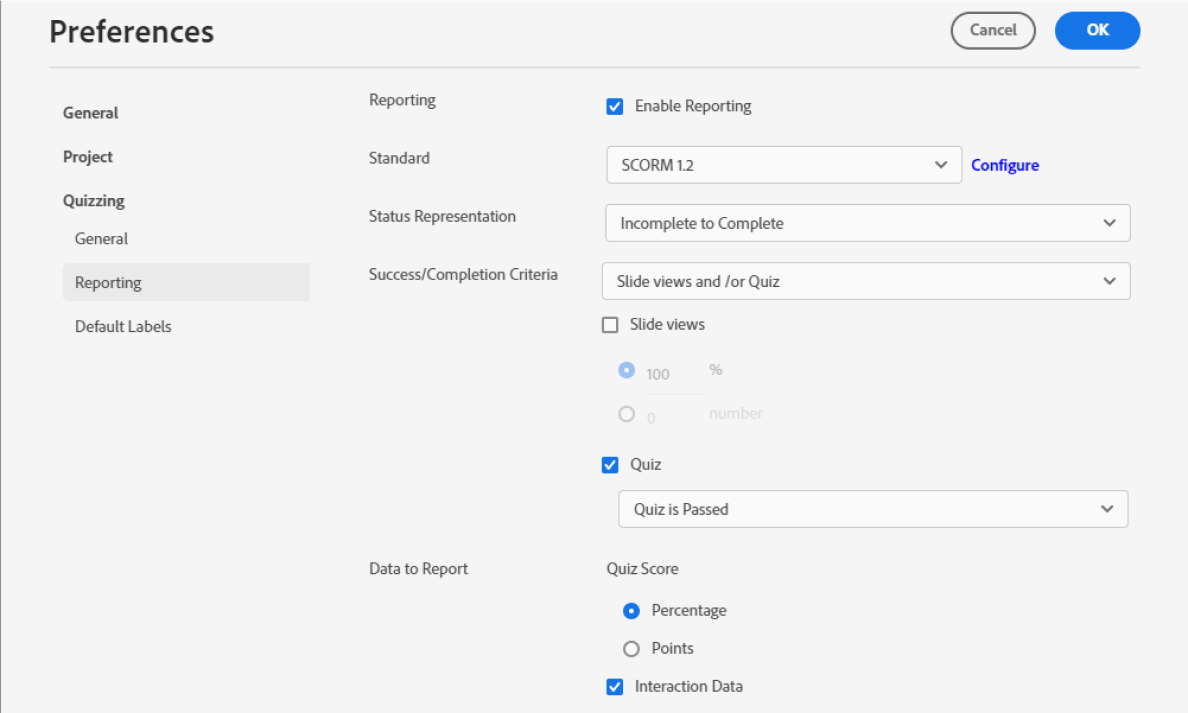
Global defaults (feedback wording, score reporting, pass marks) sit under Edit > Preferences, which saves set-up time on large projects.
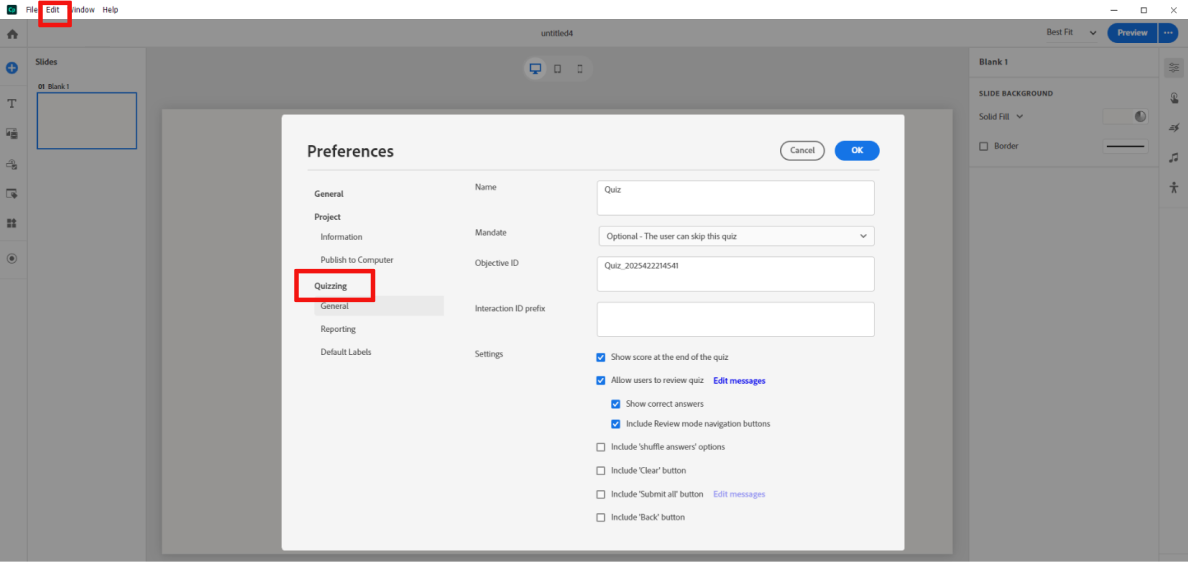
Captivate’s question slide template customization
Users also love Captivate’s question bank or pool that can be stored separately from your main project and then pulled into quizzes randomly or selectively.
You can also import questions using a CSV file. This speeds things up when working with large question banks or moving existing assessments.
As part of Adobe’s simulation feature, you can create assessment simulations to test software and process skills. Assessment mode tracks learner input – clicks, typing, navigation – and scores performance automatically.
Here’s how it works: you record a video, it breaks it down into screenshot slides, and you set up a simulation for each action. Learners then interact with it to demonstrate the skills they’ve gained.
Example of assessment simulation in Captivate. Source: YouTube.
iSpring Suite AI
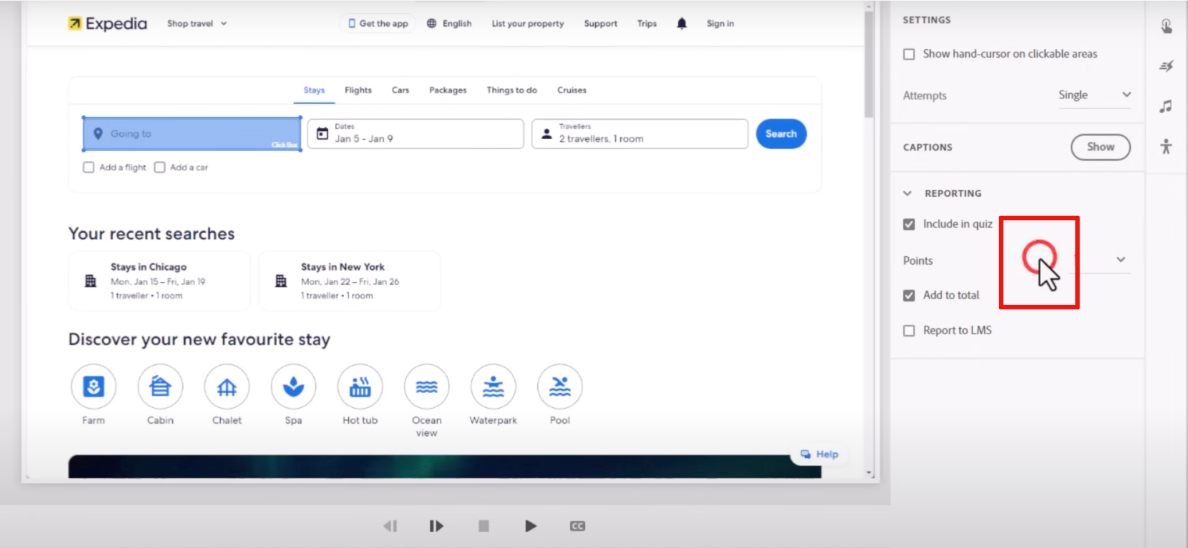
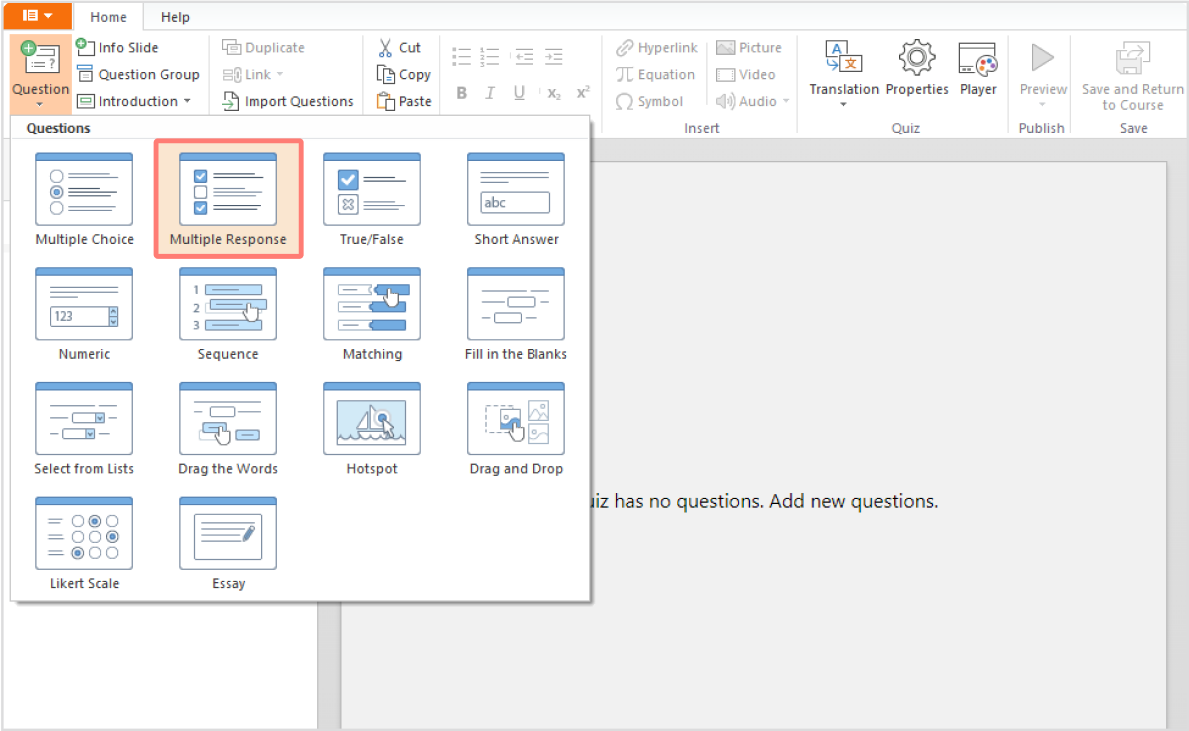
iSpring Suite’s QuizMaker has 14 pre-built question types, including multiple-choice, multiple response, drag-and-drop, short answer, matching, hotspot, Likert scale, and more.
Each template has familiar controls for grading, attempts, shuffle, feedback, scoring, timers, and branching.
iSpring Suite interface with question type selection
To change a question’s look, you’ll need to switch to Slide View.
iSpring Suite question look customization
With iSpring Suite, you can import questions via an XLS or XLSX file. It’s more useful than CSV when you need validation lists or multiple sheets, or you need to store richer meta-data.
Question group is a feature that’s similar to question pools. You can separate questions on different topics and then set up randomization within one group or several groups. This option also lets you generate completion statistics for each group separately, so it’s easier to identify learners’ weak areas.
You can also turn role-play simulations into assessments by adding scoring and reporting.

Setting up the iSpring Suite role-play assessment
Step 8. Make your course accessible and responsive
Both tools comply with WCAG and Section 508. Captivate gives you full manual control: import caption files, label every object, and set the tab order. iSpring Suite AI offers a one-click Accessibility mode that reshapes the course for screen readers and keyboard use.
Adobe Captivate
Captivate treats accessibility like another design layer that you can fine-tune. You can import and sync SRT or VTT caption files directly on the timeline. Add descriptive text to any object, define keyboard-accessible clickable areas, and manually set the tab order to guide screen reader navigation.
Captivate also provides accessibility settings for interactive elements like buttons, checkboxes, and widgets, including customizable labels and navigation sequences.
Courses in Adobe Captivate are responsive by default. You can easily preview and test content on different screen sizes. It’s also possible to customize text for each screen type.
iSpring Suite AI
When you publish, turn the Accessibility mode on and iSpring will generate a parallel version of the course that:
- Simplifies layout, enhances contrast, and ensures compatibility with screen readers.
- Supports keyboard navigation for all interactive elements.
- Lets users view audio and video transcripts.
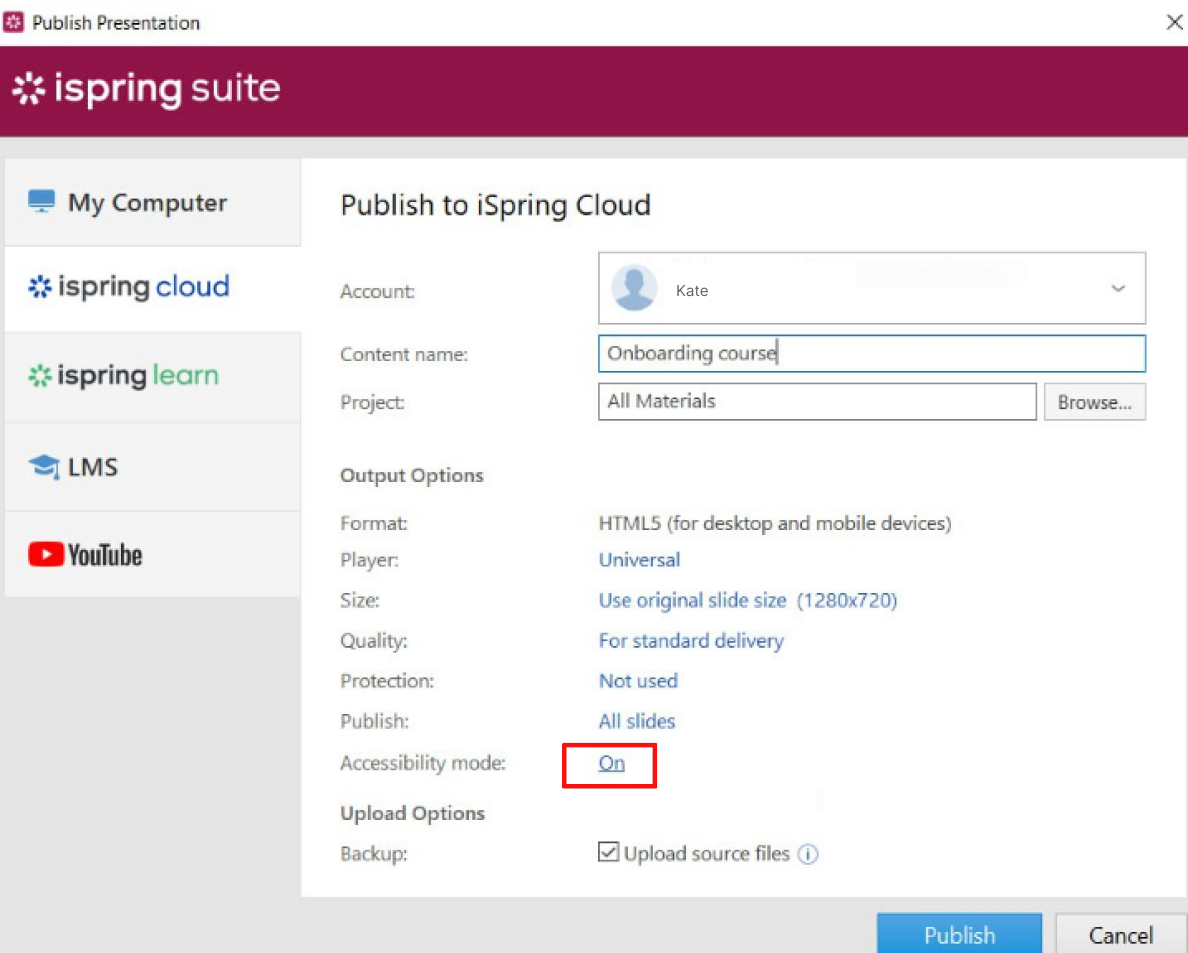
Turning on the iSpring Suite Accessibility Mode
A learner can toggle this mode as the course starts.
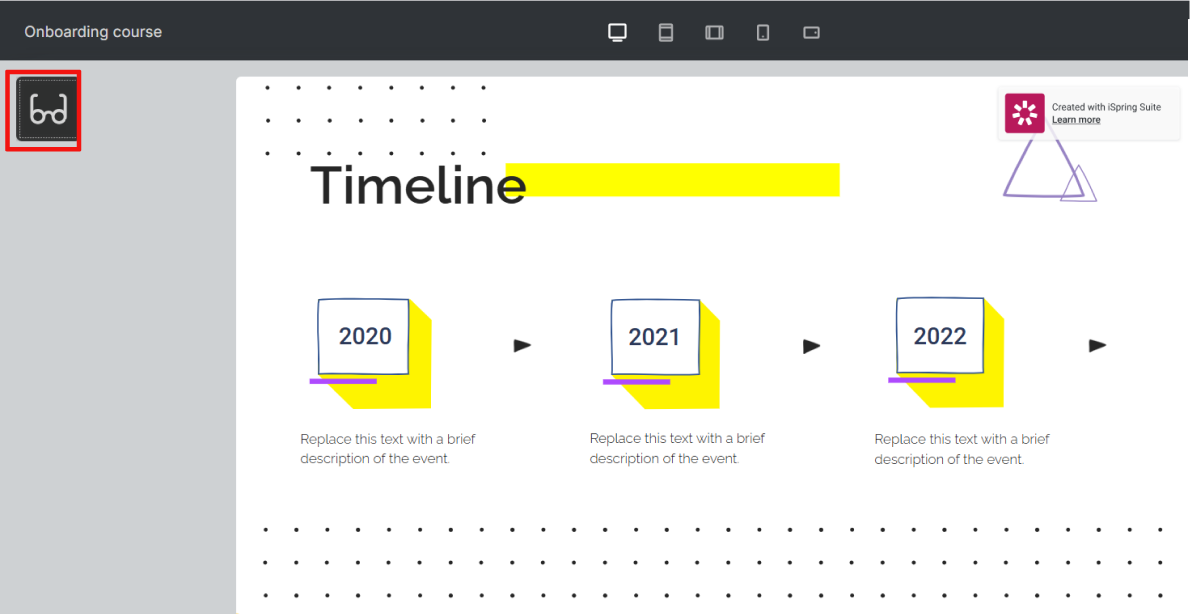
iSpring Accessibility Mode preview window
Most accessibility settings are managed through native PowerPoint features. This includes content order, decorative elements, and alt text for images and objects.

Accessibility settings in PowerPoint
Courses created with iSpring Suite also automatically adjust to different screen sizes and orientations, with no extra setup required.
Step 9. Collaborate with your team
Captivate offers a faster hand-off: create a link, send it, and reviewers can comment on multiple device views right away. iSpring Suite AI keeps feedback inside iSpring Cloud AI, which adds an account step but gathers every version and note in a single hub for ongoing projects.
Adobe Captivate
To discuss your course with stakeholders, Adobe Captivate lets you create a shareable link. You can send it to a list of emails or make it publicly accessible. Reviewers don’t need access to Captivate — the project opens in a browser.
Sharing for review in Captivate
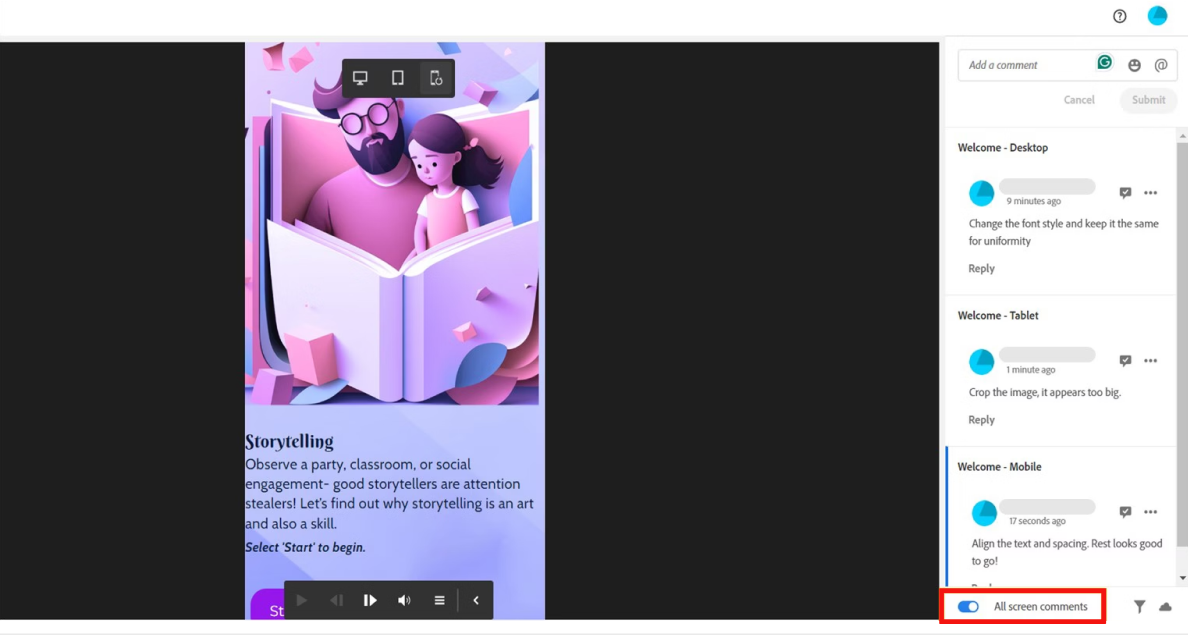
And I liked that they can leave comments for desktop, tablet, and mobile views separately. So, you don’t need to mention which version your comment refers to.
You can also edit, resolve, or assign comments to specific team members.
Adobe Captivate’s review mode with comments. Source: Adobe.
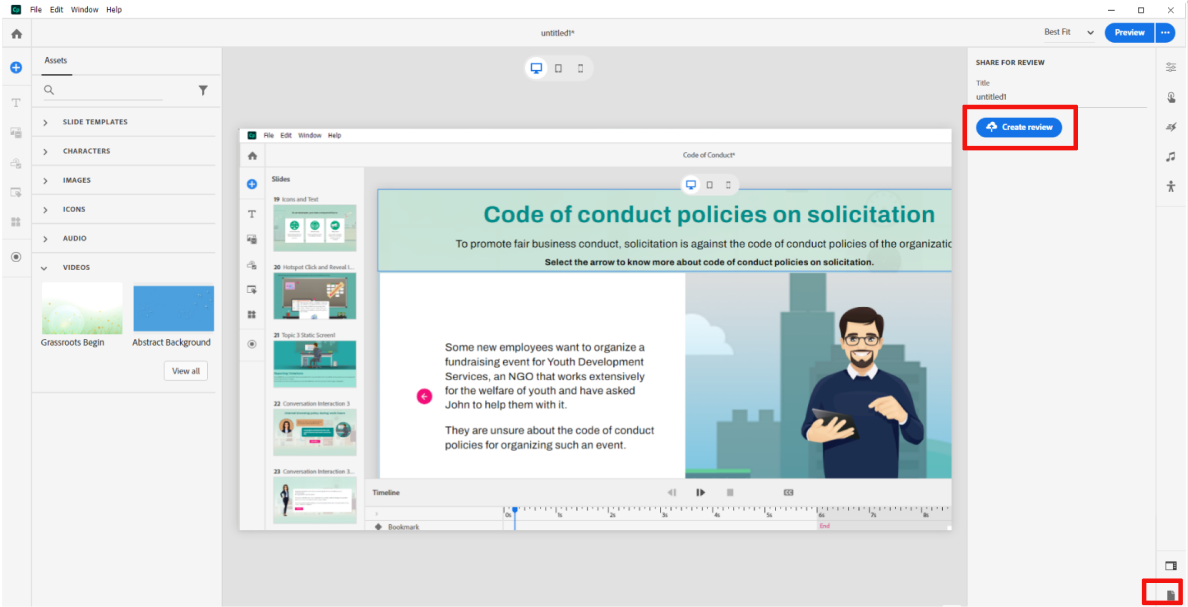
iSpring Suite AI
iSpring’s review loop starts by publishing to iSpring Cloud AI. Once the file is there, you invite reviewers as Cloud team members and grant them permission to comment.
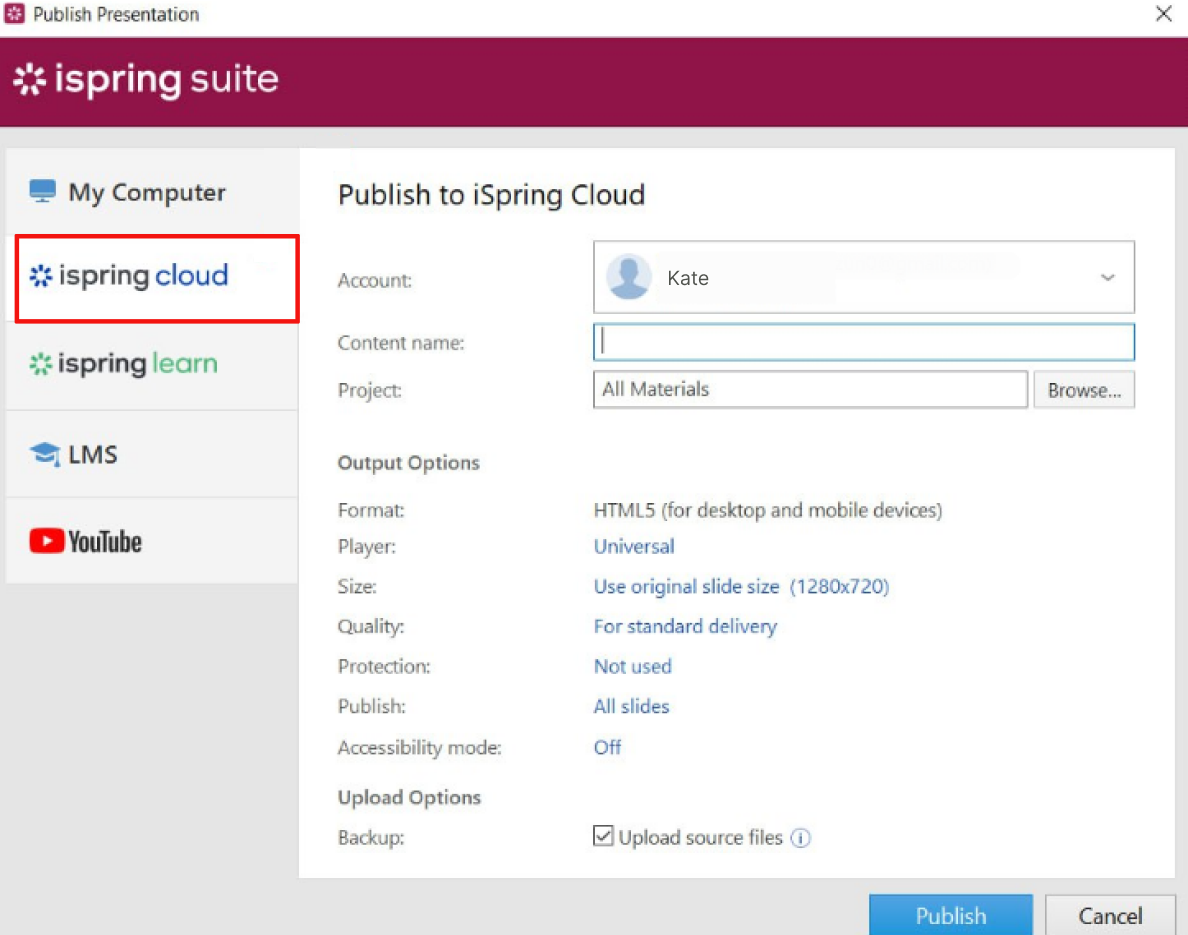
Publishing a course from iSpring Suite to iSpring Cloud AI for review
They still work in a browser, but the extra permission step can slow things down if stakeholders are not already in the system.
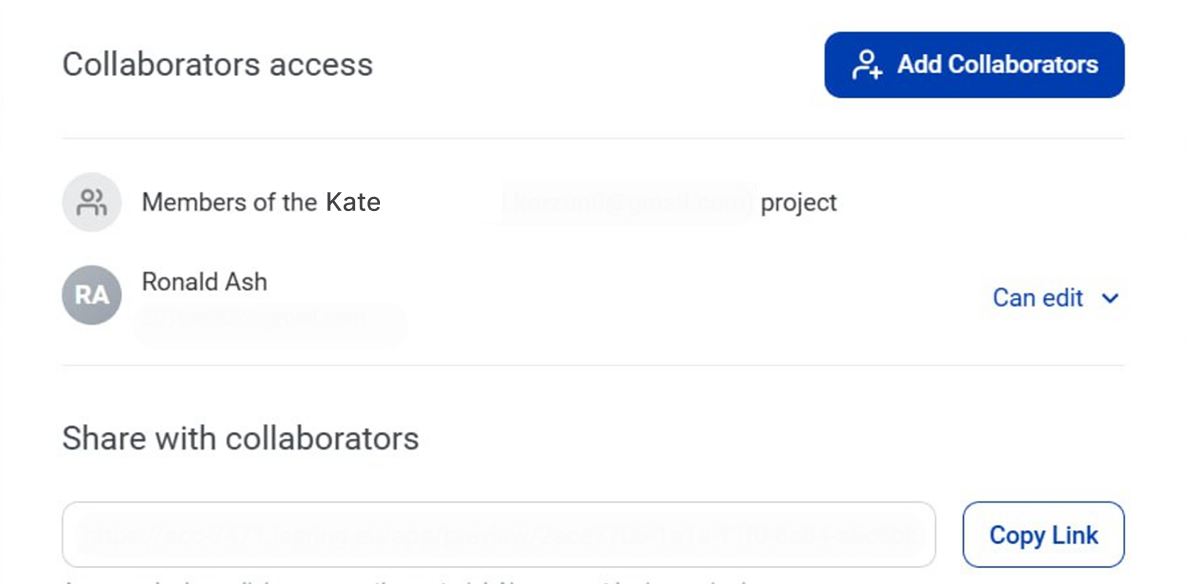
Sharing the course with team members in iSpring Cloud
Comments are also editable and resolvable.
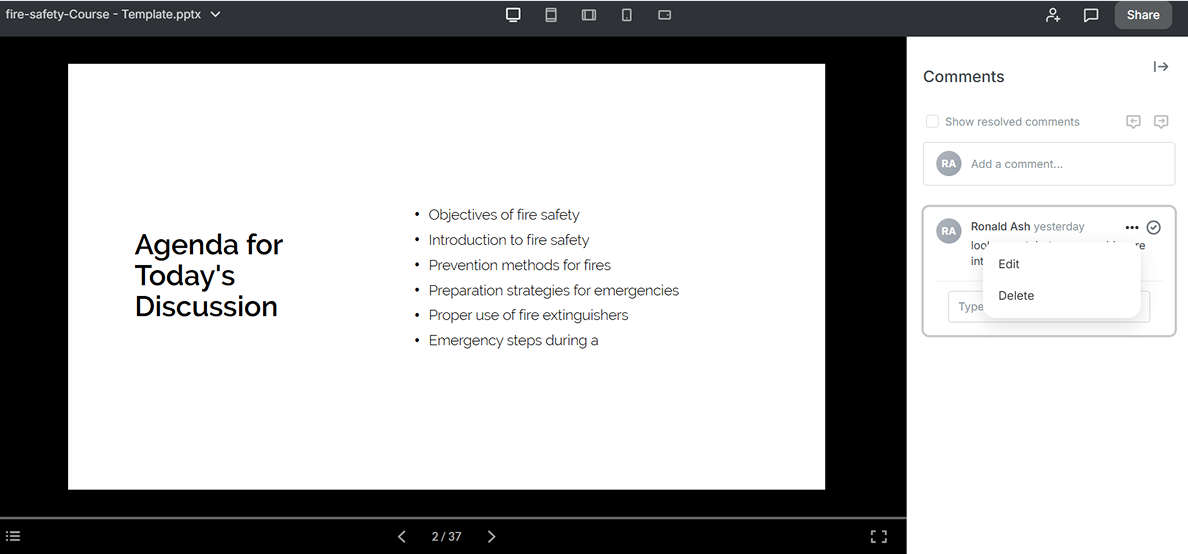
iSpring Cloud AI review mode with comments
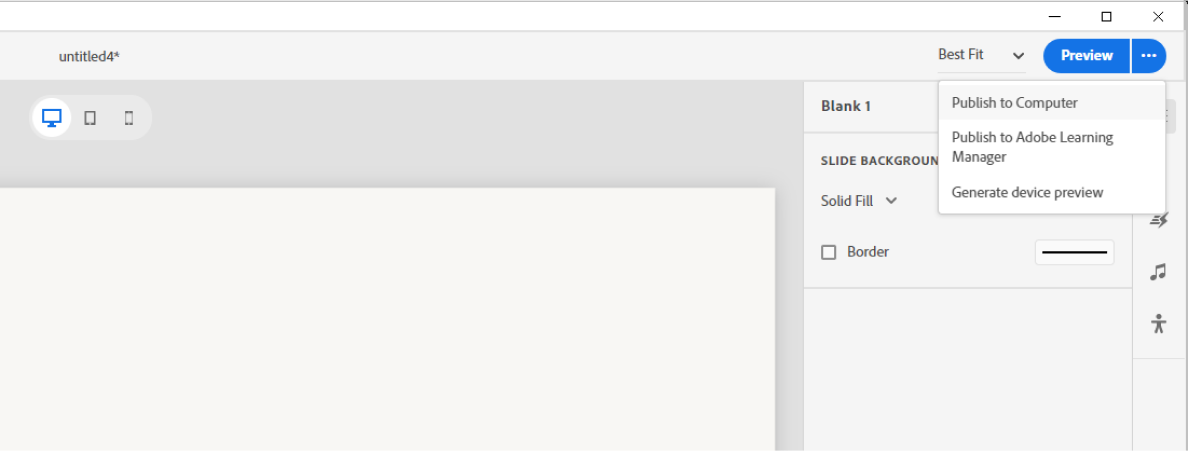
Step 10. Publish a course
Captivate offers the essentials — HTML5 plus LMS packages — but keeps the list short. iSpring Suite AI adds video export, YouTube upload, and cloud sharing, plus more settings for each format. It cuts out several conversion steps when you need multiple formats.
Adobe Captivate
Captivate gives you two primary export paths:
- HTML5 package on your computer.
- Direct upload to Adobe Learning Manager.
Adobe Captivate publishing options panel
If you’re publishing to another LMS, just make sure to set your preferences first. You can pick from options like SCORM 1.2, SCORM 2004, AICC, and xAPI.
Setting up the standard for publishing in your LMS in Adobe Captivate
iSpring Suite AI
iSpring Suite offers more publishing options and settings for each type, so you can save time on converting or refining your presentation outside of PowerPoint.

iSpring Suite publishing panel
From the Publish panel, you can:
- Save the course to your device in HTML5 and video formats.
- Publish to iSpring Cloud AI for testing and collaboration with your team.
- Publish to the iSpring LMS and Moodle™ LMS directly or any other LMS that supports SCORM 1.2, SCORM 2004, AICC, Experience API (xAPI), and cmi5.
- Upload it directly to your YouTube account.
Pricing Compared
| Adobe Captivate’s individual plan costs $489.48 per year, billed monthly at $33.99. You pay in small amounts, but you’re locked in for a year. Other plan prices are only available upon request. All plans include both all-new Adobe Captivate and Captivate Classic, 100GB storage, as well as Adobe Creative Community and Behance.Students and instructors can get Adobe Captivate at a discounted price.A 30-day free trial is available. | iSpring Suite AI costs $1,290 per user/year. Beyond desktop functionality, the plan includes an AI-enhanced cloud course builder, iSpring Cloud AI with 20 GB of cloud storage, and real-time collaboration. Freelancers are eligible for a discount, and the price is $970 per user/year. A 14-day free trial is available. |
Adobe Captivate vs. PowerPoint with iSpring Suite: When Does Each One Make Sense?
Here’s a practical breakdown of where each platform works best based on my review of both tools and user feedback.
Adobe Captivate is a strong choice for teams that already work within the Adobe ecosystem. It integrates naturally with tools like Photoshop and Audition and supports reusable themes and shared actions, helping maintain consistent branding and interactivity across projects.
Captivate is also particularly effective for screen-based technical training. Its software simulation engine allows you to capture each click, keystroke, and input, making it possible to build detailed, step-by-step practice modules where learners demonstrate real system navigation before going live.
In addition, Captivate stands out when your project demands highly customized learning experiences — you can design complex branching scenarios, trigger actions based on learner behavior, and create multi-layered interactions using variables and advanced settings.
iSpring Suite AI is a better fit when the goal is fast and efficient course production, especially for teams without a formal instructional design background. It allows subject-matter experts and new course creators to quickly build professional-looking training without dealing with a steep learning curve.
It also works well for creating instructor-led video content, thanks to a simple screen and webcam recording studio built right into the tool.
For soft skills development, iSpring’s TalkMaster feature makes it easy to build role-play simulations with branching dialogue and voice-overs.
And if your team is already heavily invested in PowerPoint, iSpring’s native integration helps you turn existing presentations into full eLearning courses while preserving layouts, animations, and brand styling with minimal effort.
Create online courses and assessments in record time.


