How to Create Step-by-Step Instructions That Are Easy to Follow


Clear and concise instructions make work easier for everyone. Whether it’s onboarding a new hire or tackling a complex process, well-written steps help people get it right the first time. Guides, SOPs, and manuals don’t just save time; they eliminate confusion and keep the entire team aligned.
In this guide, you’ll learn how to write step-by-step instructions that are useful and easy to follow. We’ll walk you through tips and templates you can use to share knowledge, support software adoption, and keep improving how your team works.
Key Takeaways
The article explains how to create clear, effective step-by-step instructions for processes such as onboarding, SOPs, troubleshooting, safety procedures, and customer guides. It outlines six key steps — choosing the right process, understanding the audience, setting a clear goal, picking an appropriate format, using suitable tools, and reviewing and sharing the finished instructions — to make guides easy to follow. The piece emphasizes clarity, the use of visual support, and testing, offers examples and templates, and suggests using tools like iSpring Suite and a centralized knowledge base or LMS to organize, share, and scale instructional content across teams.
Why Step-by-Step Instructions Done Right Change Everything
Messy or unclear documentation slows everything down. It creates confusion and leads to mistakes.
New hires get stuck.
Employees repeat avoidable errors.
Support teams answer the same questions over and over.
Does that sound familiar?
Clear and well-structured step-by-step instructions fix all that by:
- Shortening the learning curve.
- Boosting day-to-day efficiency.
- Making it easier to share knowledge across teams.
- Supporting ongoing improvement.
- Keeping everyone aligned and informed.
You’ll learn how to build step-by-step guides that scale across departments and support business growth.
Types of Step-by-Step Instructions and When to Use Them
The type of instructions you create depends on the process, the audience, and the tools at hand.
1. Onboarding Checklists
Support new employees through the onboarding process with clear, step-by-step instructions for various tasks.
Examples:
- Day-one setup
- Accessing internal tools
- Reviewing company policies
- Completing mandatory trainings
- Setting up email and calendar
- Meeting key team members
Well-documented onboarding checklists make the process smoother, help new hires get up to speed faster, and reinforce company culture.
 Download our free New Employee Onboarding Checklist
2. Standard Operating Procedures (SOPs)
Great for standardizing repeatable tasks and ensuring compliance.
Examples:
- Submitting payroll
- Handling returns
- Performing system checks
- Approving purchase orders
SOPs help keep work consistent and reliable. You can save them as detailed task documents or add them to a larger process manual or style guide, so every team member can easily follow the steps involved, boost operational efficiency, and stay on the same page.
Get your Free HR SOP Template
3. Troubleshooting Guides
These step-by-step guides help employees resolve issues independently and reduce support tickets.
Examples:
- Restart a frozen device
- Resolve connection errors
- Fix formatting issues in software
- Recover lost files
- Troubleshoot login problems
Clear and detailed instructions make it easy for anyone to solve problems without waiting for help. They also serve as excellent self-service content for end users.
Download a Free Troubleshooting Guide Template
Too much to read? Get a summary from AI
4. Safety and Compliance Procedures
For complex procedures that involve risk or sensitive data, clarity is critical.
Examples:
- Shutting down equipment
- Reporting emergencies
- Use of PPE
Using clear instructions and visual aids reduces confusion and keeps your team safe.
Download a Free Safety Inspection Checklist Template
5. Customer-Facing Guides
Great user manuals are like having a friendly expert at your side. They help everyone, from new users to pros, get things done quickly.
Examples:
- Activate an account
- Use a product feature
- Navigate a new UI
- Set up preferences
Clear guidance builds trust and helps users achieve repeatable success with your product or service.
Download a Free Customer-Facing Guide Template
How to Write Clear Instructions in Six Simple Steps
Let’s break this down into actionable steps that work across departments and tools.
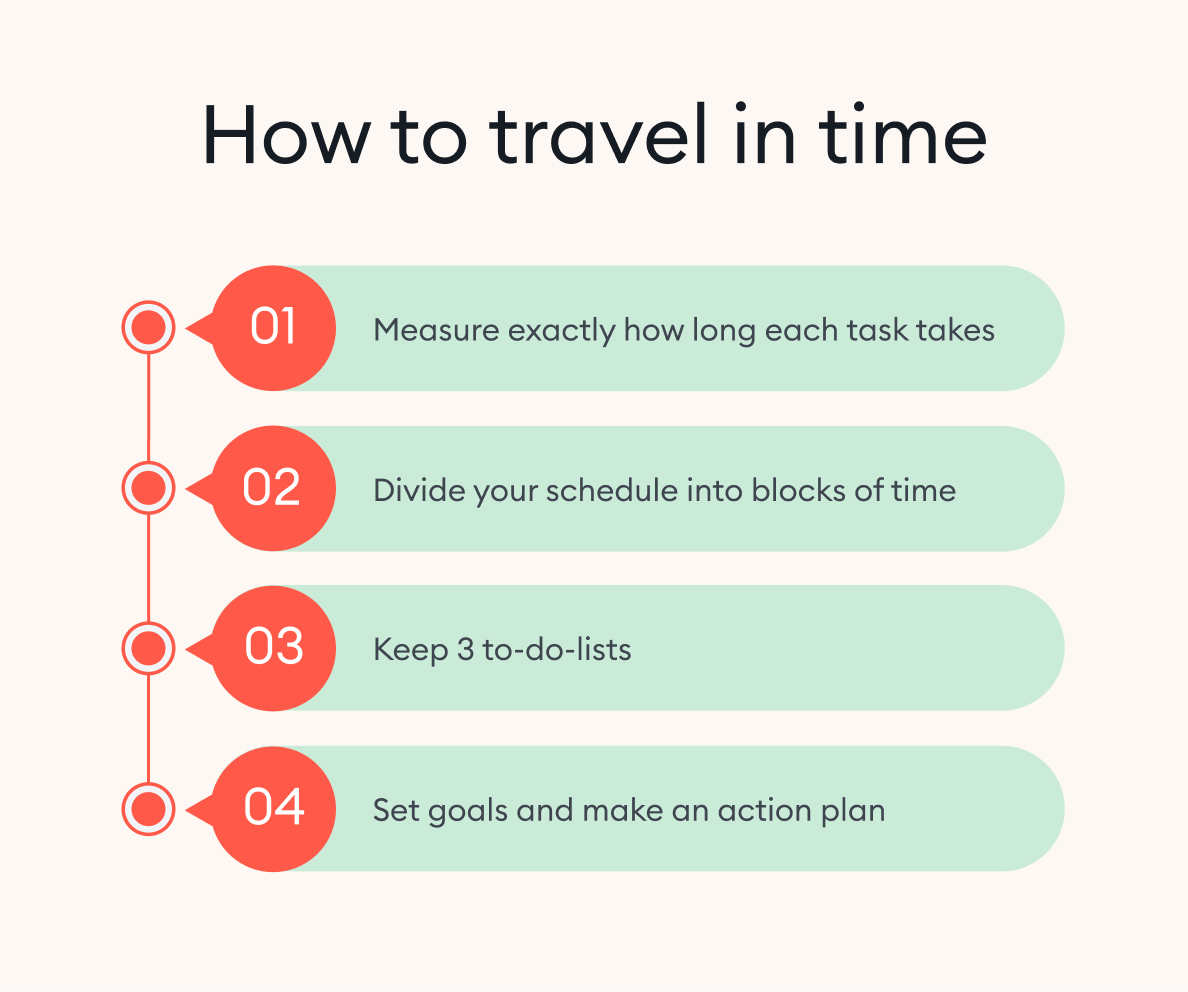
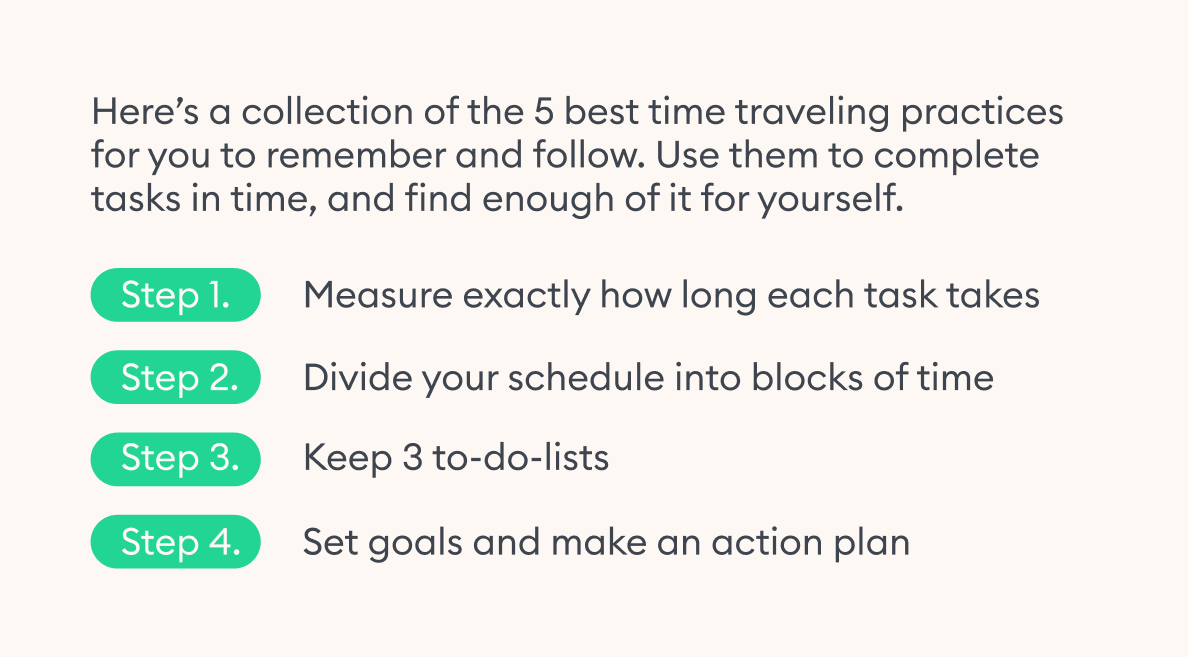
Step 1: Choose the Right Process
Start with processes that:
- Are repeated frequently.
- Are likely to be performed incorrectly.
- Involve specific tasks or cross-team handoffs.
Focus your documentation efforts where they impact performance the most.
You can start small: choose one procedure and document all the details in a clear and concise format.
Step 2: Know Your Target Audience
Tailor the tone and format to your target audience:
- New hires: Explain terms clearly, avoid jargon.
- Experts: Skip basics, focus on key details.
- Customers: Keep it simple and visual.
This helps everyone learn faster and use your guides effectively. Always follow your corporate style guide to keep work instructions consistent and strengthen your company’s knowledge base.
Step 3: Set a Clear Goal
Every effective set of step-by-step instructions starts with a single, well-defined objective:
- “Complete weekly reporting”
- “Set up a new user account”
- “Safely power down the machine”
Starting with a clear goal makes your process document easier to write and follow. It reduces errors on complex tasks and improves quality control.
Step 4: Choose the Right Format
| Format | Best for |
|---|---|
| Text + visuals | SOPs, checklists |
| Step-by-step guides | Knowledge transfer |
| Step-by-step tutorials | Training materials, walkthroughs |
| Video or simulations | Onboarding |
| Interactive modules | Training sessions, tool adoption |
Use supporting visuals, diagrams, or screenshots to simplify complex tasks and support visual learners.
Step 5: Use the Right Tool
Your tool should:
- Allow collaboration.
- Support multimedia and visual media.
- Offer easy access for the team.
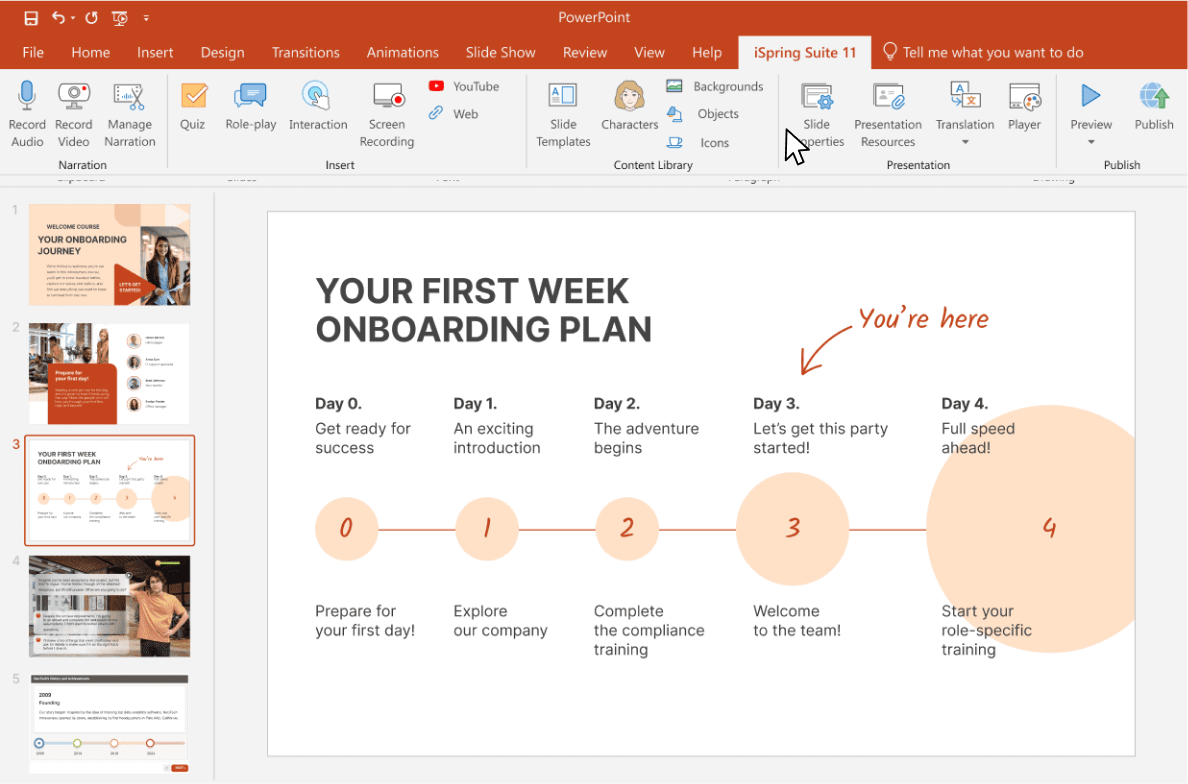
Tools like iSpring Suite help you create step-by-step instructions that incorporate visual aids and reflect your team’s real workflows.

Step 6: Review and Share
- Walk through the steps with a tester.
- Clarify unclear terms or broken logic.
- Upload to a knowledge base or LMS.
This is how you scale process documentation and make unique knowledge accessible.
Best Practices: What Makes Instructions Easy to Follow
Write easy-to-follow instructions that get results. Here’s how.
One Step = One Action
Break tasks down into digestible chunks. Don’t stack multiple actions in a single line.
Use Clear Language
Use the active voice. Avoid fillers or passive constructions. Define technical terms clearly.
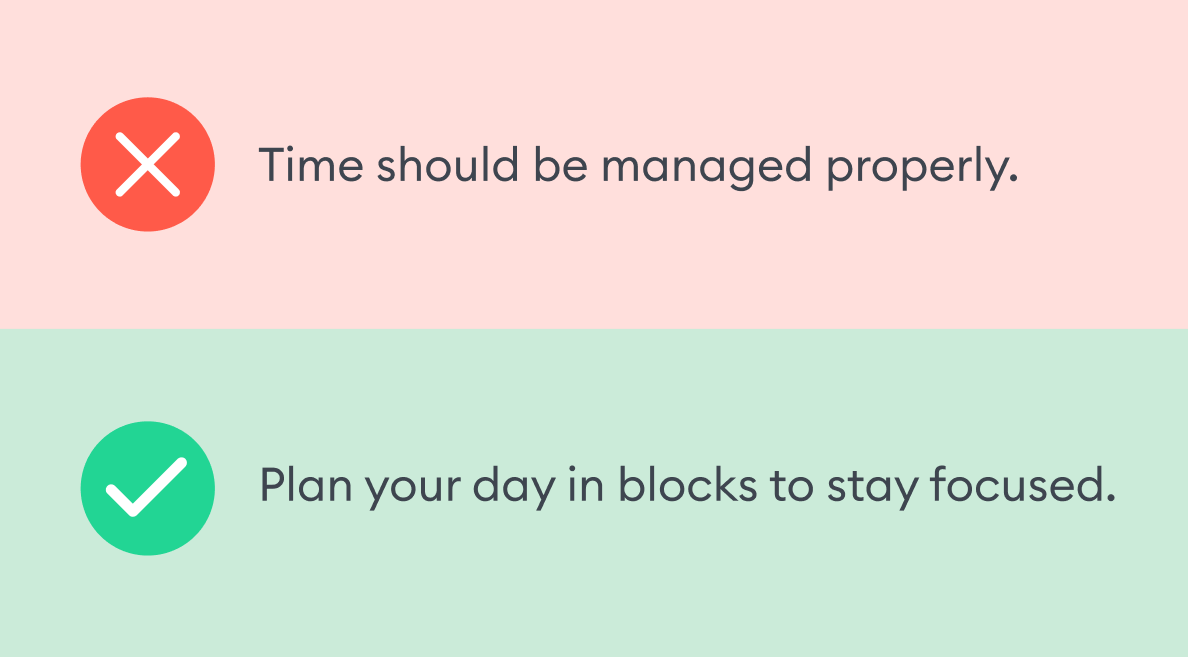
The best step-by-step tutorials provide clear directions, especially when teaching complex ideas or new processes.
Make It Scannable
Use spacing, numbered lists, and subheadings to keep the structure clean.
A consistent format improves the readability of your step-by-step instructions.
Use Supporting Visuals
Use arrows, highlights, or screenshots to clarify each step.
Focus on clarity, not complex design. Use visuals only when they make the steps clearer.
Callout Tips and Warnings
Highlight time-saving tips, safety notes, and common errors. This reduces the need for consulting colleagues and helps encourage users to stay focused.
Test and Refine
Have a fresh pair of eyes follow your instructions exactly as written. This is the best way to find missing steps or confusing points before the document is finalized.
Examples of Effective Step-by-Step Instructions
Confusing:
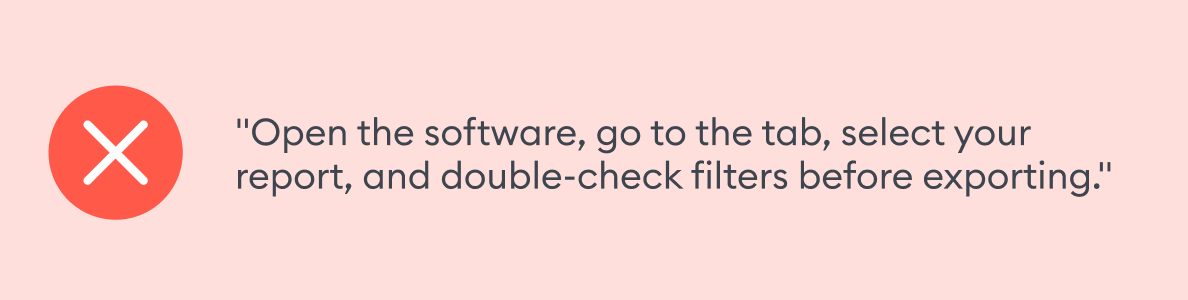
Problem: Too much information all at once. No visuals. No clarity.
Better:
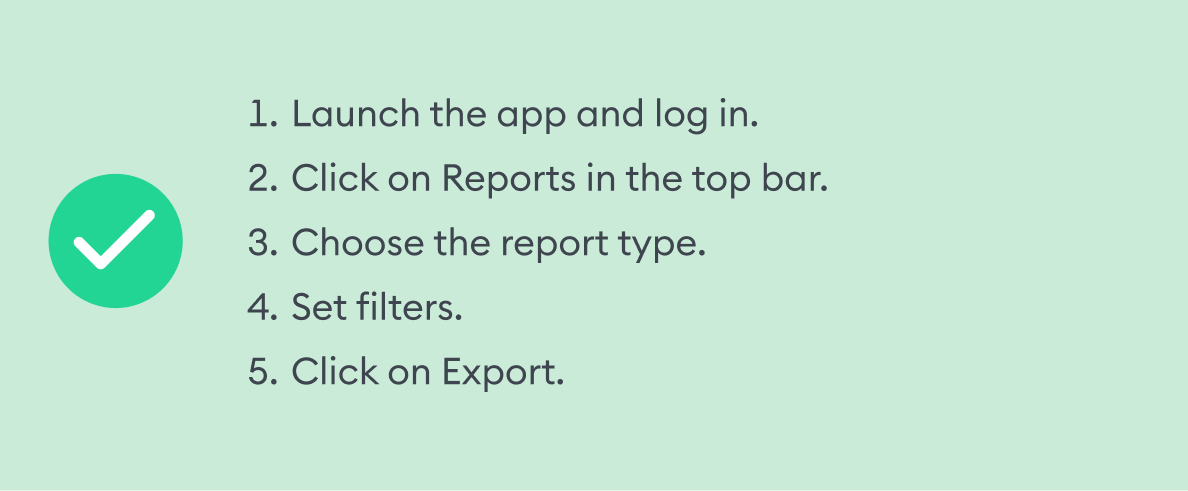
This version reflects the key qualities of proper step-by-step guides: it’s easy to scan, accurate, and repeatable.
Power Up with iSpring Suite
Would you like to create training that people actually remember?
Use iSpring Suite to:
- Build engaging tutorials with audio, video, and visual media.
- Transform step-by-step instructions into interactive courses.
- Add quick quizzes to check understanding and provide feedback.
- Automate follow-up content to make training stick.
How to Share Your Instructions
Don’t just email docs to everyone.
Use a centralized knowledge base or LMS that:
- Enables search and easy access.
- Tracks completion.
- Supports updates across the entire workforce.
iSpring LMS helps you organize your step-by-step guides and connect them to actual business processes.
To Wrap Up
Step-by-step instructions are one of the most powerful tools for scaling knowledge and performance.
They help everyone work smarter by:
- Preventing mistakes with clear directions.
- Speeding up training for new team members.
- Making complex tasks easier to understand.
Make your documentation efforts scalable and consistent. Whether you’re onboarding new hires or sharing critical workflows, step-by-step guides help you create clear, effective resources that teams actually use. This makes every process faster, smoother, and more reliable.
Create online courses and assessments in record time.


PowerPoint Add-ins and Plug-ins: 13 Essential Picks for 2026
The 10 Best Training Video Software for 2026
14 Types of Quiz Questions to Use in Your Tests in 2026
Data Security Training: How to Protect Your Company’s Data