eLearning Storyboard for Instructional Designers: Tips & Examples [+Free Template]

Imagine you’re stuck in a maze. If you were told you could choose one item to help you find your way out, what would it be? Chances are, you would ask for a map.
Now imagine the “maze” is an eLearning course you need to deliver — where do you start? How do you let everyone on your team know what they need to do and when to get the course created?
In this case, the ‘map’ is an eLearning storyboard, and we’re about to tell you everything you need to know about this often misunderstood part of the eLearning development process.
What is a Storyboard in Instructional Design?
As the name suggests, a storyboard tells the story of your training course. It’s a document, slide deck, or prototype in which the instructional designer or training developer lays out the framework for the eLearning course that they plan to create.
Instructional design principles should guide the storyboarding process. This helps to organize and present course content in a way that engages the learner, for instance via the use of dialog and interactivity. In addition to the written content, the instructional designer should consider how to connect with the learner visually. What photos, icons, charts, infographics, or animations will best support the learning objectives?
Why Use a Storyboard for eLearning
There are many compelling reasons to use a storyboard in the course design process; some are obvious, like planning the design of your eLearning course, but some you may not have considered before.
Let’s look at the top reasons for using an eLearning storyboard:
- Visualize training design. A key benefit of storyboarding is working through how your training will look and function in its final form. You can specify what kind of images will be used, the type of user interface that will be presented to the learner, and the animations and interactions that will engage your audience.
- Aiding team collaboration. By using an eLearning storyboard, your project can be validated by a subject matter expert, a project manager, a graphic designer, and other team members.
- Identify weaknesses in training design. One of the best things about storyboarding is being able to visualize what will happen on screen, how your audience will interact with the training and identify any weaknesses in the eLearning design. You’re likely to find many things that can be improved or tweaked by picking through your storyboard with a ‘user hat’ on.
- Save time. It might seem like storyboarding is a lot of work when you could just start building eLearning content immediately and make changes on the fly. Storyboarding does take time, but it’s time well spent. Getting your entire design signed off will save a lot of costly mistakes later if major changes happen after development starts. In the long run, storyboarding will save everybody time on larger projects and facilitate eLearning project management.
Examples of Instructional Design Storyboards
There’s no one-size-fits-all storyboard, but there are some industry-standard types and methods of storyboarding that you can use as your base and adapt as required. Many course developers prefer Word and PowerPoint for building instructional design storyboards, because these programs are accessible and simple to use.
Let’s consider different eLearning storyboard examples one by one and look at why and when you may choose each of them.
Word / Pages
You might consider using a Word storyboard template (also known as a text-based storyboard template) when you, as the training designer, have a design resource handling most of the graphics.
A Word storyboard is also a good choice in instances where the visual look of the course has already been established. For instance, your organization may use a slide storyboard template with approved branding and colors, or there have been previous eLearning courses developed that the business is happy with, and there are template files available.
Another consideration is the technical literacy of your SMEs and reviewers. Are they tech-challenged, or really pressed for time? Most people can open and review a Word document without too much trouble.
Word storyboards usually have a landscape page layout, with columns and rows. The image below is a good example of how this might look.

Word storyboard example
Here is what this sample of an instructional design storyboard in Word contains:
- The screen title and number (#)
- Media Files that will be used on each screen
- Visual Instructions/Developer Notes (which will include comments on how the graphics behave, how the slide advances, and where the learner is going after this screen)
- Page/Media Text (On Screen which is any text that appears on the screen)
- Audio File Narration – The script that will be used to create the voice over
PowerPoint / Keynote
Also known as visual storyboards, these are usually built in PowerPoint. By nature, these focus more on what the learner’s going to see on-screen, and can help to visualize and build out graphics and scenarios.
You might consider using it when you want to give reviewers a clear picture of what you’re planning to show on the screen. If your reviewers are new to storyboarding, or if your layouts and graphics are different than the standard used in previous online courses, creating a visual eLearning storyboard template may save you a lot of time and rework. You might also consider using a visual storyboard when you, as the eLearning developer, are mostly responsible for the layouts and graphics of the course.
Visual storyboards usually have a landscape layout. The image below is an example of how visual storyboard template might look.

PPT storyboard example 1
Here is what this sample of an instructional design storyboard in PowerPoint contains:
- Note to developer: How we want the action to unfold on screen
- Image asset: Placeholder or actual image
- Note to artist: What graphics assets to create so the developer can create the scene
- Screen name/number
- Lesson and topic
Other things you could include in a visual storyboard are navigation indications and buttons, and a narration script. You might use stock pics or SmartArt in PowerPoint to give simple mockups of charts and infographics.
Here’s another example of a visual eLearning storyboard:

PPT storyboard example 2
In this example, we have the following information (from top left):
- Screen title
- Mockup graphic (timeline)
- Developer instructions
- Voice over/narration script
Note that the background graphic has already been added to the slide.
Prototype
Rapid prototyping is building a rough version of a slide or interaction complete with narration and animations. Instead of storyboarding what you’re planning to do, you build a quick version of the slide and present it to the reviewers for their feedback. This can either be done with an eLearning authoring tool, with any UX prototyping software, or even in Photoshop.
The example below shows a prototype built with an authoring tool.

Prototype example
When might you choose to prototype? When it’s crucial that your reviewers’ experience, the proposed look, and feel of the course. For instance, if you’re building a large course for a new customer, it’s a good idea early in the process to actually build a few slides and interactions, so the customer can experience your vision of what the course will look and feel like.
You may also choose to prototype for complex interactions. For example, if you’re building a fairly complicated branching scenario and your reviewers have never gone through one, build a prototype so they can experience it as a learner would. By doing this, you use your team as a way to receive learner feedback and help further refine your content or layout.
Also read: → Best 30 eLearning Examples
Components of an eLearning Storyboard
We already saw some of the components that can be included in an eLearning storyboard in the examples above. Here’s a more detailed look at what the main components are, and the reasons you would want to include them.
Screen/Slide number
A slide/screen number naming convention will keep you consistent throughout your projects and avoid confusion for others. An example could be something like ‘OB_M1_S2_T1_1’. Looks confusing right? Let’s break it down in full sentences and see if it makes more sense.

Now imagine how much easier it will be in the review process if you need to direct your developer to make an edit on a specific slide, or a reviewer to re-check an edit.
Depending on the structure of your course, you can come up with your own naming convention that best suits your needs.
Slide title/name
This could either be the visible ‘Title’ line of the slide, or it could be a description of the slide, such as ‘Jump page’, ‘Closing slide’, etc. Whichever you use, make sure you keep it consistent.
Screen text and elements
This will take up a significant amount of space in your storyboard and is usually the main part of the course content. This typically includes all visible text on the slide and should appear exactly as you want it written and in the order you would like it displayed.
Graphics and animation
You can find placeholder images, create graphics mockups, or simply describe for the designer/animator what you want to do.
- Use thumbnails of the actual big size images if possible.
- If using an animation, provide a full description of what the animation will show, including timings.
Navigation
You may need to describe the path the user will take after clicking a certain element on the screen, for example to the next slide, the previous slide, jump to a specific slide, to a popup form, start a quiz, etc.
Branching
More complex eLearning courses often involve branching. This is when a choice the user makes determines the screen that comes up next. This could be a decision to access further information on a topic, or the answer they give for a question or interaction. Whatever the trigger is, be sure to clearly explain to the developer where the user should end up next.
Developer notes
Include anything here that will help the developer translate what’s on the storyboard into the eLearning content.
Audio narration script
This is the narration text that will be used in the voice over. It’s recommended that you have the project owner sign off on this separately to avoid unnecessary changes and complications later.
How to Create an eLearning Storyboard
Now that we have all the background information we need, it’s time to dive in and start creating our eLearning storyboard. We’ll walk you through this process step by step with examples so you can use it as a reference when you start creating your own eLearning storyboard.

Step 1. Assess your needs
Depending on your project, this step may have already been completed in the analysis stage by an instructional designer. In this step you should aim to identify the target audience of your learning and development project and its learning objectives.

Step 2. Decide on an instructional technique/design approach
Now it’s time to think about how you will present the content to the learner. Do you want to present it through storytelling, a scenario-based approach, narrated infographics, or a combination of different content types?
If you haven’t decided yet on how you’re going to break up the course into modules, sections, and topics, now is the time to do so. You will hopefully have a course outline as a result of the previous analysis that you can leverage at this stage.
Step 3. Gather and organize content
At this stage, consider what resources you have to work with. What reference or learning material has been provided for you? What assets are available, for instance, photos, graphics, charts, software simulations, etc.? It’s helpful to catalog or store this material in a folder structure with naming conventions that make it easy to find and organize.
You should also decide what components you need to include to tell the story of your course. You can refer to the previous section for a recommended list.
Step 4. Pick a storyboard template
Based on the work you did in the first three steps, you should be ready to decide what type of eLearning storyboard template you will use. Remember, you can download one of our free starter storyboard template.
Step 5. Add and sequence content
This is when the real work starts! Begin adding your content and arranging the sequence in the screens or text columns of your chosen storyboard type. Consider the order of content and what topics need to come before or after others.
Add the interactions, scripts, progressions, navigation, branching, and design details. For example, when the learner leaves a slide, where do they end up next? Is there more than one option? If so, you may need to add branching options to your storyboard.
Step 6. Choose an authoring tool
By the time you hit this step, you will have a fully complete eLearning storyboard and a good idea of both the visual look and the level of interactivity that will be used in your course. Now, it’s time to pick an authoring tool. This is the software that will make your vision come to life, so make sure you do your research and choose a tool that’s appropriate for the job.
You may already have an authoring tool in mind, or have been prescribed one by your organization. If not, then now is the time to decide on one.
When choosing an authoring tool, ask yourself these questions:
- Will it help me get what’s in my storyboard developed quickly and effectively?
- What features does it have that will make my life easier? Does my storyboard contain a lot of eLearning interactions? Developing these can be time-consuming. Is there anything in the storyboard that could slow down development?
- Will the authoring tool help me do it faster? Maybe you have a great dialog simulation in your storyboard or planned ambitious designs but you’re worried about how the developer will bring it to life.
If you want to build beautiful interactive courses, try iSpring Suite. This is an authoring toolkit that offers a rich feature set to bring your storyboard to life easily and speed up course production drastically. With iSpring, you can make slide-based courses, quizzes, dialog simulations, interactions, and video tutorials. Get a free iSpring Suite trial and explore all its features right now.
Also read: Best 20 Explainer Video Software for Every Budget and Skill Level
Tips for Effective Storyboarding in eLearning
Storyboarding belongs to eLearning best practices: it facilitates course building and helps instructional designers greatly. We covered storyboarding in quite a bit of detail in this article, but let’s wrap up with some tips to make your storyboards even better!
Tip 1: Choose a consistent theme and style for your storyboard
If your organization uses a certain look, feel or branding for other training materials, your storyboard should indicate how that will be reflected in eLearning courses.
Tip 2: Make it visual
Adding visual elements can convey how your course will present itself to learners with just one look.
Tip 3: Review with your SMEs
Storyboarding is an easy way to include your subject matter experts in the development process. It’s crucial to get their feedback on your storyboard before you start developing the eLearning course.
Tip 4: Try to cater to different learner types
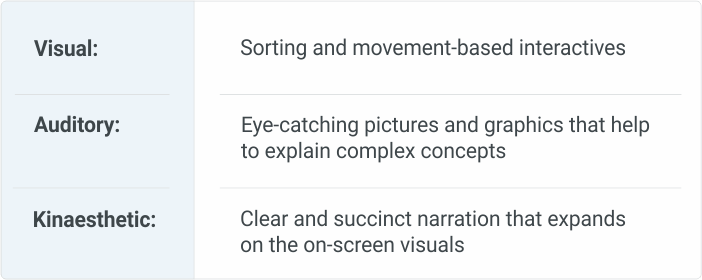
People learn in different ways, so try to combine different learning modalities in your storyboarding to accommodate for visual, auditory and kinesthetic learning preferences. Example:
Tip 5: Focus on the learning objectives
Writing content for your identified learning objectives will help keep your eLearning storyboard flow natural and your audience focused. Remember to state each topic, explain the idea, focus on key points, and use simple language with a focus on plain English. Short sentences, examples, and questions are all good things to include. When you have finished your storyboard, review it to ensure your content covers all the learning objectives.
The Grab-and-Go eLearning Storyboard Templates
It’s easier to get started if you have ready-made eLearning storyboard templates. Using them as a base, you can develop your own format to reuse for future eLearning projects. This allows you to reuse certain elements that are unique to your course design, for example, creative course introduction pages or interesting slide interactions.
You might want to create your own storyboard template if you have some very specific eLearning project requirements, but for most scenarios, ready-made templates from iSpring will be a perfect fit. Feel free to choose and download any of these for your personal use:
Hit the ground running with these free storyboard templates!
FAQ
Take a look at a few more questions and answers regarding storyboards.
What should a storyboard include?
Commonly, storyboards for eLearning include:
- Screen title or number
- Lesson and topic
- Voice over/narration script
- Plan of interactivities
- Mockup graphic (e.g., timeline) and image placeholders
- Navigation buttons
- Branching
- Notes to developers and designers
A storyboard is only as good as the sum of its parts, so components are key. If you’re missing a crucial component, it won’t tell the whole story, so select what to include wisely.
How can you review an eLearning storyboard?
It’s critical to invite subject matter experts and project stakeholders to assess your mockup and collect feedback from them. But it tends to result in emailing materials back and forth and the risk of missing all deadlines. If you use PowerPoint for storyboarding in eLearning and subsequent course authoring, the review process is much easier with iSpring Suite Max that provides an online space for real-time collaboration.
How do you create a storyboard in PowerPoint?
The process starts from setting a landscape layout and then arranging content on it. You can utilize a free eLearning storyboard template in PowerPoint – just download it via the link above.
Takeaways
We hope this article helped kick-start your storyboarding process. Remember these key takeaways to ensure your first eLearning storyboard is a memorable one.
- Identify your ‘why’. If you keep the reasons for using a storyboard at the front of your mind, it will help you all the way through the process.
- Use the right tool for the job. Selecting the correct type of storyboard template will make the whole process a lot easier.
- Keep learning objectives front and center. Always check that your storyboard content maps back to a learning objective. If it doesn’t, question why you are including it.
If you have any questions, or suggestions for what makes a great eLearning storyboard, we’d love to hear your comments below.
Create online courses and assessments in record time.


