How to Create a Course in Moodle

Education has expanded beyond the boundaries of conventional classrooms and textbooks in the current digital era. Modern education is based on learning management systems (LMS), and Moodle stands out as a strong and adaptable platform in this space.
A lesson in Moodle is a complete training session with theory and practice. The theory helps to convey knowledge with the help of lessons containing text, images, and videos; hands-on activities such as quizzes allow you to check how much the student has learned.
If you’re new to Moodle site administration and are wondering how to set up a course on this system, you’ve come to the right place. Creating a lesson in Moodle will take new users anywhere from 30 minutes to an hour.
If you need to make it quicker and easier, use the iSpring Suite authoring tool. In this article, we’ll demonstrate how to build the same lesson in Moodle and the iSpring Suite authoring toolkit so you can decide which tool works best for you.
TL;DR
The article explains how to create a course in Moodle, guiding new administrators through setting up a new course and adding lessons, content pages, and quiz questions using Moodle’s built-in editor. It then compares this process with building the same lesson using the iSpring Suite authoring tool, highlighting iSpring’s PowerPoint-based interface and a wider range of question types. The piece also offers tips on structuring course material, using multimedia, encouraging interaction, and tracking learner progress. The built-in editor is free but can be complex, while iSpring Suite simplifies and accelerates course creation.
How to Create a Course in Moodle
There are several ways you as an administrator, can create a course from scratch. The two most common are: Create a new, empty course and Upload an existing course from a different Moodle site.
As an example, we’ll build a Moodle course on Workplace Safety rules and a lesson on Fire Safety. To continue, you’ll need to sign up to Moodle Cloud and get the source file with text so you can just copy and paste it in the sample lesson.
Step 1: Create a New Course in Moodle
According to the logic of Moodle, you can’t create a lesson without creating a new Moodle course first. To create a new online course, go to Moodle Site Administration → Log in with your administrator account → Click Site administration → Click the Courses tab → Click Add a new course. Enter full and short course names (“Workplace Safety”) and click Save and Display.
Now enroll yourself in the course; this way, it’ll appear in the list of available Moodle courses. Click Enrol users, enter your name in the pop-up window, and choose Manager from the dropdown menu. Then click Enrol users.

Step 2: Add a Lesson to the Course
For convenience, let’s edit the topic name and rename Topic 1 to Fire Safety. Then click +Add an activity or resource. The Moodle toolbar appears on the screen. Choose Lesson displayed in the Activities section and click Add.
In the new window, we’ll need to set up four sections:
- General: Enter the name of the lesson and its description.
- Appearance: Configure the lesson design. Would you like users to see a progress bar or demonstrate the lesson as a slideshow?
- Flow Control: Manage the rules for taking the lesson. For example, it’d be wise to allow learners to view the lesson on fire safety several times, but for an exam session, it’s better to give just one attempt.
- Grade: Determine the rules of assessment. Will you use points or a scale to evaluate the results? What is the passing grade? For the sample lesson, set four points as the passing grade as there are four test tasks.
Click Save and display.
Step 3: Create a Question Page
Our sample lesson starts with the question “What to do if a fire starts?” To add it, click Add a question page in the Actions column. In the new window, select Question type; select Multichoice for the sample, and click Add a question page.

Once again, you find yourself on a new page. Do the following general setup for the question:
Page title | What to do if a fire starts |
Page contents | Imagine it’s an ordinary day at the office. Suddenly, you smell smoke. What do you do? |
| Answer 1 | I’ll look around to find the nearest stairway, leave all my belongings, and run to the exit. |
| Response | Right. You didn’t panic and got out. Yet you managed to breathe in smoke, as you didn’t protect your nose and mouth while evacuating. |
| Answer 2 | I’ll pack up and go to the nearest exit. |
| Response | Wrong. When there’s smoke in the building, you must leave immediately. By wasting time on packing things, you may lose your chance to get out, as smoke and fire spread very quickly. |

Click Save page.
Step 4: Create a Content Page
The content page is a building block for creating a lesson in Moodle. It may contain text, pictures, audio, or a video format file. Click Add a content page to create one, then enter a page title and its content details.
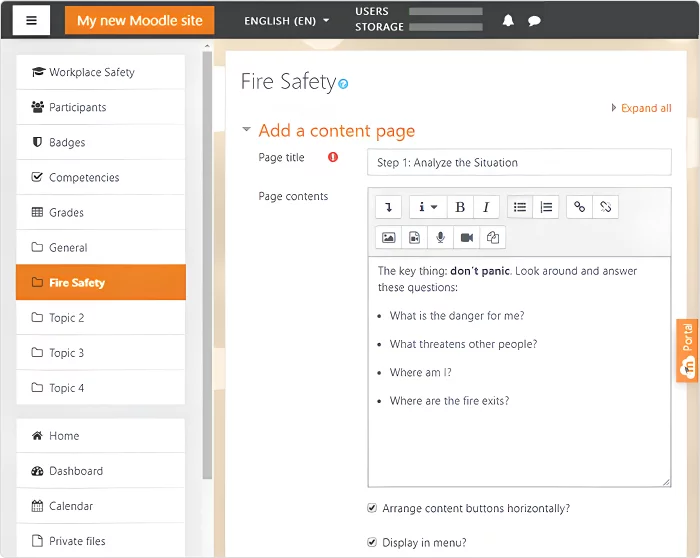
Moodle content page settings
Below, you’ll also see a Content 1 (Content 2, Content 3, and so on) section. Using each field, you can set up navigation within a lesson. A Content setting is a button that forwards a learner to another slide of the lesson. For instance, you can create buttons for every page of the lesson, so learners will be allowed to navigate from the first page to the last one. If you prefer closed navigation and don’t fill in the Content field, then learners will have to study the assignments one by one by default.

For the sample course, we don’t need any extra navigation buttons except Next.
For our sample Moodle course, we’ll set up closed navigation and create just one button, Next, that leads to the next course page.
Too much to read? Get a summary from AI
Step 5: Add More Content and Question Pages
Create the rest of the pages using the lesson source files. Also, don’t forget to define the Next button by entering the word Next in the Content 1 description and choose to jump to Next page on each new course page you add.

Moodle content page settings
In the end, you should get the following structure:

The structure of a lesson
The lesson is ready. You can preview it through the admin panel.

The preview of the Fire Safety sample lesson.
How to Create a Lesson in Moodle using the iSpring Suite
The built-in Moodle editor isn’t the only tool for creating lessons and courses for Moodle. You can also use the iSpring Suite toolkit, a powerful PowerPoint add-in that allows you to quickly build interactive courses in a familiar environment.
Here’s what the same lesson on Fire Safety looks like with iSpring Suite:

To continue, you’ll need to sign up for an iSpring Suite free trial.
Step 1: Create Info Slides
Create a new PowerPoint presentation. Most of the slides of the sample lesson are just text supplemented by images; we even won’t need to use any additional functions so far; just create enough slides and fill them with information from the source file.
You can set custom backgrounds for each slide to make them more informative and attractive. Go to the Design tab and click Format Background. Choose Picture or texture fill in the right pane and then select an image you’d like to use from your computer. For the cover page of the Fire Safety lesson, we used a photo with firemen.

With iSpring Suite, you can use the familiar PowerPoint interface to create info slides.
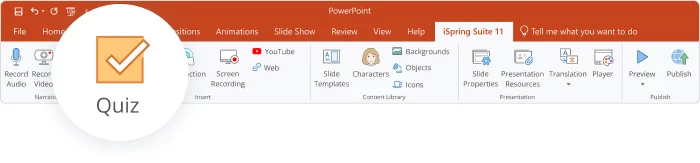
Step 2: Add Quiz Questions
In the sample lesson, there are four test questions. While you can create six basic question types with the built-in Moodle editor, there are 14 types of tasks in iSpring Suite. Go to the iSpring Suite tab and click the Quiz icon to launch the Quizmaker tool.
In the new window, choose Graded Quiz.
The first test question in the lesson is a Multiple Choice. Click Question in the upper left corner of the ribbon and choose the necessary question type. If you pay attention to the preview icons in the drop-down list, you’ll get an idea of how each question will look on the slide.
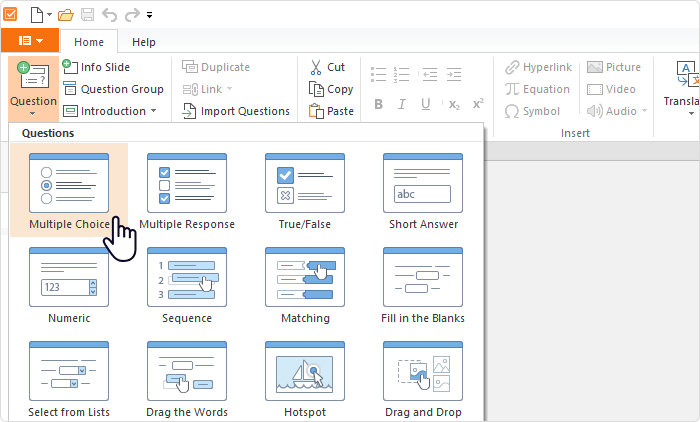
Mouse over on the question type to see the preview.
Fill in the Question, Choices, and Feedback fields using the text from the sample. Then go to the Quiz Results section in the left pane.

In the Quiz Results option, enter custom feedback details for a user who pass or fail and un-check all the boxes, save for Allow user to retry quiz setting (for the Failed tab), in the Result Slide Options to the right. In our sample, we don’t need to show the user’s score or set a passing score, so we’ll leave only one button, Retry, on the Results slide. You can experiment with different configurations and click Preview on the ribbon to see what it’ll look like.

Result Slide options
Let’s add three more assessments. To make the lesson more interactive, let’s use some question types that aren’t present in the Moodle editor.
Sequence question. You can ask learners to choose not only one response (What should you do first when you smell something burning?) but organize options — in our case, actions during a fire — in the correct order.

Drag and Drop question. The task is to check if learners remember what they should use to put out burning computers. The drag-and-drop feature turns an ordinary question into a game, where the learners can pick up different objects and throw them at the fire.

Trying to suppress a virtual fire is more engaging than answering theoretical questions.
Hotspot question. When we created this lesson in Moodle, the last task was to examine the picture, find the safety violations, and write down the answer. Hotspot allows learners to avoid typing an essay and mark the violations right on the picture. In our example, the learners should click on the boxes that are blocking the passage.

Show, not tell.
When creating questions, you can also check how they look in the Slide View option and customize the fonts and size of text and objects, and insert images.
Step 3: Publish to Moodle
When the lesson is ready, you can see what the content looks like on different devices in the Preview mode and click Publish on the ribbon.

In the pop-up menu, select the LMS tab, choose Moodle in the LMS profile and click on Publish. Using these course settings, you can prepare a lecture or test for a learning management system such as Moodle.

iSpring Suite has an interface that is similar to Microsoft PowerPoint, so it’s easy to work with text. Thanks to the iSpring Module plugin, it fully integrates with Moodle, allowing you to create quizzes and gather data on your learners’ performance.
To upload a course to Moodle, go to the My Courses tab and select New Course. Fill in the fields and click Save, then go to Edit mode and click Add an activity or resource. Select the iSpring Module, fill in the title and description, and upload the file containing the quiz. Now you can track learners’ progress with progress reports.

Useful Tips for Creating a Moodle Course
Planning, organizing, and implementing a practical Moodle course involves meticulous planning. We’ll look at some top practices for designing useful Moodle courses.
Start with specific learning goals
Spend time clearly defining your learning objectives before creating your Moodle course. By the end of the course, what do you hope your students will be able to do, know, or understand? Once you have them, you can create course activities and content to accomplish your learning objectives.
Organize the material in your course
Creating a clear and efficient learning experience requires organizing your course content. Consider segmenting the material in your course into logically linked modules or subjects. Making your text simple to scan and understand requires using headers, subheadings, and bullet points.
Publish captivating multimedia content
Use multimedia components in your Moodle course to keep students interested and inspired. Videos, pictures, articles, animations, and interactive components can all be a part of this. Use multimedia content to amplify important ideas, illustrate examples, and give context for real-world situations.
Create possibilities for dialogue and teamwork
Moodle’s capacity to promote interaction and collaboration between students and teachers is one of its strengths. Incorporate discussion boards, group activities, and peer feedback into your course layout to promote community and involvement.
Utilize the tracking and reporting tools in Moodle
You can track learner progress and engagement throughout your course using Moodle’s tracking and reporting features. Use these characteristics to spot students who might require assistance, so you can offer more support and direction as needed.
Takeaways
We’ve covered two ways to create courses for Moodle website: using the built-in editor and the iSpring Suite toolkit.
The benefit of the Moodle editor is that it’s free, and you can build content directly on the platform. The main disadvantage is its complex interface. Every content item — a course, a lesson, or a quiz — consists of individual pages; each course page must be individually set up. In short, many steps must be taken to prepare a lesson that will catch the learner’s attention.
iSpring Suite, on the other hand, has an intuitive interface that allows you to quickly build professional-looking lessons for Moodle without the need to create numerous pages and master the interface.
With iSpring Suite, you’ll be able to convert PowerPoint presentations into online courses, create interactive simulations, edit videos, and much more. There’s a 14-day trial version of the toolkit; theoretically, that’s enough time to create dozens of lessons for Moodle.
Create online courses and assessments in record time.


The 15-Minute Guide for Teachers on Getting Started with Moodle
How to Create an Online Course: A Comprehensive Guide
23 Moodle Plugins to Take eLearning to the Next Level