How to embed your HTML5 presentation into a website or blog
Do you want to embed a PowerPoint presentation into your website? The best way is to convert it to HTML5 format. A great advantage of HTML5 slides is that they can be viewed on virtually any PC or mobile device, including iPads.
In this article, you'll learn how to turn a PPT presentation into HTML5 with iSpring Converter Pro and ins ert it in your website or blog. Follow this simple step-by-step guide:
-
Publish an HTML5 presentation for uploading to the Web
-
Get the presentation’s URL on the server
-
Ins ert your HTML5 presentation in a website
Step 1: Publish a presentation for uploading to the Web
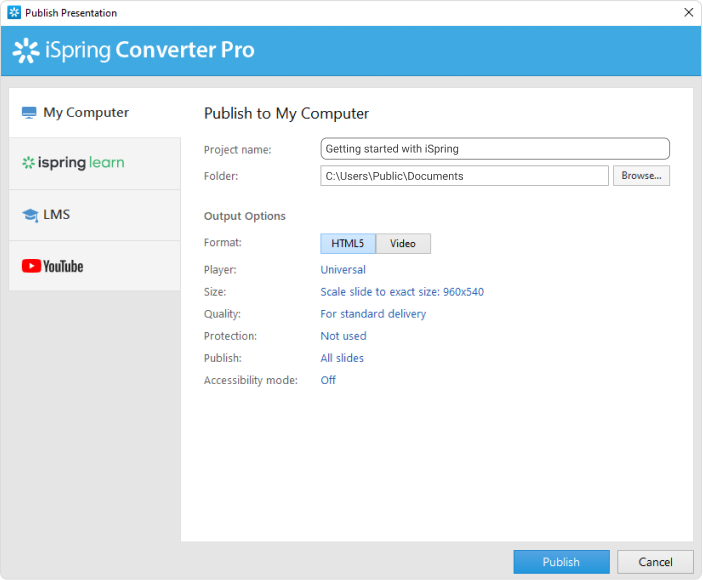
When your PowerPoint is ready to convert to HTML5, you can publish and put the presentation on a website using the Publish button on the iSpring toolbar.
 Choose Publish to My Computer. You can sele ct a local folder for the HTML5 presentation, where a new folder with the specified file name will be created.
 You can also customize a player, adjust the size and quality of your presentation, and se t up protection parameters. After you finish with all the configurations, click Publish.
Once the publishing process is complete, you need to upload the entire folder of the specified file name to the server.
Step 2: Get the presentation’s URL
You need to find out the HTTP URL of the uploaded HTML5 presentation and copy the URL to the clipboard. The URL of the presentation depends on the specific settings of your server.
Tip: Make sure that the selected URL starts with ‘http://’ and not ‘ftp://’
Step 3: Ins ert your HTML5 presentation into a website
To have your PowerPoint presentation logically fit into a website, you can choose one of the following ways to play it:
- play on a separate webpage;
- open in a pop-up;
- ins ert in to an iframe.
a) Play HTML5 Presentation on a Separate Webpage
One of the easiest ways to share your presentation via a website is to provide a hyperlink to the presentation somewhere in a webpage. To ins ert a hyperlink, switch to the HTML editing mode and use the following code:
<a title="CUSTOM TITLE OF THE LINK" href=”ENTER YOUR URL” target=”_blank”> CUSTOM TEXT OF THE HYPERLINK</a>
You can choose to open the presentation in a new browser tab (target=”_blank”) or in the same tab (target=“_self”)
b) Open HTML5 Presentation as a pop-up
To open your presentation in a pop-up window, make sure that your website allows using JavaScript code.
You can use the following code to create an on-click pop-up:
<script>  function popup(url)  {
     window.open(url, 'new', 'width=800,height=600,scrollbars=no,menubar=no,status=no,toolbar=no');
 }
 </script>
 <a onCl ick="popup('http:// ENTER YOUR URL ')">CUSTOM TEXT OF THE HYPERLINK</a>
You can customize the width and height and add different elements to your pop-up (learn more).
Alternatively, you can se t the pop-up window to appear as soon as the webpage is loaded:
<script>  function popup(url)  {
     window.open(url, 'new', 'width=800,height=600,scrollbars=no,menubar=no,status=no,toolbar=no');
 }
 popup('http://ENTER YOUR URL');
 </script>
c) Insert HTML5 presentation in to iframe
If you want to show your HTML5 presentation right within your webpage, you can ins ert it in to an iframe using the following HTML code (learn more):
<iframe src="http://ENTER YOUR URL" width="800" height="600" scrolling=”no” />
Published on your website in one of the described ways, your HTML5 presentation can be delivered to much wider audiences using modern Web browsers, mobile devices and iPads. To make sure that your HTML5 presentation will be played back properly, check out iSpring Converter’s tech specs.
}, false);
// ]]>
Related Articles
