How to Create Flashcards in PowerPoint Using Trigger Animations

Microsoft PowerPoint is much more than mere presentation software. It provides a wide variety of options to give information, help people process it, and remember the most important points.
Did you know that iSpring Suite provides superior support for the most advanced PowerPoint features? You can use any animations, transitions, hyperlinks, and triggers in your presentations that you wish, and iSpring Suite will convert them to flashcards perfectly.
Flashcards have always been a great learning tool, and PowerPoint can help you recreate this learning technique in a much more engaging and effective manner for your virtual classroom. In this step-by-step guide, you’ll learn a quick and easy way to create a set of interactive virtual flash cards using trigger animations in PowerPoint. We will walk you through the entire process and provide all the tools you need to recreate this flashcard template.
Overview
How to Create Flashcards in a Microsoft PowerPoint Presentation in 4 Simple Steps
FAQ on Creating Flashcards in PowerPoint
How to Create Flash cards in a Microsoft PowerPoint Presentation in 4 Simple Steps
To create flashcards as multimedia elements in a PowerPoint file, have the images for the cards ready beforehand. You can upload them to Google Drive or just keep them in a folder on your computer.
In our example, we’ll be creating a new PowerPoint presentation featuring flashcards with birds and their names. When you flip the image of a bird over, you can see its name. It’s a great activity to help learners remember new words or create associations.
Let’s break down the process of creating flashcards – you can repeat it later with your own learning resources.
To learn more about creating interactive games for your eLearning classroom, read our guide on PowerPoint games.
Step 1. Add images for the “clues” to the slide
1. Open PowerPoint and click on File > New to create a new blank presentation.
2. Insert the “clue” pictures into your slide. Go to Insert > Pictures and choose the desired images. Arrange them in a preferred layout and add some text for additional information if needed.

Step 2. Add images for the “answers” to the slide
Insert the “answer” pictures to your slide.
3. Go to Insert > Pictures and choose your images for the flip side of the flash cards.
Place them right on the previous images so as to cover them.
4. Then right-click the top images with the “answers” and select Send to Back. Now they are hidden behind the “clue” pictures. The learner will see them when they flip the cards over.

Pro tip: You can also turn on the Selection Pane to give distinct names to objects on a slide. Go to Home > Select > Selection Pane. It also allows you to see all the objects on your slide; you can hide them, show them, and select them on all layers.

Step 3. Create a flip animation for your flashcards
Create a Flip Custom Animation effect for each pair of pictures. This effect can be built with the Collapse Exit effect and the Stretch Entrance effect. You can do this with the help of the Animation pane.
5. Go to Animations and click on the Animation Pane on the right side of the ribbon.
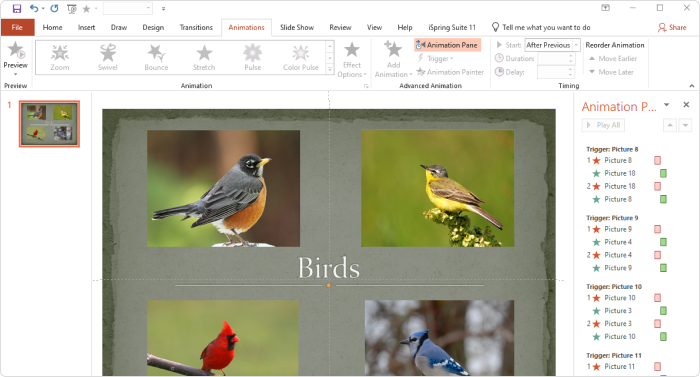
6. On the right of the slide, you will see all the pictures you inserted for the flashcards
earlier on. Click on a picture and select your preferred animation on the Animations menu. Apply Collapse to the clue images, then apply Stretch on the answer images.
7. Click on the drop-down menu next to each clue image and select Start On Click.
That way, the animation will activate when you click on the clue picture, and the image will disappear.

8. Click on the drop-down menu next to each answer image and select Start After Previous.
In this way, the animation will activate once the previous collapse animation occurs, and the answer image will appear in place of the clue.

Pro tip: You can also set the animation timings to delay them or adjust their duration. For flashcards, we typically choose Very Fast for the animation duration to create the flipping effect.

If you wish, you can add effects to your animations, such as the direction or an accompanying sound.

Step 4. Create a trigger for your “clue” images
9. Select the “clue” picture as a trigger for all four pictures and all four animations
(16 animations in total). To do this, click on Trigger (under Animation Pane) and choose all the clue images. In this way, when you click on the clues, they will trigger the animations for the flashcards.
Pro tip: name all your images to avoid confusion when you need to distinguish between clues and answers. In our example, we named the cards after each bird and marked which pictures are clues and which are answers.

To preview your flash cards, go to Slide Show > From Current Slide.

And that’s it! Each of your images is now ready to click and flip to show the student
the correct answer.
Creating flash cards is just one of the many ways to create wonderful eLearning materials
by simply using trigger animations in Microsoft PowerPoint. We’ve made just one sample slide, but the possibilities are only limited by your imagination, and a great variety of features such
as these can bring your ideas to life.
FAQ on Creating Flashcards in PowerPoint
Find out more about creating flashcards in PowerPoint presentations and get answers to frequently asked questions below.
What are trigger animations in PowerPoint?
Trigger animations in PowerPoint are interactive elements that allow you to control the appearance of objects or content on a slide based on specific user actions, such as clicking or hovering. They are commonly used to create interactive content like flashcards, quizzes, and interactive presentations.
How do triggers work for PowerPoint flashcards?
Triggers in PowerPoint flashcards work by linking an action (e.g., clicking or hovering over an object) to another object’s animation or appearance. For example, when a learner clicks on one side of a flashcard, a trigger can be set to reveal the answer on the other side. This interactive feature enhances the learning experience and engagement in presentations.
Can I create interactive flashcards in PowerPoint without trigger animations?
Yes, you can create interactive flashcards in PowerPoint without using trigger animations. You can opt for other flashcard PowerPoint features, such as hyperlinks, action buttons, and custom animations, which can be used to achieve interactivity in your flashcards. However, trigger animations provide a more seamless and user-friendly way to create interactive flashcards, making them a popular choice for this purpose.
How do I make a clickable button in PowerPoint?
To create a clickable button in PowerPoint, you need to use shapes or text boxes for the button itself and add hyperlinks to these objects. These features allow you to design and link interactive buttons within your PowerPoint presentations. Read our guide on how to add an action to an action button in a PowerPoint presentation to see the process laid out step by step.
Final Thoughts
Now you know how to create and customize PowerPoint flashcards to bring extra interactivity to your slides and engage students even more. Experiment with effect options, shapes, fonts, and other aspects of your cards for an immersive and effective learning experience that captivates your audience.
If you want to take it a step further and turn your presentations into full-fledged eLearning assets, try iSpring Suite. It’s a user-friendly authoring tool that enables you to build interactive eLearning courses in PowerPoint like a pro, even if you’re a first-time course creator. But don’t take our word for it – get a free 14-day trial of iSpring Suite and see for yourself!
Create online courses and assessments in record time.


