How to Sell Video Courses Online: The Ultimate Guide

Did you know that the average person watches 1.5 hours of video each day? And by 2022, online videos are expected to comprise more than 80% of all consumer internet traffic. Sounds convincing, right? At least, convincing enough to believe that video is a nice option to share knowledge. So, if you have decided to create and sell video courses online, it could be quite a profitable business idea.
Let’s say you’ve already made a couple of instructional videos – what’s next? Where can you place the courses to allow your prospective learners to find and buy them, and all with no technical headaches? iSpring Market is specially designed to sell your courses online and doesn’t require any technical skills to get started.
In this article, you will learn how to easily create your own online storefront in iSpring Market, where you will promote and sell videos and get payments for them too. If you still don’t have an iSpring Market account, start your free trial now. After you register, you’ll have your personal digital storefront. Good news! Information on the storefront is indexed by search engines like Google and Bing, bringing you organic traffic for your courses.
Step 1. Log into the System
To sign into your iSpring Market account, follow the link that you received in the registration email and enter your password.

You’ll get to your personal portal.
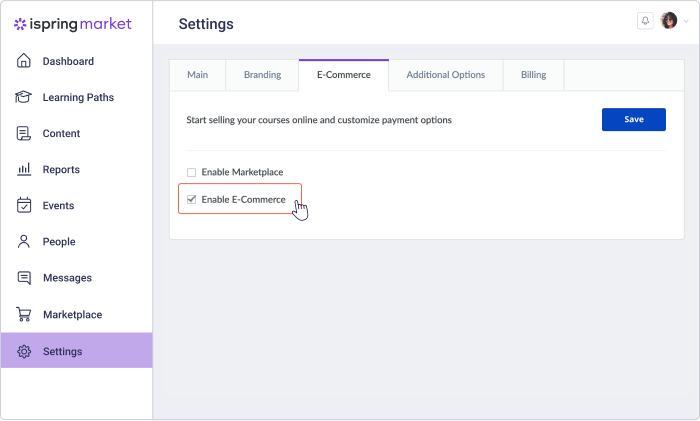
Step 2. Activate E-Commerce
Go to Settings, choose the Additional Options tab, and click E-Commerce. Then check Enable E-Commerce and tap Save.
Now, you can select a payment system through which you’ll receive your payments. iSpring Market supports PayPal, Stripe, and Authorize.net. Fill out the form fields for the selected payment system and choose the currency.
If you want to send notifications to administrators after payment is made, check Notify administrators about purchase and type in the name or email of administrators who’ll get the alerts.
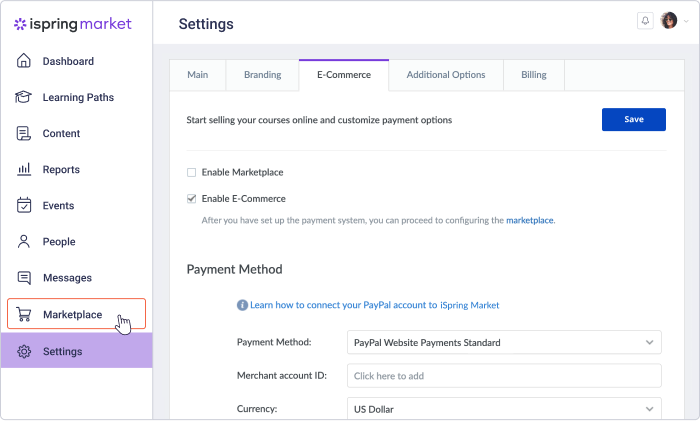
After you have set up the payment system, the new Marketplace section will appear.
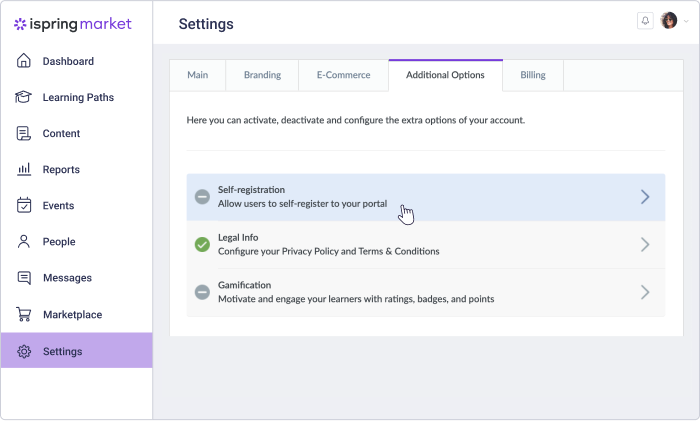
Step 3. Enable Self-Registration
By activating the self-registration option, you allow users to register new accounts in iSpring Market themselves, without the administrator getting involved. To enable the feature, go to the Settings page again, select the Additional Options tab, and click Self-registration.
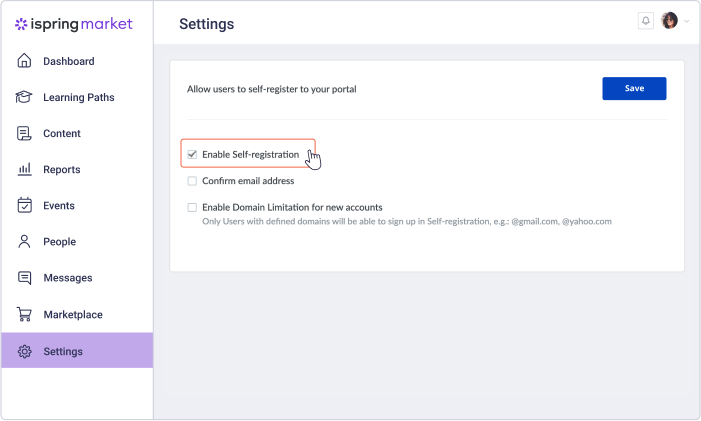
Note: Self-registration is available only when the Privacy Policy and Terms and Conditions text blocks are on.
On the newly opened page, click Privacy Policy. Now you need to choose which blocks you want to show below the registration form and enter some information about how to use the system and how learners’ personal data will be used. Finally, click Save.

Note: If you don’t have the privacy policy ready yet, you can use a generator like this one that will help you.
Tailor the privacy policy to your website and your business.
After you have configured the policy settings, go back to the Self-registration option. Check Enable Self-registration, select additional options, if necessary, and tap Save.
Step 4. Set Up the Marketplace
Now you can proceed to configure the Marketplace. The Marketplace is a webpage visible to all users. This is how they will see your virtual storefront.
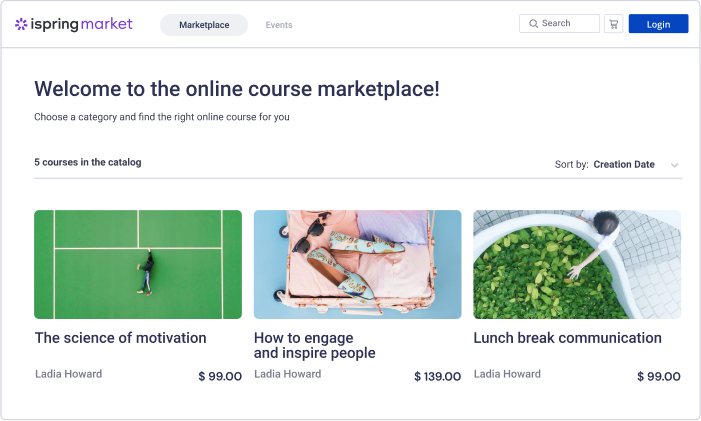
Open your Marketplace and choose the Categories tab. To help users navigate through courses and find the content they need faster, you can divide the courses into categories. Click Add Category, enter the title and description and save changes.

Go to the Settings tab to adjust your Marketplace parameters. Check the box next to Display the marketplace in search engines to make your video courses searchable on the Internet. If necessary, you can edit a welcome title that will appear at the top of all the content listed on your storefront, and change the instruction message.
Later, when you upload your courses to the platform and put them up for sale, you’ll also be able to add a featured video course that’ll be displayed above all your other materials in the Marketplace.

If you want to offer a discount on your courses, choose the Coupons tab, and click the Add New Coupon button. Type in or generate a coupon code automatically, specify the discount, shift the toggle button to the ON position to activate the coupon, and then tap Save to apply all the changes.

Step 5. Upload Your Video Course
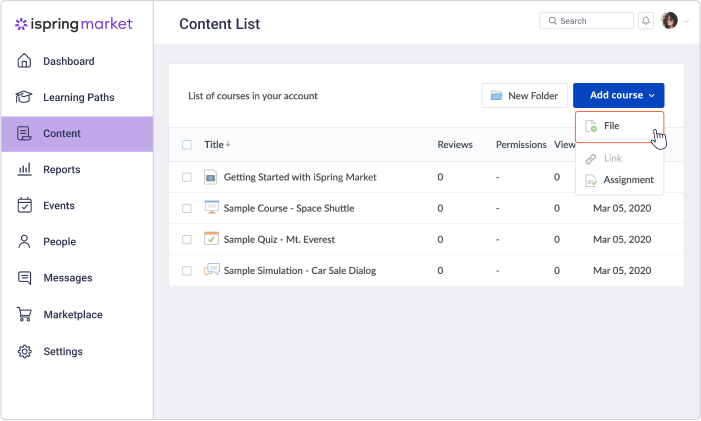
Now it’s time to add the video course that you’re going to sell on the platform. To do this, open the Content section, click Add Course, and select File.
In the Upload window, tap Browse and choose a video. The title will be added automatically and will have the name of the uploaded file. You can change it if you want, though. Add the description of your course and tags, if necessary, then hit Upload.
Note: The size of the file shouldn’t exceed 2 Gb.
If you’re going to have a lot of courses on your portal, you may need to organize them into different folders to easier navigate your content items. Create new folders and give them the appropriate titles.

After you have uploaded your video course, click on it and go to the Details tab to edit the information about the course. Here, you can edit the course title, type in a description, set up the course duration if necessary, and add information about the author/instructor.
Open the Settings page to configure the content settings. If you want to deliver a certificate to users who have completed the course, select Issue a certificate after completion of this course. You can choose a ready-made template or upload your own certificate in the Certificate Templates
section.

Under the Settings tab, you can also limit the number of attempts to launch the course and the time your course will be available for viewing.

What if you want to sell a complete training program?
If your course is a series of videos, you need to create a learning path to combine all of them into one course.
Note: Don’t forget to upload all the videos you have to the platform beforehand.
Go to the Learning Paths section, add a new path, and fill out the information about the course in the Details tab.

Open the Outline page. Here, you can group your videos into chapters (lessons). Click on Add Chapter to create the first video lesson and type in its title and description. Then tap on Add Content to fill in the chapter with your videos.

Under the Settings tab, you can adjust completion settings for each chapter of a learning path. First, choose whether users will take the chapter courses in sequential or optional order. Here, you can also restrict the time learners will take to complete the whole course or pass the chapter. For each chapter, you can set an individual due date.

On the Settings page, you can also select a chapter completion condition: Complete all chapters or Specified chapter. If you select Complete all chapters, learners will have to watch all the videos to pass the course. If you choose Specified chapter, users will need to complete one selected chapter to pass the course.

If you have several videos in each chapter, you can also configure completion condition options for each video. To do this, open the Outline tab and click the pen image. In the Edit Chapter window, open the Completion
condition menu and select Complete all courses, if you need your learners to watch all the videos to pass the chapter, or Specified course, if you want them to view one selected video to pass the chapter. Finally, click Save Changes.

Go back to Settings if you want to enable auto-numbering of chapters and videos in the chapters, or issue a certificate to your learners after they complete your course.

Step 6. Put Your Video Course on Sale
To start selling your video course, you need to add it to your Marketplace. To do this, open the E-Commerce tab and check Make this content available in the marketplace.
If you have several Marketplace categories, choose the one to which your course will belong. After that, drag the Paid content toggle button to the right to put your course on sale and specify the price. Lastly, click Save.
Note: You may also want to distribute some video courses for free. If this is the case, just leave the toggle button by default.

Good job! Now, your course is available for purchase. What’s left to do is to keep track of how your customers buy the course. You can find the sales statistics for selected content items and the information on income received in the Reports section.

Try iSpring Market for free and start selling your video courses online right now!
