How to Make a Timeline in PowerPoint (A Template is Inside)

A timeline is a list of events arranged in the order in which they happened. It can be used in history, paleontology, and any other study that requires displaying sequential events. A common timeline looks like a horizontal line with segments of time progressing from left to right.
In this article, we’ll explain how to create a timeline in PowerPoint in two different ways. Check them both and choose the one you like most.
- How to make a timeline in PowerPoint with SmartArt
- How to create a timeline faster and easier with a PowerPoint add-in

How to make a Timeline in PowerPoint with SmartArt
PowerPoint has a great tool, SmartArt, that allows you to communicate information with graphics instead of just using text. This is a great way you can let a viewer grasp temporal relationships quickly.
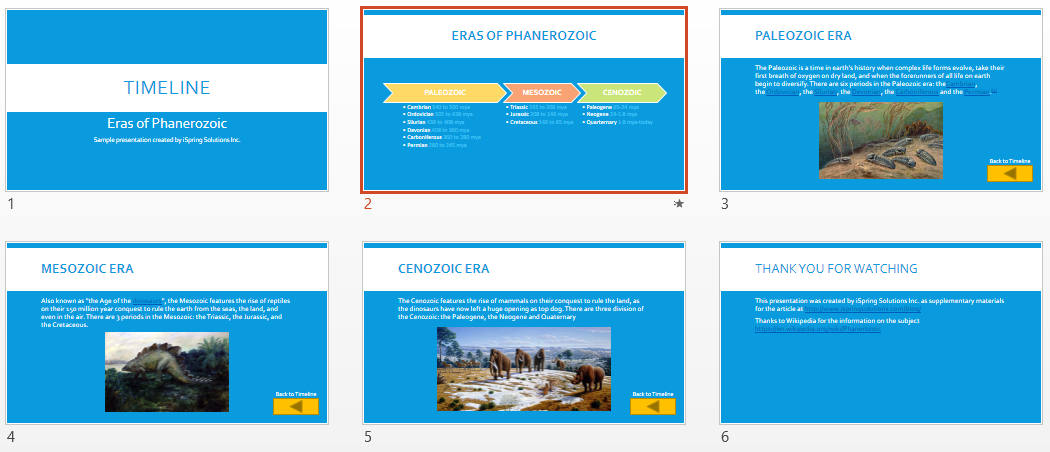
Here’s a step-by-step guide on how to build a timeline in PPT with SmartArt. Let’s use the example of the Phanerozoic Eon for a paleontology class.
1. Create a timeline chart
- Create a new PowerPoint presentation or open an existing one. You can apply a custom Theme that reflects your style right away via the DESIGN tab.

- Then go to the INSERT tab and click on SmartArt.

- Select Process on the left and pick the design of the timeline you like in the central pane. Then click OK.

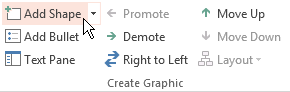
- The timeline will include three elements by default. If you need to add more sections to your timeline, click Add Shape on the top panel.


2. Add the text
Now you need to add all the data to your timeline.
- Start by giving names to your timeline elements according to your topic.

- Fill in additional text under each section. You can arrange it with bullet points so it looks better.
 Familiarize yourself with the use of the Text Pane to fill in the text of your timeline more conveniently.

 Familiarize yourself with the use of the Text Pane to fill in the text of your timeline more conveniently.
3. Customize your timeline
Once you add all the necessary details, customize your chart. Set the fonts, resize elements, and change the colors of shapes (FORMAT tab > Shape Fill).

Awesome! Your timeline already looks pretty good in PowerPoint. We just have to make it interactive by adding some links and animations.
4. Add links and animations
Here is an important point: we’ll have to break up our SmartArt into shapes to prepare it for conversion, fine-tune links, and set custom animations. Therefore, we recommend that you make a copy of your original SmartArt, in case you need to change it or create another timeline like this (using convenient SmartArt tools).
- To copy your SmartArt, just manually drag it by its border while holding the Ctrl key on your keyboard. Drag and drop the copy of the original Smart Art outside the slide.

- Then right-click on the border of the SmartArt that’s on the slide and select Convert to Shapes from the dropdown menu.

- Right-click on the border of this shape and go Group > Ungroup.

- Select each form individually and apply the Wipe animation. Set Start: With Previous for the first animation and After Previous for all the rest. Set effect options From Left for the horizontal timeline bar and From Top for the bullets.
 After you apply all the elements, the Animation Pane should look like this:

- Create slides for all milestones, e.g., this slide is about the Cenozoic Era.

- Create an action button by going to INSERT > Shapes > Action Buttons.

- Draw it on the slide and set Hyperlink to: 2. Eras of Phanerozoic, which will open the slide with the timeline again.

- Copy this action button to every slide so a learner can go back to the timeline from any descriptive slide.


 After you apply all the elements, the Animation Pane should look like this:


After everything is done, the presentation will look like this in Slide Sorter VIEW.
Don’t want to set up hyperlinks and animations on your own? Just download our template below.
Download our free Timeline template (.pptx, 0.7 Mb)
How to Create a Timeline Faster and Easier with a PowerPoint Add-in
Creating your timeline using PowerPoint provides many benefits. You can create custom element shapes, colors, animations, etc. … You can literally make any design you want using only PowerPoint’s functionality. However, as you can see from this article, it’s a pretty creative, complex, and therefore time-consuming process. There is a much simpler way of doing it (though with less freedom of customization) with iSpring Suite.
iSpring Suite is a complete eLearning content authoring toolkit that works as a PowerPoint add-in.

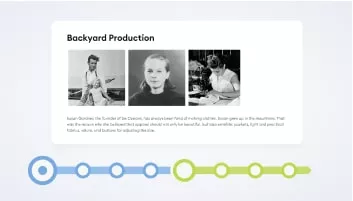
One of its tools lets you create various interactive interactions, including a timeline, quickly and effortlessly. Here’s what an interactive timeline created with iSpring Suite looks like:
To make a similar timeline, follow this brief guide:
- Download the iSpring Suite free trial and install it on your computer.
- Open iSpring Suite and select the Interaction tab on the toolbar.

- You’ll see the menu with 14 types of interactions. Choose Timeline.

- To add a new milestone, click on Add Period / Add Event on the toolbar.

- Add an introduction/summary to your timeline by selecting the relevant box.

- Choose a slide in your presentation and click Insert on the upper panel. Enter your event description and choose the type of multimedia you’d like to add.

- Click Format text to change fonts and text size.

- Customize the slide in Properties. Here you can adjust the color scheme.

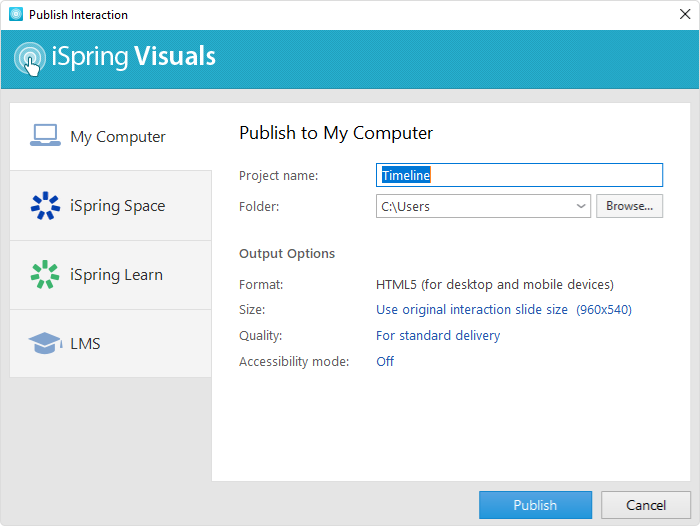
- Once your interaction is ready, click on Publish.

- Decide where you want to allocate your timeline. You can save it on your computer in HTML5 format and then send it online via email or upload it via FTP.
If you want to upload it to your LMS, choose LMS and select the format you need from the drop-down list – SCORM 2004, for example.


Congratulations! Your interactive timeline is ready to go.
How to Add a Timeline From Another Software Into Microsoft PowerPoint
Another way to complement your slide deck with a timeline is to create it in another software, copy it, and paste it on your slide. Simply export it from a tool like Microsoft Project or Excel as a JPG or PNG, and insert the timeline in your PowerPoint presentation as an ordinary image.
Check out a comprehensive list of the best timeline makers that you might want to use to build a timeline for presentations.
FAQ on Making Timelines
✓ What is the best way to display a timeline?
This totally depends on what you prefer. But if you want your viewers to perceive and retain the information displayed in the timeline better, it would be best to opt for an interactive timeline. Besides, with tools like iSpring Suite, creating timelines is a breeze.
✓ What is the best Microsoft program for creating a timeline?
If you need to create a timeline for your presentation, it would, of course, be better to do this right in PowerPoint – either manually with SmartArt, or with a specific add-in. But you can also build a timeline in Microsoft Word and Microsoft Excel. The principle is the same as with PowerPoint — you should use SmartArt graphics. The tools allow you to select from dozens of timeline layouts and change colors to fit your project.
✓ How do you create a timeline with dates in PowerPoint?
To make the timeline in PowerPoint with dates, you just need to name the periods with dates and add the sequence of years to your timeline.

✓ Are there timeline templates in PowerPoint?
There are no ready-made templates integrated right into PowerPoint. However, you can use the one we’ve made for you or go to the Microsoft library of templates and download one there. But keep in mind that you need to have a paid subscription to Microsoft 365 if you want to get access to premium templates.
Final Thoughts
Timelines are an easy and effective way to illustrate sequential events and explain how things changed over time. As you can see, you don’t need to have any specific tech knowledge to create them. However, if you’d like to save time and effort, and make an interactive timeline that looks really great, opt for iSpring Suite. Download its 14-day free trial!


