How to Create a SCORM Content Package – 3 Ways That Work


If you’re looking for information on how to create SCORM content packages for your learners, chances are you came across the term “SCORM.”
SCORM stands for Sharable Content Object Reference Model, an international eLearning course standard. By publishing your course in the SCORM format, you can guarantee it will display well on any learning management system (LMS).
And even if you decide to change your LMS someday, you can simply transfer all your existing SCORM file packages to the new platform. They’ll run perfectly without any tweaking.
To get a comprehensive picture of what a SCORM file is, how it works, why it’s important, and how to implement it in your training program, check out our complete guide to SCORM.
In this article, we’ll share three ways to create SCORM courses so you can pick the best fit for you. But first, let’s look at SCORM in greater detail.
What Is a SCORM File?
A SCORM file is a ZIP file that contains markup files. These files show how a course is built, and the required assets.
Here’s what the ZIP folder should contain:
- An XML manifest file (imsmanifest.xml). This contains all the information the SCORM-conformant LMS needs to deliver the content: the unique identifier, the metadata describing the SCORM course, resource definitions that list all files needed to launch and deliver each resource, and the organization of the learning activities.
- Resource files. These make up the course and its learning activities.
- Schema/definition (XSD and DTD) files. These refer to the manifest file.
File compatibility across SCORM versions
SCORM has three distinct versions: SCORM 1.1, 1.2, and 2004. Among these, versions 1.2 and 2004 stand out as the most popular because of their technical capabilities and benefits.
That said, there can be compatibility issues between SCORM 1.2 and SCORM 2004 due to their differences in data tracking, interactivity features, and reporting capabilities.
So, while both versions aim to enhance eLearning experiences, transitioning from SCORM 1.2 to SCORM 2004 may be challenging because different versions handle and display content differently.
To learn more about the differences between these SCORM versions, check out our SCORM 1.2 and SCORM 2004 comparison.
Now let’s go over the methods to create a SCORM content.
How to Create a SCORM Package Without Extra Tools
To create a SCORM package from scratch without any authoring tools, follow this process:
1. Collect all the information you want to include in the course
Whether text, images, audio, or video, place your source files into a specific folder and think about how you want all of them to come together.
To brainstorm how these ideas will fit together, you can make a storyboard to draw out a plan for the course or write a simple outline using your favorite text editor.

2. Create an HTML version of your course
To use an LMS effectively, the content you upload must be displayable in a web browser. So, before your course becomes a SCORM package, you need to break it down into a series of HTML pages, like you would for a website. You’ll also need to link every text and media file so they display on the platform.
If you’re not tech-oriented, don’t worry. We’ll show you how to develop eLearning content using an authoring tool later in the article.
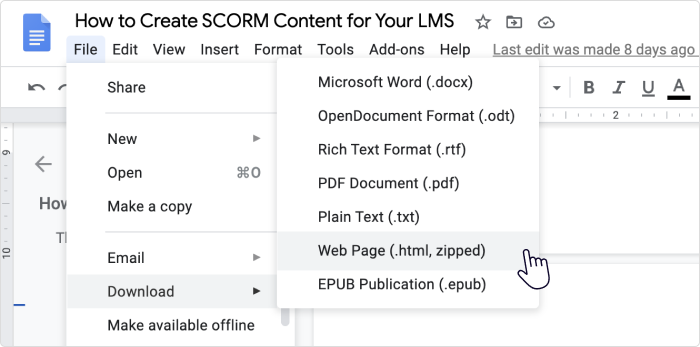
That said, the manual creation of an HTML version of your course is pretty straightforward. You can structure your course in Google Docs and use the File → Download → Web Page option to download the HTML version of the course.
Once you have an HTML version of your course that works in a web browser, you can tackle its SCORM compatibility.
3. Add the required SCORM files
Create a bunch of text files that describe your course using SCORM terms and put them in a ZIP package along with the HTML content you created in the previous step. This way, the second SCORM-compatible product in the equation (your LMS) can process your course and properly record learning stats once your course is made available to learners.
You can go about doing this in different ways, but here’s how we recommend approaching it:
1. Download and extract the SCORM 2004 Basic Run-time Package from the SCORM website.
2. Take a look at the file structure. See how the HTML content is stored as well as the SCORM files that “describe” it.

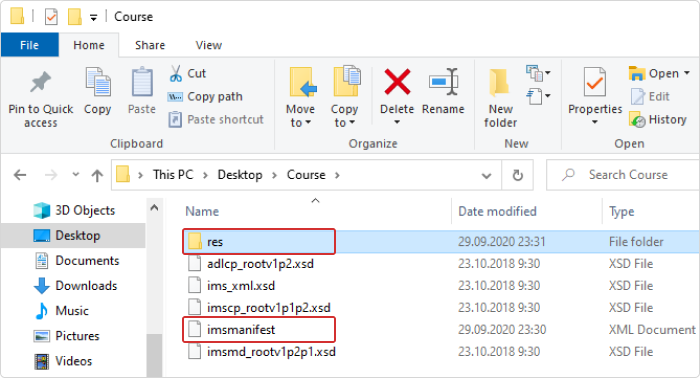
3. Copy and paste the following files into the folder with your HTML course:
- Adlcp_rootv1p2.xsd
- Ims_xml.xsd
- Imscp_rootv1p1p2.xsd
- imsmanifest.xml
- imsmd_rootv1p2p1.xsd

4. Open imsmanifest.xml with a text editor and take a look at it. This is the most important file for a SCORM course and the only one you’ll need to edit. It contains information like the course’s title, defines which version of SCORM specification it conforms to, and lists all resource files that come with the HTML portion of it.

5. Adapt the imsmanifest file to your content. Edit the text in <title> and change the links to the HTML resources of your course. The first resource in the list should be your main HTML file, which contains all the links to your course’s resources.

4. Pack the results into a ZIP folder
Once you finish customizing the imsmanifest.xml file, compress your HTML and SCORM files into a ZIP archive. Then, upload the resulting file to your platform and see if it processes it all successfully.
As you can see, packaging a SCORM course on your own can be a hassle, and it definitely requires some IT skills. We recommend going down this path only if your tech savviness and patience are rock solid.
Pros of the approach:
- You can have complete control over the result.
- You can save money on authoring tools.
Cons of the approach:
- Requires certain tech skills like knowledge of HTML and XML.
- Takes significantly more time than using an authoring tool.
- Is a manual error-prone process.
Useful resources for creating a SCORM package without tools
To create a SCORM package manually without an authoring tool, we recommend using the following resources and tools:
SCORM file templates
SCORM templates are pre-designed structures that facilitate the creation of SCORM-compliant eLearning content. These templates provide a framework for organizing learning content, interactions, and assessments within the SCORM format.
For instance, you can browse the list of XML schema definition files on the SCORM website to ensure your SCORM package is properly formatted, regardless of which version you choose. You can also check their list of SCORM content packaging samples to get a better idea of how to create an imsmanifest.xml file, add metadata, and package the course.
With these, you can streamline the development process and ensure that the content meets SCORM standards and will be compatible with a learning management system.
HTML and text editors
HTML editors are essential for creating the structure of your SCORM content before you can convert your HTML file to SCORM. You can use them to write the HTML code for your course content, including text, images, multimedia elements, and interactive features.
Moreover, you’ll need a text editor to write the textual content of your SCORM course. You can use a simple text editor like Notepad or a more advanced one like Sublime Text to compile and edit the textual content of your eLearning module.
How to Convert an Existing File into a SCORM Package with an Authoring Tool
Creating a single SCORM course manually can be justified by exploration-induced entertainment and the acquisition of new skills. But what if your task requires you to design multiple SCORM lessons, each with lots of audio and video? This task can require many months of tedious coding and editing of SCORM files.
Luckily, there are software tools that can shoulder the weight of coding and packaging, so you can devote your precious time to instructional design.
These programs are called SCORM authoring tools. They can transform your courses from visual content to HTML-compliant SCORM packages that can be uploaded directly to an LMS.
Logical questions here would be: “But what kind of content can these tools convert to SCORM? How do I use a computer to channel my vision of an eLearning module?”
The simplest and best answer to these questions is PowerPoint. Being installed on over 1 billion computers, it’s a piece of software we have all used at least once. Plus, it lets you compose text, images, audio, and video into a series of slides, which is a great opportunity for making a learning module on any topic.
Once your PowerPoint presentation is ready, follow these steps to convert it into a SCORM module.
1. Install the iSpring Suite authoring toolkit on a PC with MS PowerPoint.
2. Open your presentation in PowerPoint and go to the iSpring Suite tab. Click on Publish.
3. In the Publish Presentation window, select the LMS tab on the left.

4. Here, you can enter your project name and select a folder to save the SCORM package. You can use the default output options or customize them to your needs.
5. In the LMS Profile drop-down list, choose the format that your LMS supports: SCORM 1.2 or SCORM 2004.
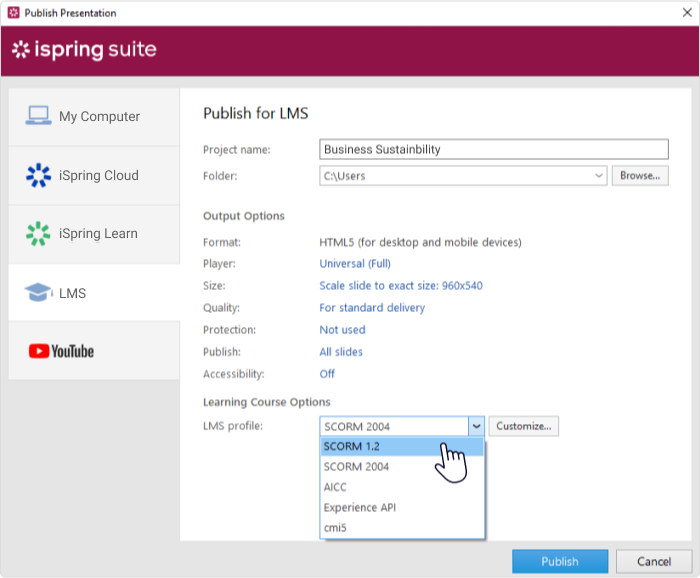
6. By clicking on the Customize button next to the drop-down list, you can set up different parameters to evaluate your learners’ progress and completion rate: lesson duration, passing score, the minimum number of slides a student must view to complete the course, and more.
7. When everything is set up, hit Publish to convert your course into a SCORM package. Wait for iSpring to finish the conversion, and voilà, your course is ready.
Pros of the approach:
- Saves a ton of time on operations like coding and packaging.
- Ensures that your course can be read by the majority of LMSs on the market.
- Built-in features allow your courses to be much more interactive than mere text with images.
Cons of the approach:
- Individual activities in a course can be rated in SCORM points so that your LMS can automatically grade learner performance.
- Not free.
How to Create a SCORM Course from Scratch with an Authoring Tool
Full-featured authoring tools like iSpring Suite can be so much more than simple converters. They allow instructional designers with any level of expertise to create interactive content. For example, with iSpring Suite, you can build the following types of eLearning content from scratch:
- Slide-based courses
- Quizzes
- Screen recordings
- Role-plays
- Interactive modules
Take a look at this demo course to see what you can make with iSpring:

As mentioned, iSpring Suite is an easy-to-use PowerPoint-based toolkit, so you can start creating SCORM courses immediately, even if you have no instructional design background. If you want to create professional-looking content even faster, you can try its premium version, iSpring Suite Max. It offers a vast Content Library that contains over 69,000 eLearning assets like characters, locations, and templates.
Check out this page for more details on iSpring Suite’s features.
Pros
- Most authoring tools work seamlessly with any LMS
- They allow you to create versatile SCORM content
- Courses built with modern authoring tools look glossy and professional
Cons
- Some tools require training
- Can be pricey
How to Play a SCORM Course
You can open a SCORM course in a browser right from your computer. Simply extract your ZIP package and click on the launch file, which is often called index.html.

If you have an LMS, upload your SCORM package to the platform and simply click on its icon to run a course.
How to Test a SCORM Package
Oftentimes, uploading a SCORM package straight to the production version of your LMS may not be the best approach. After all, uploading a large file like a SCORM course takes time, which may differ based on how fast your LMS is.
Also, if you find a mistake in your course during a test run (for example, you discover that the scores are not reported after you try taking the course as a learner), you’ll need to fix it and then replace the old version with a new file, doubling the upload time.
To avoid these obstacles, experienced instructional designers tend to test their SCORM package before uploading it to an LMS or sending it to a client.
The best and simplest way to test a SCORM package is a web-based service called SCORM Cloud by Rustici Software. This company currently oversees the SCORM standard, so it deserves your trust.
Here’s how you test a SCORM package using Cloud SCORM:
1. Register for a free trial here.
2. Upload your SCORM package via the Add Content button.

3. When the file is uploaded, click Launch to open your course.

4. Take the course as if you were a learner, then close the browser tab that you were using for this purpose.
5. Check if the status in Cloud SCORM changed to “complete” or “passed.” That will indicate whether your course will work properly on an actual LMS.

It’s very simple. After using Cloud SCORM, your life as an instructional designer will never be the same again.
How to Upload a SCORM Course to Your Learning Management System
Now that you have prepared your SCORM file, it’s time to get it into your LMS. Depending on the LMS platform you have chosen for hosting your SCORM packaging, you’ll receive detailed guidelines on the upload process. However, some common steps need to be followed:
- Log in to your LMS and navigate to the section where you can upload the course content.
- Look for an option to upload files. Select the SCORM zip file from your computer by clicking “Choose File” or a similar button.
- Once you’ve selected the file, upload it by clicking “Upload” or a similar command. The LMS will then process the file and prepare it for your learners to use.
By following these steps, you can successfully upload a SCORM package to your chosen LMS, making your eLearning content accessible to users.
Beyond that, make sure your SCORM content is compatible with your eLearning software products.
Best Practices in SCORM Content Creation
Here are some good practices to keep in mind when creating SCORM content:
- Choose an authoring tool wisely. Choose a SCORM-compliant authoring tool that fits your technical skills and design needs. Take advantage of templates and pre-built designs to save time and maintain consistency.
- Design for accessibility. Make your SCORM content accessible to all learners by adhering to web accessibility guidelines (WCAG). Include alternative text for images, captions for videos, and make sure that keyboard navigation is possible.
- Keep content modular. Break content into smaller, modular sections that can be reused or updated individually. This modularity will also allow learners to digest information in manageable segments.
- Keep navigation intuitive. Create intuitive navigation to prevent learners from getting lost. Provide clear instructions and feedback on learners’ progress.
- Engage your learners. Use a mix of multimedia, such as images, video, and interactive elements, to cater to different learning styles. Include quizzes and role-plays to engage learners and reinforce understanding.
- Test across platforms. Test your SCORM course in multiple browsers and devices to ensure compatibility. Preview the content in a SCORM-compliant LMS to check for any tracking or technical issues.
- Ensure proper tracking. Set up the LMS to track completion, time spent, and assessment scores to the degree that this is possible. Clearly define the criteria for a passing grade and completion within the SCORM package.
- Gather feedback and update. Collect feedback from learners and instructors to identify areas for improvement. Update your SCORM packages regularly to refine the content and address any technical issues.
Conclusion
The SCORM format is a real breakthrough in eLearning. It saves eLearning content developers plenty of money by making SCORM content easy to incorporate into all LMSs. Besides, it allows the tracking of learner progress and results, making online learning much more effective.
Fortunately, designing and publishing SCORM courses today is easier than ever before. But, there are still opportunities for “handicrafters” looking for a technical challenge. We hope this article satisfies both camps and makes SCORM less of a scary acronym and more of a powerful eLearning tool.
Have you tried to create a SCORM file from scratch using our article, and did you test it with SCORM Cloud? Please share your experience in dealing with SCORM packages in the comment section.
Useful Resources
- The Best SCORM-Compliant LMS
- SCORM on Mobile Devices
- How to Create a Moodle Quiz: A Step-by-Step Guide
- How to Add a SCORM Course to the Moodle LMS
- How to Convert PowerPoint to MP4 Video on Windows & macOS
- The 11 Best HR Tools for Streamlining Your Workflow in 2023
FAQ on SCORM Content Packaging
Exploring SCORM content packaging? Here are some common questions and answers to help demystify the process.
Why should we use SCORM?
The answer might seem absurd, but here it is: people use SCORM because it is widely used. Although some other eLearning standards, like xAPI or cmi5, have been introduced, most companies don’t really understand their use cases and stick to SCORM, which is comprehensive and reliable.
Is SCORM still relevant?
Yes, SCORM remains surprisingly relevant several decades after its first appearance. Most companies use this standard for their eLearning and don’t plan to change to another. Think of SCORM as a movie with Tom Cruise or Jackie Chan: It’s old-fashioned but still incredibly popular and beloved.


