How to Create an Interactive PowerPoint Presentation

PowerPoint presentations are one of the most popular educational resources nowadays. Having been so for quite some time, they might look a bit old-fashioned and not as engaging as we would like. However, there’s a surefire way to make them much more dynamic – create interactive slides.
In this article, you’ll learn what interactive elements you can add to your PPT presentation, how to do this in PowerPoint step by step, and how to keep the audience’s attention by making the learning experience even more exciting and interactive with iSpring Suite. Let’s get started.
Contents
What Makes a PowerPoint Presentation Interactive?
3 Ideas for Interactive PowerPoint Presentations
An Easier Way to Create Interactive Learning Materials
What Makes a PowerPoint Presentation Interactive?
There are many ways to make your presentation interactive. Some require only PowerPoint functionalities, while others require a different tool or a PPT add-in. Here are some of the most common ways to add interactivity to your PPT slides:
- PowerPoint triggers and animations
- Multimedia: visual content, audio files, web pages, and videos
- Interactive software simulations
- Mini games
- eLearning interactions
- Interactive quizzes
- Interactive role-play simulations
3 Ideas for Making Presentations Interactive with PowerPoint
PowerPoint lets you create lots of learning content that will keep your audience engaged, by using functionalities like on-click interactions, pop-up menus, and tests with branching scenarios. Here we’ll show you how to do that and ways to make this process even easier and more effective.
Check out a demo that includes some of these content types:
Follow our step-by-step guides to create one of these content types for your interactive presentation.
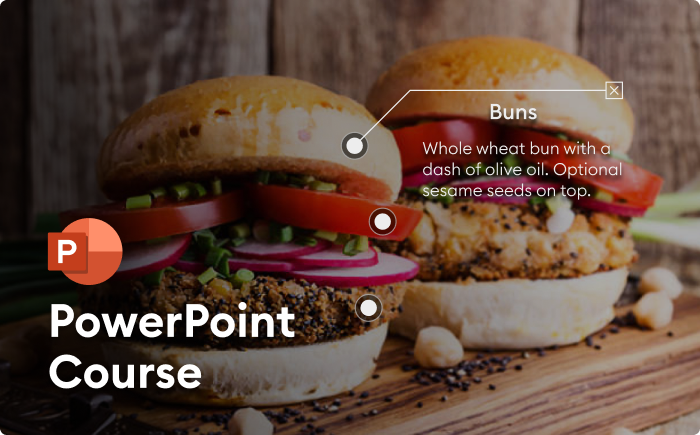
Idea #1: PowerPoint triggers for on-click interactions
One of the ways to make your slide interactive is to add a clickable button (trigger) that activates something. For example, it can launch one or more animations simultaneously. See how it works below:

To build such on-click interaction, you’ll need to add animations. Follow these steps:
1. Pick a background image, insert it into your PPT slide, and stretch it so that it fills the slide completely.
2. Add an object that will become the clickable button. This can be an image or a simple shape.
3. Select this object on the slide and click on Format → Selection Pane. Double-click the highlighted object and rename it to Open button.

4. Create two new slide objects (and rename them): a text box and another button. This button will close the pop-up.
5. Open the Selection Pane and select the Open and Close buttons, along with the textbox. Simply hold down the Left Ctrl key and click each of the needed items:

Now go to Animations → Add Animation → Entrance: Fade and then Add Animation → Exit: Fade.

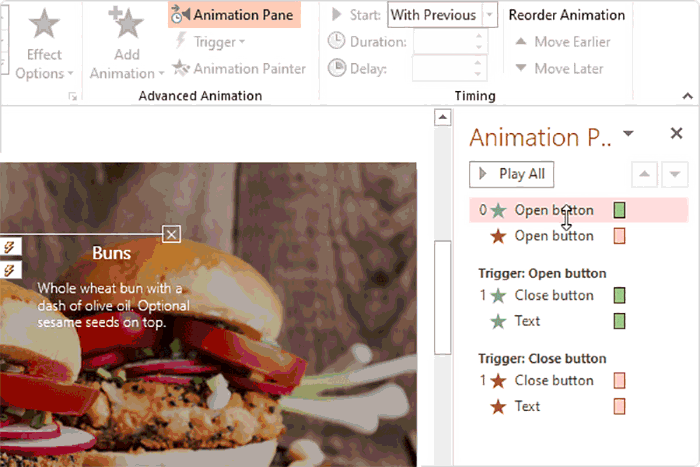
7. To see the entire list of animations on this slide, click on Animation Pane. Here’s how it should look:

8. Now it’s time to set up triggers. Select the Entrance animations for the Close button and the textbox, then click on Trigger → On Click of and select the Open button shape. What this will do: when the Open button is clicked, the textbox and the Close button will appear.

9. Now repeat the previous step but trigger the exit animations of the same objects by clicking on Close button. Once this has been done, you should see the following in the Animation Pane:

10. There’s one minor thing left to do: when you click the Open button, it should disappear, and when you hit the Close button, it should appear again. How do you make this happen? Simply move the Open button animations under corresponding triggers like this:
And that’s it, your interaction is ready. If you want to enhance the pop-up with visuals, like an image or another textbox, follow the same process and add their animations to the existing triggers.
Idea #2: Single-slide interaction with pop-ups
This second idea expands on the previous one: you can add several slide buttons that will activate pop-ups on the screen. Here’s what it looks like:

To design this type of interaction, you’ll need to create the interaction from the previous idea (or build a new one by following our guide) and then follow the steps below:
1. Create a set of objects for the second pop-up. If you need the same buttons, simply select an object you created earlier, then hold down Left Ctrl and drag it to a different position on the slide – and you’ll get an identical copy. You can also repeat this step with other objects.
2. Then, open Selection Pane and rename the new objects.
3. Now, animate the second pop-up. Press and hold Left Ctrl, then select objects in Selection Pane and add two sets of Fade animations:

4. Trigger the new animations using the same logic from the previous idea. Once finished, Animation Pane should look like this:

5. Your interaction is almost ready. All you still need to do is fix this issue:

As you can see, two pop-ups can now be opened at the same time and it doesn’t look good. To fix this, you need to set your animations so that when you click on “Open button 1,” the second pop-up button disappears, and vice versa. And make them appear again when either of the “Close buttons” is clicked. Here’s what your animation pane should look like:

Now, your interaction should work like this:

And that’s it, your interaction with several pop-up menus is ready!
Idea #3: A quiz with branching scenarios
Another way to make your slides interactive is to add a quiz with clickable answer options. You can also make the test progress differently for each student, depending on the option they select: if the answer is correct, they proceed to the next question; if not, they go to the info slide to dive deeper into the topic. Or you can make it so that a learner receives feedback after each answered question.
Below, you’ll learn the basics of building quizzes and branching scenarios in PowerPoint, which you can further use for creating all sorts of tests – the essentials are the same.
1. Create the title page of the quiz. Add a background image, then type the title of your quiz and its description.

2. Move on to the next slide to add a question and answer options. For the answer options, you can simply use text blocks (Insert → Text Box) or shapes (Insert → Shapes). You can also add an image if you wish.

Add other question and answer slides for your test in the same way.
3. Create the correct answer slide after your first question. Add a congratulatory message, such as: “Well done!” or “That’s correct!” or “Correct!” Below the message, add a button that will take the learner to the next question.

4. Create the incorrect answer slide. Repeat the same process as in the previous step but add a different text (and an image, if you use them).

If you want to make knowledge checks even more insightful for
learners, you can provide them with feedback on each incorrect answer.

Add correct and incorrect answer slides after each question slide.
5. Set navigation for your quiz. Link the correct and incorrect answer options to the relevant feedback slides. Click on the answer text box, then go to the Insert tab and select Hyperlink. In the opened window, select Place in This Document and select the necessary slide.

Then add a hyperlink to the button on the feedback slides. You’ll need to do the same for each slide because feedback slides should lead to a new question every time.

Once you’ve finished setting up navigation, your quiz is ready. If you want to learn more about this topic, read our article on how to make a quiz in PowerPoint.
An Easier Way to Create Interactive Learning Materials
PowerPoint isn’t designed for creating interactive slides. Yes, it’s possible to do this, but it requires a great deal of time and effort. So if you’re planning to develop such educational content regularly, consider using one of the 23 best PowerPoint add-ins. Some of them, like iSpring Suite, are built for this sort of task and empower you to create better content in less time.
iSpring Suite works as a PowerPoint add-in and provides you with templates and smart functions for designing advanced learning content quickly and easily. You can design interactions, quizzes, educational simulations, and many other content types. Then, you can upload them to your learning management system (LMS) or your online storage (iSpring Cloud) and share them with your learners.
Let’s see how to make your slides interactive using iSpring Suite. Download a 14-day free iSpring Suite trial and follow the steps below to put theory into practice.
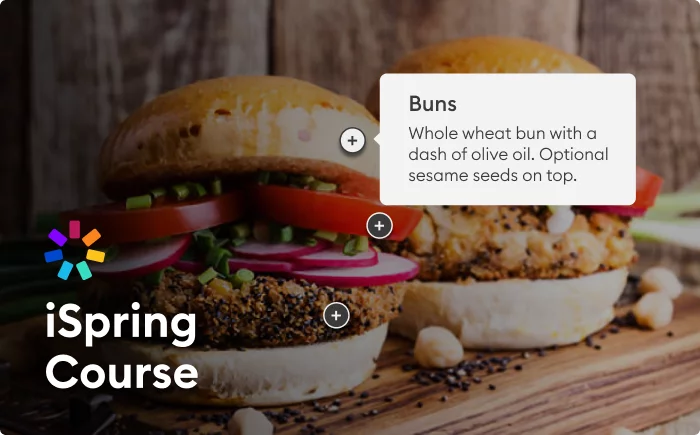
Interactions
Open the iSpring Suite tab and go to Interactions. There are 14 interaction templates, such as an FAQ, a timeline, and a diagram. Select one of them, fill it with texts and multimedia, and that’s it – your interaction is ready!

Watch this video to see the interaction development process from A-Z.

And here’s an example of an interaction created in iSpring Suite. It took us only 2 minutes to design it, while a similar interaction in PowerPoint took us at least an hour to create because we had to set up all of the triggers, animations, etc.
Quizzes
Just as with interactions, iSpring Suite has 14 ready-made question templates that you only need to fill with text and multimedia.

Here’s how. Open iSpring Suite, then go to Quizzes and click on Graded Quiz. Then, select a question type and fill it with information. If you wish, you can also add advanced settings, like time limits, the number of attempts allowed, and others.
See the entire routine in our tutorial video:

There’s no need to add separate feedback slides because feedback is already built into each question slide. You can customize it and add reinforcement information.
By the way, even if you don’t have an LMS, you can still share the test with your learners and track their progress – iSpring Suite has a special online storage space for that and the tool will email you the quiz results of your learners.
Here’s an example of a quiz created with iSpring Suite:

Role-play simulations
Role-plays scenarios or educational simulations are one of the most engaging educational activities in online learning. While most interactive tools require programming to create this content type, iSpring Suite enables you to create educational sims easily – even if you have no IT background.
Simply go to Role-Play and click on New Role-Play. Select New Scene. Pick a character and a background image from the library of ready-made content. Add texts. Then repeat the process with other scenes, connect them by dragging an arrow from one scene to another, and that’s it! Your sim is ready.

If you want to dive deeper into this topic, read our in-depth article on role-plays, their types with examples, and a guide and tips on creating them. It’s written by Clark Aldrich, the world’s most experienced designer of educational simulations.
And here’s an example of a role-play that Clark Aldrich created with iSpring Suite:

In Summary
Now, let’s recap some highlights from this article. Here are the key takeaways.
Can you make a PowerPoint presentation interactive?
Yes, you can add interactive elements to your PPT presentation either by using PowerPoint alone or with additional tools, like iSpring Suite.
What are the interactive features of PowerPoint?
PowerPoint lets you create triggers and animations that make your presentation more interactive.
How do I make my PowerPoint presentation more engaging?
Consider adding interactions, quizzes, triggers, and animations to your presentation to make it more dynamic, engaging, and participatory.
Endnote
So, these are several ways you can create engaging presentations with PowerPoint only and with other tools (check out this list of the 12 best interactive presentation software tools). If you want to save time and effort while creating much more engaging and interactive presentations, courses, and assessments, check out iSpring Suite.
Get started with iSpring Suite for free during a 14-day trial period.
Also read: How to Convert PowerPoint to MP4 Video on Windows & macOS