Steps to configure SAML 2.0 SSO with Microsoft Active Directory Federation Services
Note: ADFS 2.0 on Windows Server 2008 r2 or ADFS 3.0 on Windows Server 2012 / 2012 r2)
SAML 2.0 single sign-on (SSO) supports integration with Microsoft Active Directory Federation Services (ADFS) 3.0.
Requirements
-
A fully installed and configured ADFS service.
-
A server running Microsoft Server 2008r2 or 2012/2012r2
-
An SSL certificate to sign your ADFS login page and the thumbprint of that certificate
In this example we are using ADFS 2.0 on Windows Server 2008 R2. On Windows Server 2012 the steps will be the same except for the installation, because you install AD FS role via the server manager, not via the installation package as on Windows 2008 server r2.
Step 1. AD FS Management
Login in to your AD FS server and launch the ADFS Management Console via the shortcut in Control Panel\Administrative Tools.

Step 2. Check AD FS settings
Right-click on Service and sel ect Edit Federation Service Properties...

Confirm that the General settings match your DNS entries and certificate names. Make a note with the Federation Service Identifier, since that is used in the iSpring Learn SAML 2.0 configuration settings.

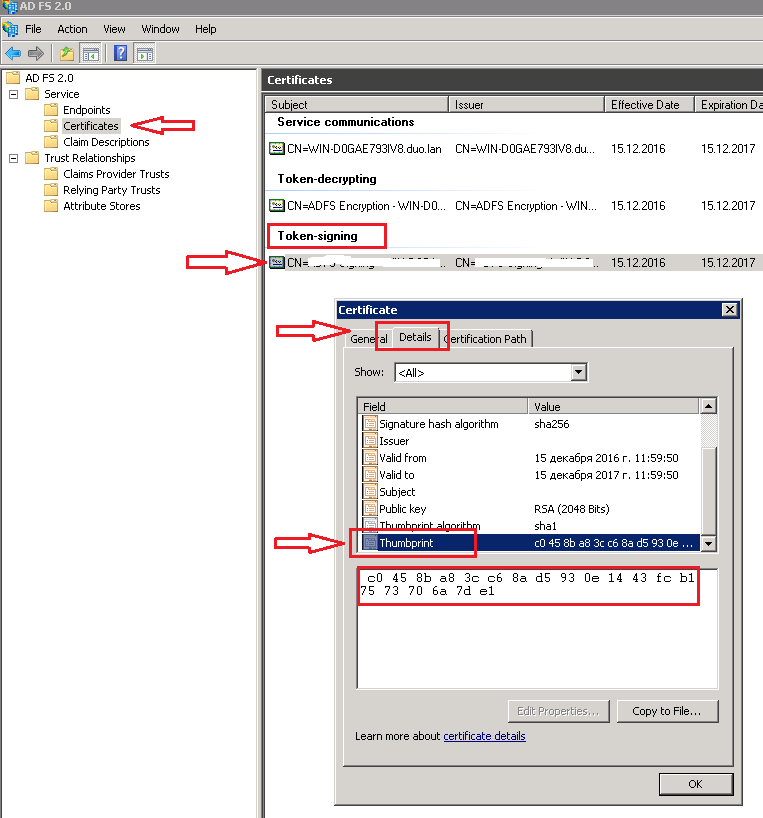
Step 3. Token-Signing certificate
-
Browse to the certificates.
-
Right-click on the certificate and sel ect View Certificate.
-
Go to the Details tab.
-
Find the Thumbprint field and copy the contents of this field to the Windows clipboard.
Step 4. Learn Settings
-
Log in into your iSpring Learn account and go to the SSO settings via this link: https://YourAccоuntURL.ispringlearn.com/settings/sso
-
Ins ert your Thumbprint into the Certificate Fingerprint field and remove all spaces between characters.
-
Enter your data to the Metadata URL, Sign ON URL and Logout URL fields.

Step 5. ADFS Relying Party Configuration
Go to the ADFS Management console and select Relying Party Trusts, right-click on it and select Add Relying Party Trust…

Select Next On the Welcome Screen of the wizard, and on the Select Data Source step, select the last option: Enter data about the relying party manually.

On the next screen, enter a Display name that you will recognize in the future.

Next, select AD FS profile:

Leave the default values:

On the next screen, check the box labeled: Enable support for the SAML 2.0 WebSSO protocol. The service URL will be: https://YourAccоuntURL.ispringlearn.com/module.php/saml/sp/saml2-acs.php/default-sp

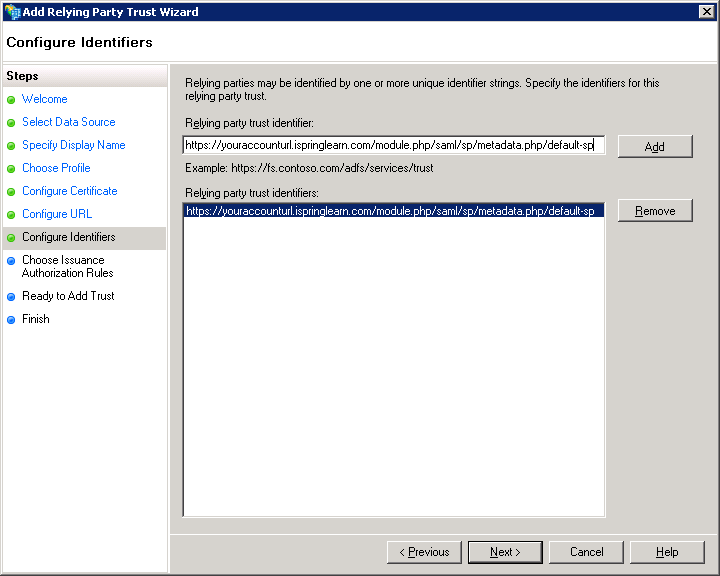
Click Next. Add Relying party trust identifier: https://YourAccоuntURL.ispringlearn.com/module.php/saml/sp/metadata.php/default-sp
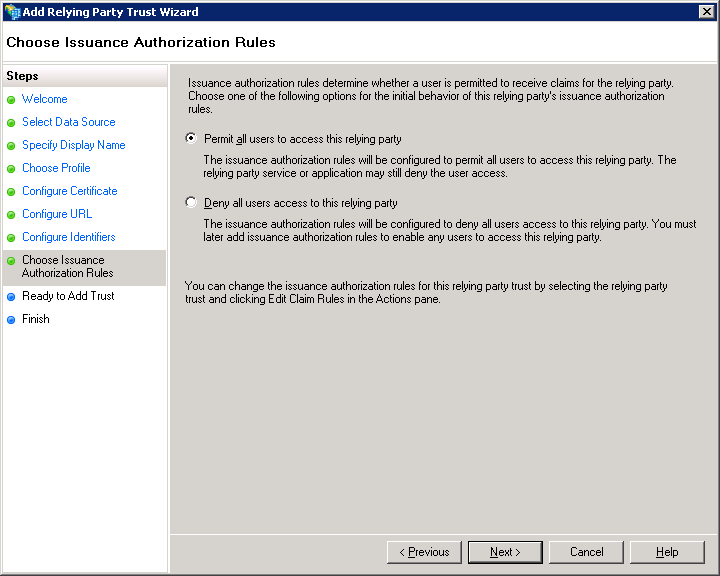
Choose Permit all users to access this relying party.
On the next step, just click Next.

On the final screen, check the box Open the Edit Claim Rules dialog and use the Close button to exit.

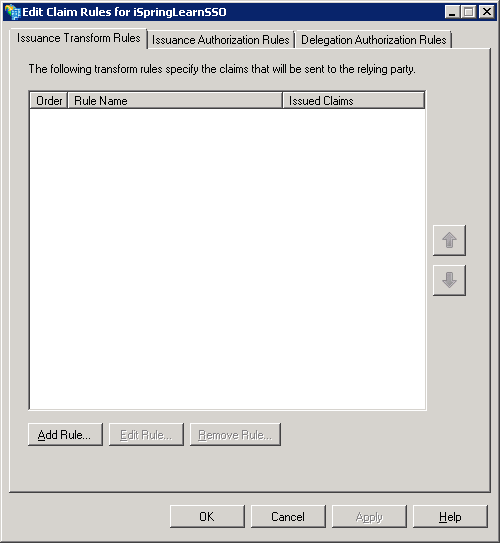
Step 6. Creating Claims Rules
-
Add the first rule
-
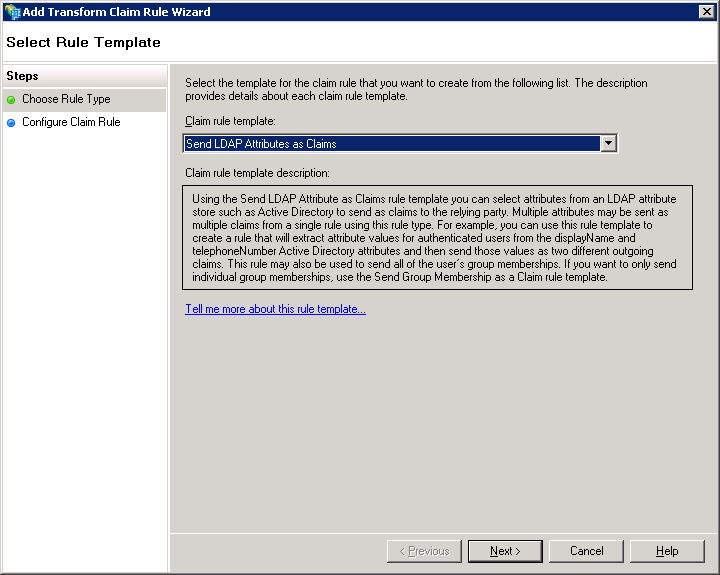
Select Send LDAP Attributes as Claims
-
On the next screen, specify your Claim Rule, for Example E-mail to Learn, using Active Directory as your attribute store, and do the following:
-
Fr om the LDAP Attribute column, select E-Mail Addresses
-
Fr om the Outgoing Claim Type, enter “email”
-
Click on Finish or OK to save the new rule
-
-
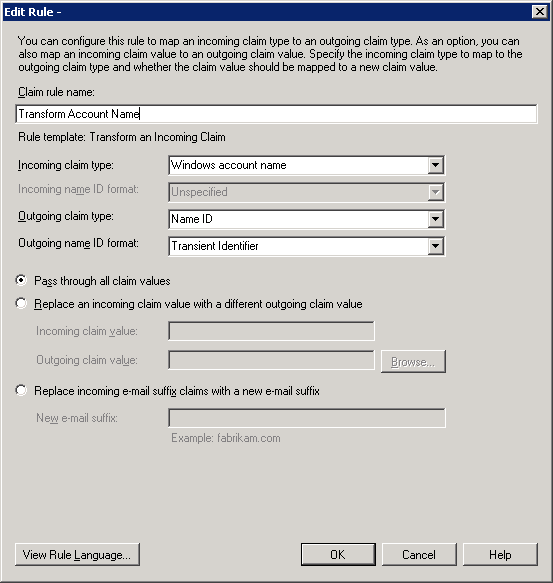
After that, add the second rule and select Transform an Incoming Claim as the template
-
Give your Claim Rule a title, for example, Transform Account Name
-
Select Windows account name as the Incoming Claim Type
-
Under Outgoing Claim Type, select Name ID
-
Under Outgoing Name ID Format, select Transient Identifier
-
Leave the default rule Pass through all claim values
-
-
Finally, click on OK to create the claim rule, and then OK again to finish creating rules.


Step 7. Adjusting the Trust Settings
Some settings on your Relying Party Trust will need to be adjusted. To access these settings, select Properties from the Actions sidebar on the right while you have the Relying Party Trust selected.
-
Under the Advanced tab, make sure that the selection is SHA-1
-
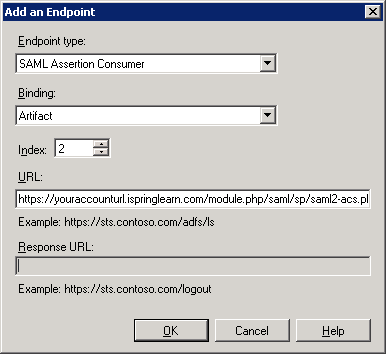
Under the Endpoints tab, click ADD to add a new endpoint
-
For the Endpoint type, select SAML Assertion Consumer
-
For the Binding, choose Artifact with Index 2
-
The URL field should look like this: https://YourAccоuntURL.ispringlearn.com/module.php/saml/sp/saml2-acs.php/default-sp
-
Leave the Response URL blank and click on OK
-
Click ADD one more time
-
For the Endpoint type, sele ct SAML Logout
-
For the Binding, choose POST
-
The URL field should look like this: https://YОUR_ADFS_SERVERNAME.domail.local/adfs/ls/?wa=wsignout1.0
-
Leave the Response URL blank and click on OK


Step 8. Logging
Go to your SSO login page: https://YourAccоuntURL.ispringlearn.com/sso/login and enter your credentials.
Related Articles