How to Make a Training Video Right in PowerPoint


The most natural way to learn is to imitate others. That’s why, if you want to teach others what you’re an expert at, it’s wise to demonstrate your skills in action.
Even a short video tutorial may be more effective than a big textbook. See how easy it is to make a training video in PowerPoint. In this article, we’ll walk you through the video creation process step by step. Just follow our instructions.
Before You Start
It may be tempting to skip the preparation part and move on to immediately working with the raw video files. However, adequate preparation is crucial for creating a professional video lecture. These essential steps will help you make a tutorial that viewers will love.
1. Define your audience
You may have already heard this before: no material should be created without understanding who it’s being created for. But how do you actually define your audience? Answering these simple questions may help you figure that out:
- How well informed are the viewers? While newbies require an additional introduction to the subject, veterans may find it boring or even insulting.
- How interested are the viewers?
- Will they search for the video themselves or will you share it with them?
- What are the age, gender, and education levels of the viewers? Define the demographics of your audience and choose the language of your video lecture accordingly.
You can learn more about defining a target audience and get other useful information on training video production
2. Prepare a narration script
When creating a training video, it’s crucial to prepare a narration script in advance. Having your speech written down will help you understand if any key points have been missed. It also allows you to avoid rambling and unnecessary pauses that would otherwise create a bad impression.

A sample script of an iSpring video tutorial
Note: If you’re planning to combine a training video with a PowerPoint presentation, divide your script into parts so that each of them corresponds to a certain slide. Here, it may be useful to create a presentation outline by opening the Outline View from the View tab on the PowerPoint ribbon. Alternatively, you can use the convenient narration editor that gives you the possibility to enter a script while seeing slide thumbnails and durations.
In addition, you may want to create a shot list for your training video. This is a document that maps out what will happen in every shot you need to capture to create the narrative of your story. This technique is usually applied when the presenters, background, or camera angle is changed from scene to scene.

A fragment of a shot list for a video about iSpring
3. Set up the scene
Now that the scenario is ready, it’s time to move on to the scene. To make the tutorial more effective, film in a real-life environment that directly relates to your training video. For example, if you’re teaching sales techniques, record your training video right at the sales desk. If you’re going to make a guitar lesson video, equip a place for a music studio, or, at the very least, choose a neutral background.

The right shooting location
Make sure nothing will distract viewers from the main action: keep the backdrop minimal and meaningful. If you’re demonstrating a product, take advantage of the power of contrast; for example, use lighter colors for dark items such as cameras.
You will also need to adjust the presenter’s appearance. When choosing clothing for the presenter, keep the target audience in mind, especially their demographics and preferences. While creative how-tos are more liberal in this matter, corporate training videos require a corresponding style.
4. Choose recording devices
Poor quality tools may throw quality content out the window. For instance, it’s recommended that you avoid using built-in microphones, as they may absorb too much background sound. Overall, there are two microphone types: condenser and dynamic. To find out which one to choose and why, read this guide to selecting the best microphone. It also contains instructions on setting the right recording level.
It’s no less important to use an appropriate camera, since it will affect the resolution of your training video. Other factors to consider when choosing a camera are its mobility, zooming, viewing options, and controls, such as focus. You can learn about the best cameras in this overview of the top 6 cameras for video lectures. However, if you’re going to make a training video in PowerPoint rather than record a video course in a professional video production studio, using a webcam can be quite sufficient.
If you’d like to capture your screen instead, check out these best 13 screen recorders on the market. This detailed comparison with the tools’ pros and cons will help you find the software that will suit your needs.
5. Practice
The final step before recording a video lecture is the rehearsal. Read your script out loud and try to find the right pace and volume. You will understand how the written words differ from the spoken ones and perhaps change some text so that it sounds better. Run a few tests with a microphone at different distances from the mouth to find the best solution.
Reading a script often makes the speech sound monotone and robotic. It’s always a good idea to have someone listen to you practicing before recording. Ask others for some advice on how to make the narration more natural and clear. Once there’s nothing more to improve, move on directly to creating a video lecture.
A Walkthrough for Making a Training Video in PowerPoint
PowerPoint itself doesn’t provide an option for video recording. However, you can do this with iSpring Suite, an authoring tool that works as a PPT add-in. It integrates with PowerPoint as a tab right in the software to help you make videos in a familiar interface.

Download an iSpring Suite free trial to get started with a video lecture right away. Created content will be available even after the trial runs out.
How to record a video
1. Open your PowerPoint presentation and switch to the iSpring Suite tab on the ribbon.
2. Click on the Manage Narration button on the iSpring Suite toolbar.

3. The Narration Editor allows you to view all slides at a glance. Choose the one you’d like to record a video for from the Slide Thumbnails on the left and it will be scaled up in the center.
The timeline below displays the duration of slides, audio, and video (once you’ve added it). You can easily adjust the duration of slides by dragging their borders to the left or right.
4. Use the Slide Notes on the right panel to insert your script. This way, the narration will coincide perfectly with the information on the slides.

5. Once you’ve inserted a script, hit the Record Video button on the editor’s toolbar.

6. In the open recording panel, mark Process current slide only to record video for the selected slide. The slide duration will automatically adjust to the video if the latter is longer.


Note: You don’t have to record a perfect narration at once, as you will be able to polish it with the built-in audio and video editor. For example, if you make a pronunciation mistake, simply repeat the phrase and then delete the unnecessary fragment of the video.
How to import a video
If you already have a training video that you want to combine with your slides, you can import it by clicking on the Video button.

In the Import Video window, you can choose where to insert the video and adjust the slide duration.

How to edit a video
Now that you’ve added a training video, you can fine-tune it right in iSpring Suite using the integrated editor. Choose the video on the timeline and click on the Edit Clip button.

The tool provides you with a lot of options that will help you make a professional-looking video.

- If you want to remove a video fragment from your video, click and drag the unnecessary part on the timeline, and press Delete on the toolbar.
- To make the speech cleaner, for example, to avoid false starts, you can silence any part of the narration. To do that, select the desired segment and click on the Silence button.
- The trimming option helps you get rid of long silent parts at the beginning and end of the narration. Select the part you wish to leave, and click on Trim.
- The Remove Noise and Adjust Volume options are designed to perfect the audio quality.
- Finally, the Fade In and Fade Out effects enable the smooth transition of the audio from one part to another. They are often used with music at the beginning and end of the video.
To preserve the applied changes, click on Save and Close in the upper left corner.
If your PowerPoint presentation contains animation and transition effects, you can easily synchronize them with your training video. To do this, select a slide on the timeline and click the Sync button.

A Sync panel will appear above the timeline. To start the process, click on Start Sync.

The Start Sync button will be replaced with the Next Slide/Next Animation/Skip Transition buttons, depending on the upcoming element in your presentation. Click on them at the appropriate moments, such as when you want the next animation to be inserted.
When you’re finished, click on Done and then Save & Close in the upper-left corner to close the narration editor.
How to publish your video
The last step is to publish the resulting presentation to share it with your audience. On the iSpring Suite ribbon, click on the Publish button.
You can publish your presentation in several ways: to My Computer, to iSpring Learn LMS, to other LMSs, to iSpring Cloud, and to YouTube.
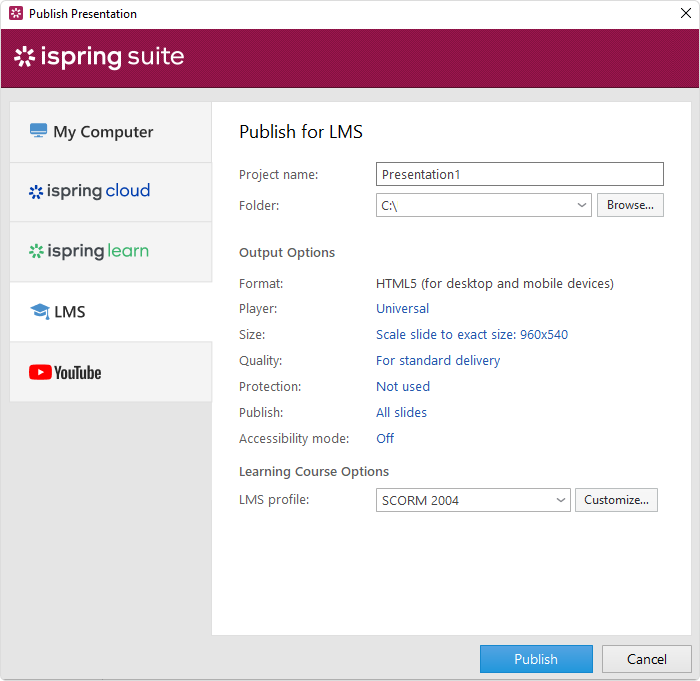
If you want to turn your presentation into a training video, save it as video.
You can also publish your slides to HTML5 if you need to make them accessible online on any device or, if you have an LMS, convert your presentation to SCORM or another eLearning format that your LMS supports.
Conclusion
That concludes our guide on how to make a training video in PowerPoint. We hope it will help you create a professional-looking tutorial that your viewers will love. If you still haven’t downloaded iSpring Suite, try it for free right now.


