How to Create Conversation Simulations with iSpring
Conversation or dialogue simulations created in iSpring TalkMaster are extremely helpful for training communication skills. To help you master this authoring tool, we’ve given a special webinar where iSpring experts shared their knowledge and experience. If you didn’t make it to the live webinar, feel free to explore its recording and transcript.
The webinar recording
The transcript
Hi, everybody, it’s Brian, and I’m really super excited to show you the capabilities of iSpring TalkMaster here.
iSpring TalkMaster is a great tool for creating dialogue simulations that help your employees get used to communicating with clients. This can be useful in many spheres, like sales, customer service, and any job that involves communicating. iSpring TalkMaster has a lot of cool features to make your simulations more realistic, such as a character and background library, and even voiceovers in version 8.3. The best way to show you is to dive in, so let’s get started.
To begin with, I’m going to show you how a finished dialogue looks, and then we’ll get into how it works. You can preview a dialogue at any time by clicking the Preview button, and this is how it will appear to a learner.

This dialogue has been created to train salespeople in the automotive industry. Obviously, it’s a job that requires a lot of tact and timing, so a simulation like this can really help a new salesperson get more comfortable with the process. Now here, we’re provided with some choices, and in fact, the timing element comes into play right away.

You don’t want to be too aggressive, but you also don’t want to be too shy. Let’s see what happens if we’re a little too aggressive. The character’s emotion changes, and we get an instant feedback message explaining our mistake.

But, we still have a chance to get back on track, and here the dialogue itself begins.

So that’s how the dialogue looks for the user. Let’s see how to make it. When you start a new dialogue, you’ll see a blank background where you can add scenes. Let’s click New Scene.

Over here, you can choose your character.

There’s a built-in library with several to choose from. And here’s our lady. There’s a set of emotions to choose from, but we can just keep it normal for now. Let’s go to the background tab to set a location.

And here also, there’s a very nice selection of backgrounds…and you can add your own with this button.

Let’s choose the automotive showroom. Now we can close this to return to the scene. Here, you can enter the character’s dialogue, and add replies with this button.

Now, we can link these dialogue choices to new scenes by dragging these icons away.

Let’s say at this point in the dialogue, she’s already given you a firm budget for a car. If you offer her an expensive one, she decides to go. And we can change her emotion to angry. And let’s also give the user a constructive feedback message.

If we were continuing the dialogue, we could drag out another scene here, but this was a fatal faux pas. To make it easier to identify these end points, go to the properties tab and change the color.

Now, I’ll show you how scoring works. Go to Properties, and check this box to enable scoring. You can also set a passing score here, and choose whether to show it to the user at the end. And, click OK when you’re done.

Now let’s say this was really the perfect choice to make. Go to Properties, and award some points. That’ll show up in the right-hand corner. You’ll also see notifications if your scenes don’t have any incoming links. You can set any scene as the starting scene by clicking the flag, or delete it, or preview it by clicking the Play button.

Now, let’s just scroll down and take a look at this completed dialogue. The flag shows the starting scene, and you can easily identify the end points, and color code different dialogue paths.

Zoom in to get a better look at the scene numbers and dialogue text, and if you want, sprinkle in some bonus points for tactfulness and listening skills.
Finally, when you’re ready to publish, just click Publish on the toolbar. If you’re using this as part of iSpring Suite, you can publish this as part of a PowerPoint-based course. You can publish for the Web, or iSpring Cloud sharing service, iSpring Learn LMS, or an LMS of your choice. There are a few different formats to choose from. Combined is the safest choice for widest compatibility, but you’re pretty safe with HTML5 for most devices. You can also offer this course on iSpring Play free mobile app for your users to take it offline. Here, there are some extra tabs for compression options, advanced options, and LMS formats. I’d be happy to go into these a little more in the Q&A, if you like.
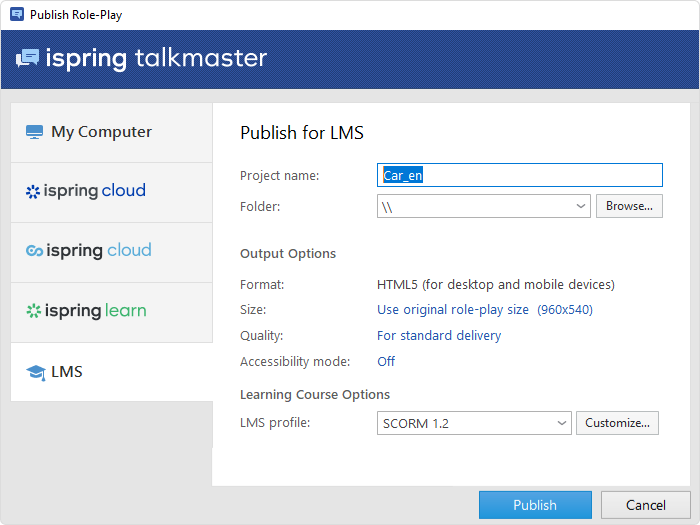
When you’re ready, click Publish. And even with big dialogues like this, it only takes a few seconds to publish. Here in the preview window, you can see how it looks on different devices like tablets and smartphones. You can open it in different browsers, plus send it by email, or put it on your website.

Voice Overs in iSpring TalkMaster 8.3
Now, let’s talk about a new feature added in version 8.3, and that’s adding voice overs to dialogue simulations. To make your dialogue simulation more realistic and engaging, you can now add recordings to match the user, the character, and the narrator. Once you’ve created a dialogue, click Voice Over on the TalkMaster toolbar to see a list of your scenes and the dialogue text.

The icons on the left-hand side indicate whether it’s the narrator, the character, or user reply choices. Before we start recording, let’s check out the Microphone Setup Wizard. This will open automatically when you record for the first time, but you can also access it via the file menu, and Settings. We’ll click set up microphone and click through to select a device, and a device type. Now you’re given some recommendations, and you can click through to set up your mic. There’s some text to read, and as soon as the wizard gets a good signal from your mic, you can click next. Now your mic is set up! And click OK to get out of this. Now click the Record button to record audio. If you like, you can show the narration script.
Now click Record, and when you’re done, click OK. If you already have prerecorded audio, it’s super easy to import. You can do it one at a time by clicking this button, and finding the file.

Or, to import several audio files in bulk, just name each file according to the labels in this column. Then go to the Import dropdown menu and select Bulk Import.

A notification will pop up with instructions on naming your files. Click OK to continue, select all your files, and click open…after the process is complete, you’ll see an import results window. and now you’ll see your dialogue populated with audio. To preview any of this audio, just click the Play button next to it. From the toolbar, you can also Edit and Delete audio, and Export Script to a text document to share with voice talent for recording. When you’re done adding audio, just click close voice over mode.
Summary
iSpring TalkMaster is made to imitate real life conversations, and thus practice communication skills in a safe environment. The tool allows users to implement any kind of case scenario, enhance dialogues with voice overs, convert them to online formats, and much more. We hope this article has helped you discover and put into practice the various capabilities of iSpring TalkMaster.
If you have any questions on iSpring TalkMaster or iSpring webinars, feel free to contact us at any time.