How to Convert a PowerPoint Presentation (PPT) to a PDF File
If you want to make your PowerPoint presentation universal, printer-friendly and compact, then converting it to PDF may be a good idea. High-resolution PDFs are ideal for sharing and printing static slides that have no multimedia or animation effects. This article explains how to convert a PowerPoint presentation to a PDF file and also how to share a presentation without sacrificing interactivity.
How to convert PPT to PDF using PowerPoint
Before converting a presentation to a PDF file, we recommend saving it as a PPT or PPTX file. This way you will have an opportunity to edit the original material later.
The fastest way to convert your presentation to PDF is to use the “Save As” option:
- In the File tab, click on Save As.
- Choose PDF (*.pdf) from the Save as type drop-down menu.
- Click on Save.
PowerPoint 2013, PowerPoint 2016 and PowerPoint Online give users more control over the conversion process. If you have earlier versions, you can achieve the same by trying online or desktop PPT to PDF converters.
To convert a presentation in PowerPoint 2013, 2016 or Online, follow these steps:
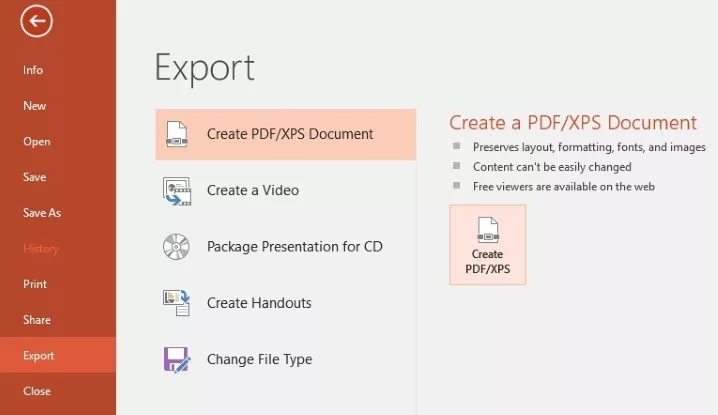
- Go to the File tab, and select Export.
- Click on Create PDF/XPS Document, and then – Create PDF/XPS.

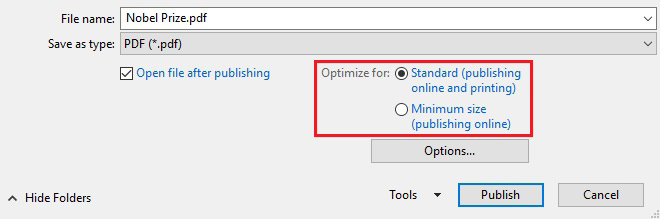
- In the open window, choose a location where to save the file. To modify the name, type it in the File Name box.
- By default, the Standard size is chosen, which makes the file quality suitable for printing. To make the output file smaller, select Minimum size instead.

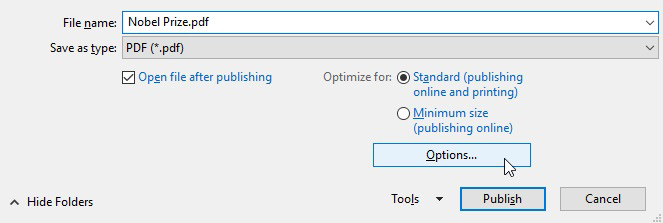
- Now click on the Options button.

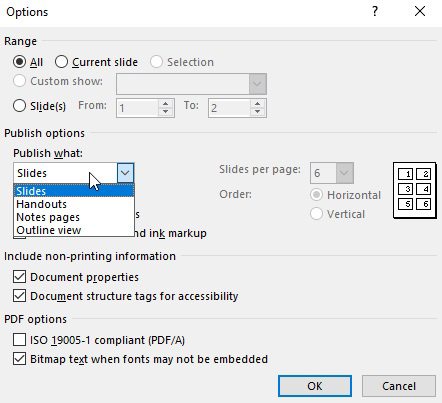
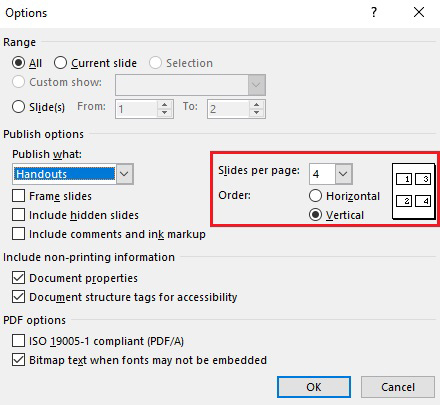
Here you can configure the presentation’s appearance with a few flexible settings:
- In the Range section, you can choose what slides to convert: all slides, the current slide, or any range of them.

- In the Publish options section, you can decide on the presentation’s form. Open the drop-down menu under Publish what: and choose whether to publish Slides, Handouts, Notes pages, or Outline view. If you choose the latter, PDF will only contain the outline of the presentation with the title and bullet points of each slide.

- If you’re publishing handouts, you can choose to display more than one slide on a page, and select the order in which slides will appear on a page.

- Select Frame slides if you want each slide to be surrounded by a frame.
- Select Include hidden slides if your presentation contains hidden slides and you want them to be displayed.
- Select Include comments and ink markup if you want to make comments and ink markups visible in the published document.
- In the Include non-printing information section, leave the Document properties checkbox selected if you want the PDF file to contain title, subject, author, and other information.
- By default, a PDF file is created with special tags that make it accessible to disabled users. Unmark Document structure tags for accessibility if you want the file to be smaller and exclude the data that improves accessibility.
- In the PDF options section, select the ISO 19005-1 compliant (PDF/A) checkbox if you want the PDF file to be in this format, which can be required by government agencies.
- When fonts cannot be embedded, PowerPoint automatically replaces them with bitmap representations. Unmark Bitmap text when fonts may not be embedded if you want the missing font to be substituted with another font instead.
- In the Range section, you can choose what slides to convert: all slides, the current slide, or any range of them.

How to convert PPT to PDF using PDF converters
There are many free and paid PPT to PDF converters that provide users with additional features, such as customizing PDF appearance, editing and protecting a document, converting files in bulk, and many others. This is especially convenient for those using PowerPoint 2010 and earlier, as these versions lack any additional options such as those shown above. All the converters can be divided into three groups: PDF printers, online converters, and desktop software.
PDF printers
Many converters work as virtual printers, which means that you can access them simply by selecting the print command in PowerPoint or other applications. These tools generally allow you to modify the page size and orientation, change the quality, and play with other settings before converting a presentation. Some representatives of this category are doPDF, bullzip, and CutePDF.
Online converters
Online services are platform-independent, which makes them a perfect solution for Mac and Linux users. At the same time, these tools usually have fewer options than their desktop analogs and place limitations on the file size. Also, when you’ve uploaded and converted a file, make sure to remove it from the website, as not all of them do it automatically. Some of the popular and free online converters are Smallpdf and IlovePDF.
Desktop converters
Desktop converters are mostly paid products, but you can try them for free for a certain period of time or limited number of conversions. These tools work either as PowerPoint add-ins or independently, providing users with more features and flexible settings, but consequently requiring more time to master the software and get started. You can download and install one of these programs: DOC2PDF, PrimoPDF, or Adobe Acrobat DC, which has the most powerful set of options.
When PDF isn’t the best idea
While the PDF format makes presentations ready for printing and distribution, there are certain limitations to consider. First of all, if you’ve added animations or multimedia (audio, video, Flash movies, etc.), they won’t be displayed after the conversion. As an alternative to audio and video narrations, you could include their script(s) (see how to convert PowerPoint notes to PDF in the guide above).
The PDF format takes away the editing power, which means that people can view slides, but can’t make any changes to them. Depending on your purposes, this can be both an advantage and a disadvantage. For example, if you’d like to prohibit recipients from making modifications, PDFs can be a good choice. Still, this is not a reason for sacrificing animations and multimedia, as there is an alternative way to share and protect a presentation, about which you can read below.
How to share a presentation and keep it interactive
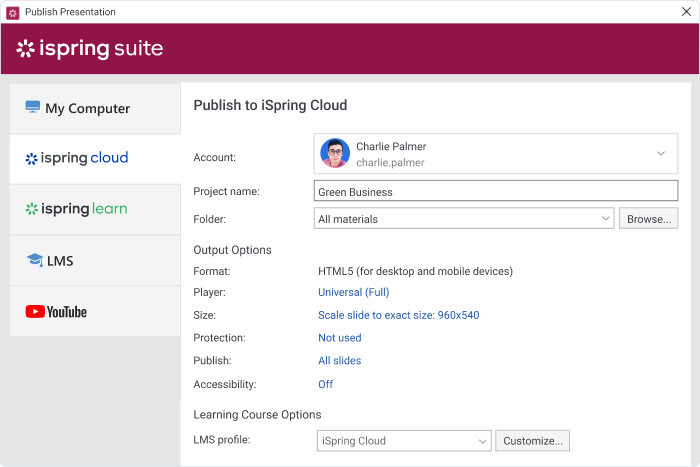
To share your PowerPoint presentations without giving up the interactivity, try uploading them to iSpring Cloud. As a part of iSpring Suite Max, it’s the only platform that allows users to share perfectly preserved PowerPoint presentations online.
To upload your presentation to iSpring Cloud and share it, follow these simple steps:
- Create a free trial account and sign in.
- Click on the Upload button and select a file on your computer.
- Mouse over the uploaded file and click on Share.
- Choose from the available sharing options:
- Copy a direct link and send it via email;
- Copy the embed code and paste it into the HTML code of your website or blog.
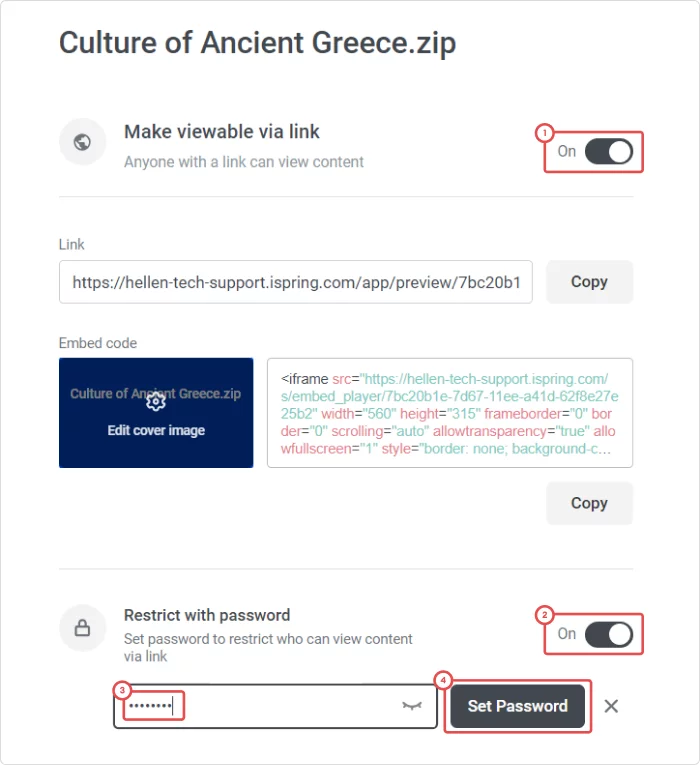
5. iSpring Cloud makes sharing secure. You can configure various protection options under the Content Protection tab:
- To grant access to trusted viewers only, set up a password.
- To prohibit viewers from sharing and downloading your files, keep the corresponding options turned off.
The recipients of your presentation will be able to view it in any browser and on any device, and they don’t need an iSpring Cloud account.
Fully-stocked eLearning authoring tool for PowerPoint. No training required to start!

Additionally, you can try iSpring authoring tools for free. Most of them work as PowerPoint add-ins, and give you a number of enhanced capabilities, such as creating interactive tests, surveys, video lectures, publishing presentations for the Web or LMSs, and more. Plus, iSpring content can be uploaded to iSpring Cloud directly and can be watched even on mobile devices.
Conclusion
PDF may be the king of printing formats, but it’s only a good choice if your presentation is static. If instead it contains audio, video and animation effects, they all will be lost after the conversion. To make your presentation accessible on any kind of device and save its original interactive look and feel, upload your presentation to iSpring Cloud. This hosting platform has already helped thousands of users to keep and share their PowerPoint presentations, as well as other documents.
