iSpring Learn SSO with Azure AD + SAML
Azure Active Directory (Azure AD) is a part of the Microsoft Azure cloud service that makes it possible to enjoy SSO (Single sign-on) without employing on-prem AD FS (Active Directory Federated Services). It is basically a cloud alternative to Microsoft Active Directory. In this scenario, there is no need to maintain an on-premise infrastructure, the process of setting it up is rather easy, and it works with most cloud-based services.
Requirements
A Microsoft Azure account with Azure AD Premium activated.
How to set up Azure AD
-
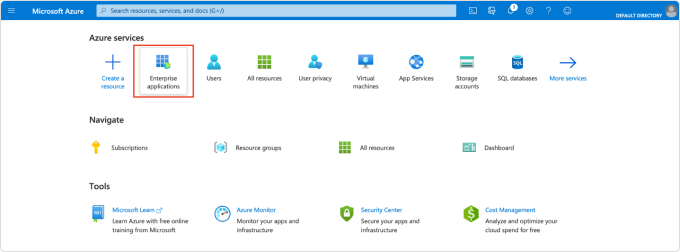
Go to the Microsoft Azure Home Page. From the Azure services menu, select Enterprise applications.
-
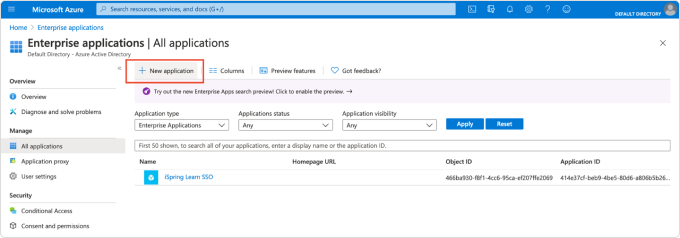
Select New application.
-
Select Create your own application.

In the right-side menu that appears, enter the name for the application, such as iSpring Learn SSO.

-
Click Create and wait until the application is added to your library. You will then be redirected to the Overview page.
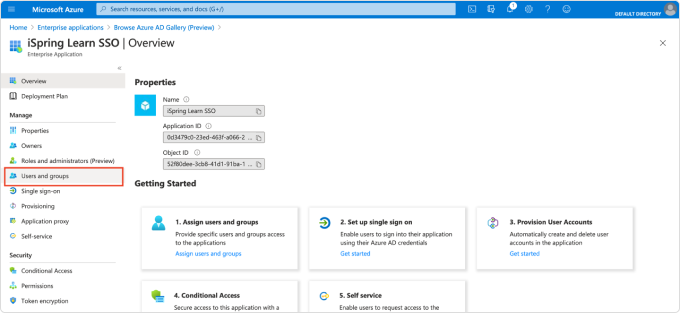
In the sidebar menu, select Users and groups. There, you can add all the users who should be able to log into their iSpring Learn account using SSO.
-
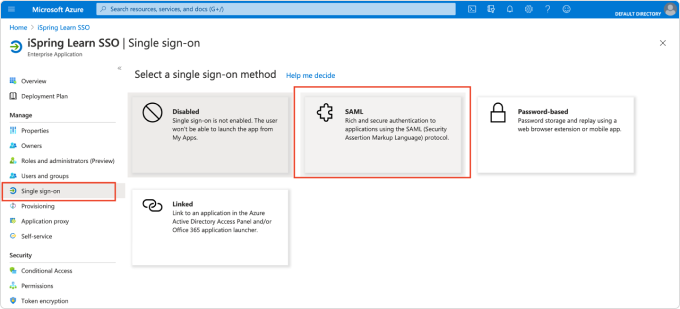
In the sidebar menu, select Single sign-on. Then, select SAML for SAML-based SSO.
Set up Single Sign-On with SAML. Here’s how:
First, select Edit, to open the right-side menu.

-
Return to the previous page to configure the third step: the certificate. Select Add a certificate to open the menu on the right side of the screen and select New Certificate.
 For Signing Option, select Sign SAML assertion. For Signing Algorithm, select SHA-1. Select Save for the certificate to be generated and the thumbprint to be displayed. You will need the thumbprint when you configure the connection settings in iSpring Learn.
Close the menu on the right side of the screen to return to configuring the fourth step: iSpring Learn SSO.
The data from this step should be used in the Connection Settings of your iSpring Learn account.How to set up iSpring Learn
-
Log into your iSpring Learn account and go to https://_____.ispringlearn.com/settings/sso
-
In Connection Settings, fill in the fields with the information from Azure.
iSpring Learn name
Azure name
Issue URL (IdP Entity ID)
Azure AD Identifier
Sign-on URL
Login URL
Logout URL
Logout URL
Certificate Fingerprint
Thumbprint
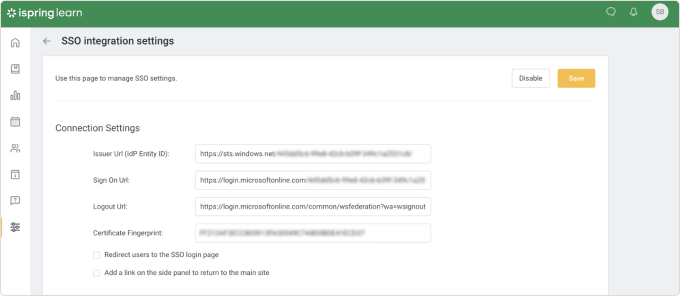
If you have selected the Redirect users to the SSO login page, the user will be automatically redirected to the Azure login page when they open iSpring Learn. If they are already logged in there, they will see their main page with the courses that have been assigned.
If this option is not selected, upon opening iSpring Learn, the user will see the default login screen with an additional option to use a corporate account to log into the account.
We recommend keeping this option deselected initially for the sake of testing the connection and to avoid being locked out of your iSpring Learn account. If this happens for some reason, you can use https://____.ispringlearn.com/login?no_sso to bypass SSO.
Proceed to Matching fields of iSpring Learn with the external SSO attributes and use the claims you created in the second step of the Azure Set up Single Sign-On with SAML page.
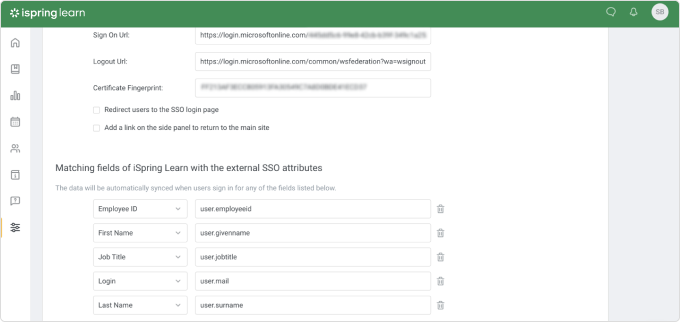
When done, scroll up and click Save.
You can now test the connection.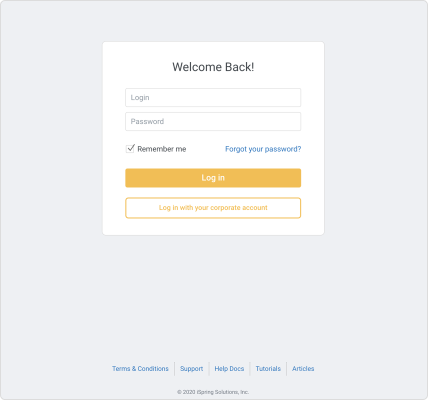
If something is not clear or additional questions arise, don’t hesitate to contact us at support@ispring.com and we’ll do our best to assist you.
-
In the right-side menu, fill out Identifier (Entity ID), Reply URL, and Relay state as shown in the table below, where ‘_____’ is the first part of the URL of your iSpring Learn account. Pay attention to the domain for your iSpring Learn account: it is either .com or .eu.
|
Identifier |
https://_____.ispringlearn.com/module.php/saml/sp/metadata.php/default-sp |
|
Reply URL |
https://_____.ispringlearn.com/module.php/saml/sp/saml2-acs.php/default-sp |
|
Relay state |
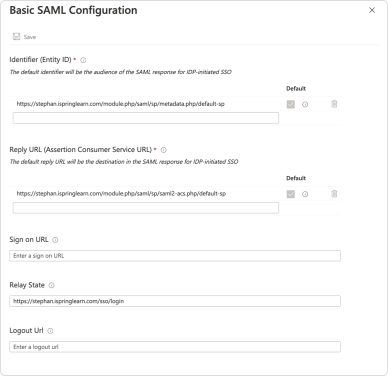
Save the changes.
Second, select Edit to edit User Attributes and Claims.
The first claim in the list is the Required claim. Its claim name is Unique User Identifier (Name ID) and its Value is user.mail. It is there by default. Leave it as it is.
The additional claims are those used by iSpring Learn to sync the data about your users and fill out their user profiles in iSpring Learn. The information will be updated in iSpring Learn each time you log in.
Since iSpring Learn requires each user to have a login, this is the required claim. We also strongly recommend using email so your users get notifications from the system about new courses assigned, coming deadlines, and scheduled meetings and webinars. The rest of the claims are optional.
Delete the preset claim names and values and add your own. You can use your own names for the claims while you select values from the available list. To simplify the process, we recommend using the same claim name as the value. The only exception is user.login, where we use user.mail, thus making the login correspond with the email. Use the table below for the correct claim names and their values.
|
Claim Name |
Value |
|
user.login |
user.mail |
|
user.mail |
user.mail |
|
user.surname
|
user.surname |
|
user.givenname |
user.givenname |
|
user.jobtitle |
user.jobtitle |
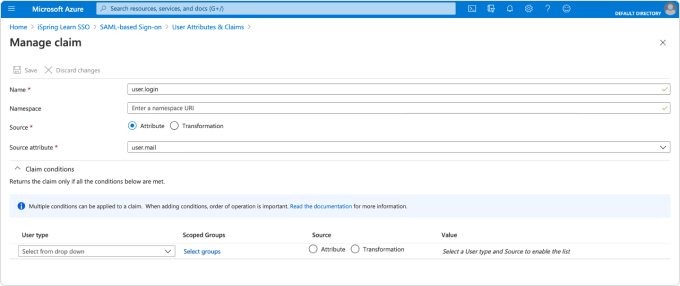 When you are done, you should see the list of all the claims you want your iSpring Learn account to be in sync with.
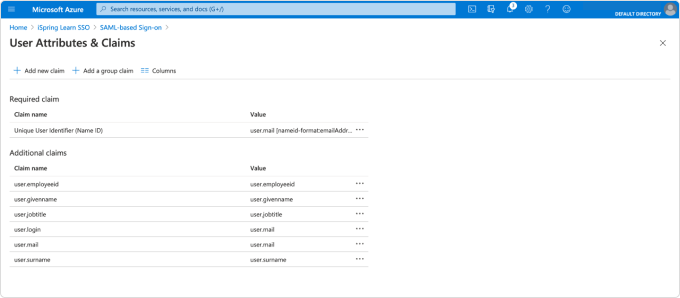
Note that you won’t be able to sync the user’s country and department.
Related Articles
